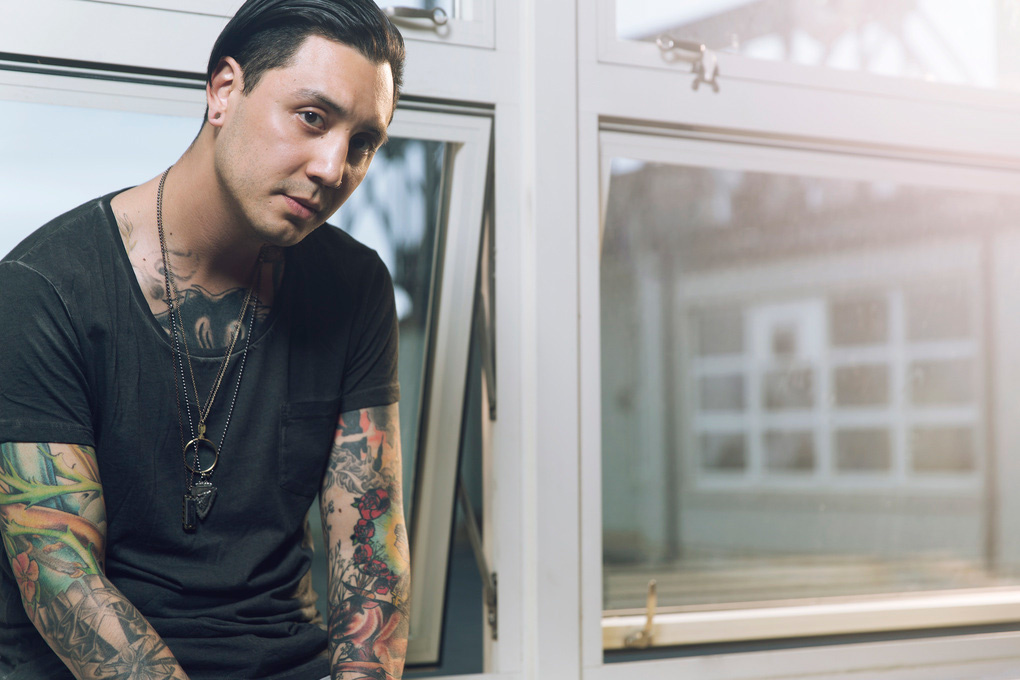
It has happened to all of us. We spend countless hours planning, scheduling, and coordinating for a beautiful golden hour photo shoot only to have our parade rained on by weather or other mishaps out of our control. Perhaps you didn't plan for those mountains in the background that's cutting your shoot 30 minutes shorter than anticipated. Maybe the conditions are perfect when you leave for the shoot, but by the time you get there, clouds are hovering above. Or it could be that your client just can't shoot at the ideal time. No matter what the obstacle, this article is going to show you a super simple trick that will allow you to get that golden hour capture at any hour!
Ok, you got me. Maybe not any hour, but any hour within reason.
The Fake Sun
First things first: I can't take credit for coming up with the technique. I attended a Joey L. workshop in Brooklyn, N.Y. back in April of 2013, and it was there that this technique was introduced to me. For lack of an actual name, I just call it "The Fake Sun." As I said before, this trick is very easy to execute and takes minimal gear. The main element in images shot during golden hour is obviously the sun. When we run into a circumstance in which the sun is MIA, the only logical option is to just make a fake one! Obviously the sun is a pretty large ball of light. I don't know about you, but I don't have a modifier quite that big yet. Luckily, we just need to recreate what the sun does to our camera and the highlights it would create on our subject. After doing this, we can bring our image into post-production to add some final touches and your photo will have that beautiful golden hour look.
The Technique
You can pull of this image with as little as one light or as many lights as you please. I personally use Paul C. Buff Einsteins because I love the flexibility I get with the Cyber Commander, but any light will do, even a speed light. First, start off by choosing what modifier you are going to use. If you are going to want the actual flare in the image, I would suggest using a beauty dish, a reflector, or even a bare bulb for your light that will be behind your subject pretending to be the sun. The reason being, these modifiers are round and small, and will give you a similar look to the sun. The smaller modifiers also give you less to clean up in post. It is good practice, but not a must, to use a CTO gel on your fake sun light. A 1/4 CTO should be just enough to give it a slight orange tint. Once you have your light set up, go ahead and expose your image without the flash. If you are going to be using flash in front of your subject, go ahead and set it to your liking as well. Once you have a proper exposure, place your subject between you and the flash and slowly bring up the power until it gives you a sun flare type look. This will be up to your personal taste because it is different for us all.
You can also use this same technique with the flash out of the frame and just behind the subject, like the image below of my wife.

One Einstein with a beauty dish and CTO gel from behind the subject.
After you shoot your images and bring them into post, there are a few things you may want to do. Sometimes this technique requires you to have your light stands in the image. You want to make sure you do a good job taking them out of your image or you're going give away your little secret! Secondly, it may help to add a light flare. Don't go overboard unless you really want that Michael Bay look, but a subtle light flare in post can really sell this effect!
Through A Window
Sometimes when indoors you may encounter a problem where there's a window behind your subject that never gets any sunlight, or it may be the wrong time of day. This technique is great in these instances. By setting your flash up outside the window, you can create that late afternoon sun look that you see in many images.

Quick tip: The Fake Sun technique is going to work best when you are shooting with a shallow depth of field. By blurring the light source, your fake sun will be less distinguishable and help sell the effect.
Use in Composites
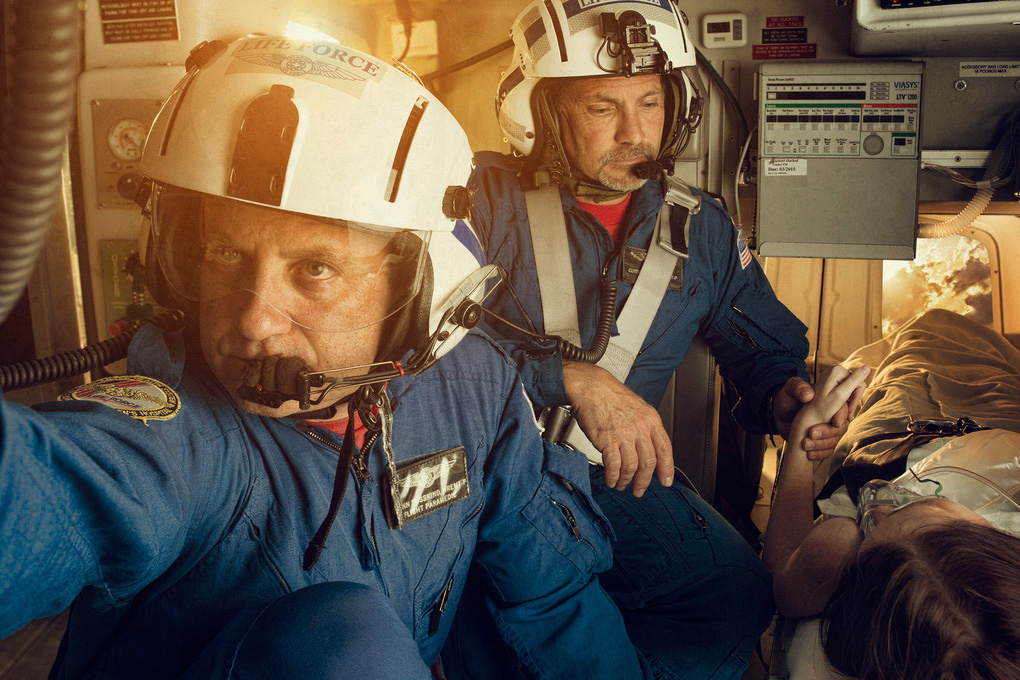
I am most known for my composite work. As you can see above, I do occasionally shoot some commercial portraiture work, but the bulk of my work is compositing. Below is an image from my Not All Wear Capes series where I used this tech niche in combination with compositing. I shot through the helicopter windows with an Einstein that had a reflector and CTO gel on it.
Show Me Your Work
I hope you can take this technique and add it to your bag of tricks! I'd love to see your work using these tips. Feel free to post a link to your work using The Fake Sun technique in the comments and I'll check it out! If you have any questions, feel free to reach out to me. Thanks for reading my first article!


Awesome article! So awesome to see you wrighting for Fstoppers, love your work.
Thank you Levi. Don't think all your compliments and likes have gone unnoticed! It means a lot to me buddy!
Awesome work
Thank you!
Great article. Here is one way I have used it.
Jan ( Norway )
awesome!
Thank You :-)
One funny thing. One of my PS hating friends loves this picture :-) He loves the mood and the light :-)
Jan, did you do this in post or with Brandons Technique ?
Awesome!
Great article and outstanding work!
Thanks man!
CTO gel is the way to go! It adds such atmosphere to the air around your subject! Great info here, bro! (I've seen your work floating around Facebook and such for the last year or so. Keep up the great stuff!)
Great job on the article Brandon!
It was a great workshop.
Nice work Brandon!
Thanks Jason!
Cool article. Glad to see your writing here.
I tend to be stubborn about matching the color temp of the ambient light so I don't know if I would use CTO on a cloudy day and might instead adjust the entire frame in post but to be honest I've never thought of doing that.
Great article Brandon! Awesome work on the Not All Wear Capes series!
Thank you!
Great Article!
Thank you for this article. I ll try the with a beauty dish ASAP. Considering a flat grey sky I had to use the kind of same technique for this image. Just a small speedlight SB900 with orange gel through a white umbrella. Not perfect but it can help ;)
sounds like a plan Fred!
The Old gelled speedlight fake sun backlight (I dont have a word for it either)-have used it alot living in a mostly cloudy country. I normally grid the speedlight for times like this when it has to come through a small window as it makes a slightly more controlled flare. I hid the lightstand next to the window so it looked like part of the frame so I didnt have to do as much retouching on it
Sounds like a great technique to try, thanks for posting
I find it works well when the flash is far away
Thanks Brandon. Are you gelling both key and backlight or just the backlight? Would the WB be set to anything other than tungsten?
The reason for the gel is so the "sun" has a slightly more orange tone so no gel on key light and white balance to the key light.
Awesome tips and tricks. Weekend project here I come!
You guys helped me a lot couple times :) That camaro ss aricle was great and now I found some of my photos matching this theme :D Here, take a look :)
Composite files...Im trying to shoot my photos in Ivan S. phtography at the right time. :)
Fb page: www.facebook.com/IvanSmiljkovicPhotography
You are giving away my secrets! :-)
Here are a few fake magic hours... speedlights and aliens.
You are giving away my secrets! :-)
Here are a few fake magic hours... speedlights and aliens.
http://www.patrickcavanbrown.com/PORTRAIT/1/caption/
Awesome Series.
What was your modifier of choice for this set?
small box for the key, ring light for fill (if I remember correctly - may have been ambient fill), bare side lights, and bare with CTO for the suns.
nice set!
thanks!
No sun was available for this sunset portrait ...
Wouldn't CTS (color temperature straw) more closely resemble sunlight than CTO?
Here are a couple of mine:
looks great!
nice of you to give away Joey L's secrets...