
Ever wanted to correct a mistake with your exposure or try a cool post-processing technique, only to find that the results weren’t all that you’d hoped? Image data may have inadvertently been lost in your workflow. These five steps can help ensure you have the best chance for technical greatness!
Fiji is a stunningly beautiful country, though you wouldn’t know it from my images of the place. We traveled there more than a decade ago, before I got more seriously into photography. When I look back through the images now, I’m appalled. Probably the single worst example of crappy technique — but by no means the only — was a shot of my wife and me. It is, in fact, the only shot of us together on the entire trip. It’s of the two of us standing beneath a thatched hut well out in the remote Yasawa archipelago. And I buggered it.
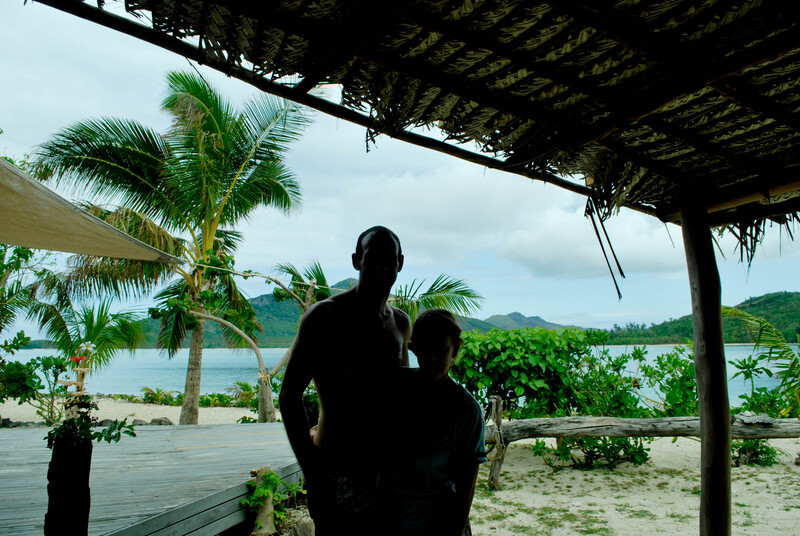
The camera obviously had metered for the bright background rather than for the two of us. I didn’t check at the time, because I didn’t want to further bother the local gentleman that was kind enough to take it for us. No problem, we’ll just correct that in post, right? Well... no. Not since I shot directly to 8-bit JPEGs rather than 16-bit raw files. This was on an entry-level, crop frame camera from the early 2000s that didn’t leave much latitude for exposure errors under the best of circumstances. There isn’t any way to “fix” an image like this in post. The information simply isn’t there. I let documenting that wonderful life moment slip away through a lack of technical preparation (not to mention a complete dearth of artistic vision).
At its technical root, the photographic process is about collecting, manipulating, and communicating information. It’s easy to lose bits of that information as you gather it, process it, and pass it between software applications. Let’s take a look at five steps that can help ensure as much of it gets retained as possible.
Be a Wizard With Your Gear
First, have the right gear for the job and know when and how to use it. We’ve often got just one chance to collect every bit of information from a scene that we’ll ever be able to gather. We don’t want to mess it up (see above). Practice. Practice. Practice. Practice aperture and shutter speed selection. Practice remembering to check the luminosity and color channel histograms. Practice until your camera becomes an extension of your hand, until using it becomes second nature. Give yourself every bit of a head start, so that when the moment counts, you’ll have the best chance of wringing every bit of data possible from a scene.
Shoot Raw
The next step is to make sure we keep all of that information around. Camera sensors don’t directly capture the type of pixel-based content we’re used to seeing in a final image. Instead, a Bayer or X-Trans filter array typically sits atop the sensor. This filter array ensures that each well on the sensor collects information only about the brightness of either the red, green, or blue portion of the light spectrum at that location (see the left panel in the figure below). What this means, however, is that if you’ve got a 20 MP camera with a Bayer filter array, only 10 MPs actually detect green light, and only 5 MPs each detect red or blue light. And none of those bits of information are collected at the same location. Yet, somehow, all that disparate data needs to be integrated in such a way as to create a single, full-color, 20 MP image. To make matters even more interesting, many sensors can collect a broader swath of color information than your typical monitor can reproduce; that is, they have a significantly broader color gamut.
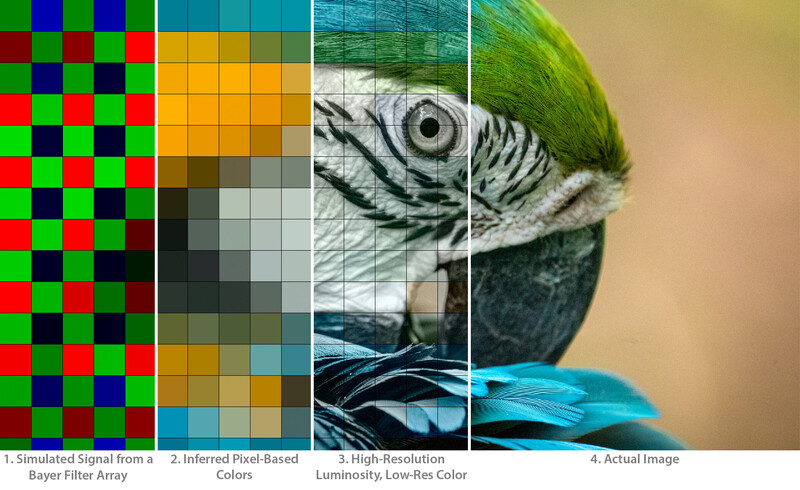
1) Illustration of the raw information gathered by a camera sensor with a Bayer filter. 2) Mathematical transformation of that same raw data into pixel-based colors. 3) Green is more prevalent in a Bayer filter, as it is most closely correlated with overall luminosity. Our brains are much more sensitive to luminosity details than they are to fine color detail. Did you notice that the color in Panel 3 is at the same resolution as that of Panel 2? Only the resolution of the luminosity has been increased. 4) Actual image.
The result is that a good bit of complex math is necessary to transform the information collected by the sensor into the image preview we see on the back of the camera or that appears when we open an image in Capture One or Lightroom. If we shoot directly to JPG, the camera makes the decisions about how to do this transformation for us, and once done, it can’t be undone. If we shoot to raw, on the other hand, we afford ourselves an opportunity to have significant influence over the process.
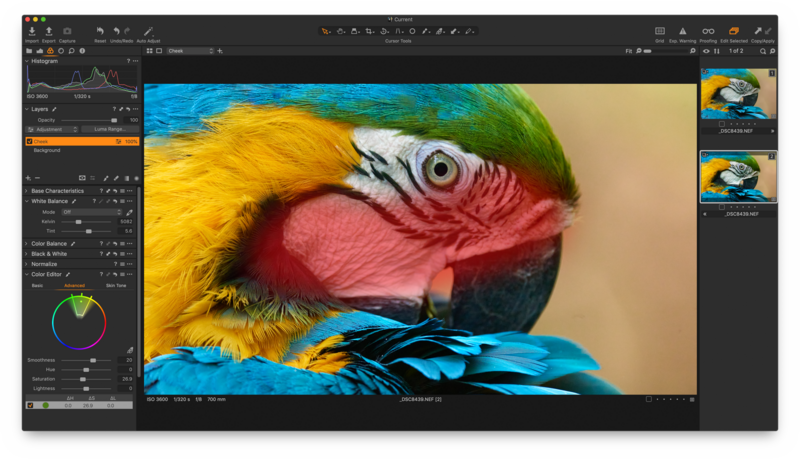
Make Major Adjustments Directly in a Raw Converter
It’s for this reason and another that we’ll want to make all of the adjustments we can, then, in a raw converter. Adjustments made there directly transform the original data (rather than a processed version of it) and in ways that a photo editor often can’t. The Camera Calibration panel in Lightroom, for example, allows us to adjust what the very definitions of “red,” “green,” and “blue” should mean when interpreting the sensor data. Other elements of Lightroom and Capture One allow us to decide how we want to handle that wider gamut of color information. Should colors beyond the boundary of the export gamut simply be clipped? Or do we want to more seamlessly compress portions of that wider color space into the narrower output gamut by using, for example, the Highlight slider (or a host of other adjustments)? Both have advantages and drawbacks.
This broader color gamut is also at the root of the second reason for working directly in a raw converter. It’s not just that a camera’s sensor may capture color information — hue, saturation, and lightness values — that lie beyond the standard sRGB color space. The transformations made to those colors — even if the colors themselves lie within that color gamut — can result in levels of saturation and lightness that lie beyond it.
RAW converters such as Capture One and Lightroom perform color transformations in a wide-gamut color space.
Imagine we have a bright, highly saturated image in the sRGB color space. A simple, highly saturated, solid, bright green is used as an example in the figure below. Let’s then add two adjustment layers in Photoshop, one increasing the saturation by 50 and the other decreasing it by the same amount. In theory, this should have no discernable impact on the image. The two operations should simply cancel each other out. Yet, that’s not what happens. The first adjustment results in the already saturated color being clipped. We can’t get more saturated than the color was to begin with when limited to the sRGB color space. When the second adjustment is then applied, the effect is to reduce the apparent saturation rather than return it to its original state (third panel in the figure below). If, on the other hand, we begin with a much more muted green, as in the fourth panel, no clipping occurs, and the two actions do, in fact, simply cancel one another out. In a real image, of course, the potential for clipping won’t affect all pixels uniformly. Instead, color-dependent shifts in hue/saturation may crop up across different regions of an image in different ways.
To help ameliorate these issues, Lightroom uses the ProPhoto RGB color gamut internally. It’s much broader than the sRGB color gamut. Capture One’s reference material suggests an even broader gamut is used but doesn’t specify precisely what. In either case, color and exposure adjustments made within either raw converter are rooted in the original sensor data, can utilize color information that resides beyond the boundary of standard export gamuts, and take place within a wide-gamut color space that provides more latitude for safe, reversible transformations that are less likely to result in clipped colors that propagate into other adjustments.
Export to Photoshop at 16 Bits/Channel
After making any macro-level adjustments in Capture One or Lightroom, you’ll likely want to export an image to Photoshop for the final, local touch-ups or more serious complex masking and manipulation. To make the move to Photoshop, the raw image data must be formally converted into a pixel-based image format. I generally export the image from the raw converter as a 16-bit TIFF in either the ProPhoto (best) or Adobe RGB (next best) color space. Both color spaces have a wider gamut than the sRGB color space, reducing the risk, as described above, of color clipping.
Make any adjustments to the image in 16-bit mode. While the 256 shades of gray associated with an 8-bit image may sound like a lot, there are a couple of things that can effectively reduce this number significantly. First, while a camera sensor has a linear response function, the human eye typically responds logarithmically to intensity. A logarithmic transformation is, thus, applied during the raw conversion process so that the resulting images look natural to us. This has the side effect, however, of compressing more narrower luminosity bins into the bright end of the luminosity histogram and fewer broader bins into the dark end. Second, using a curves layer can exacerbate this effect, expanding these few darker bins even further when, say, pulling up the shadows. In 8-bit mode, it’s easy to end up with just a handful of quantized color or luminosity values across broad portions of an image.
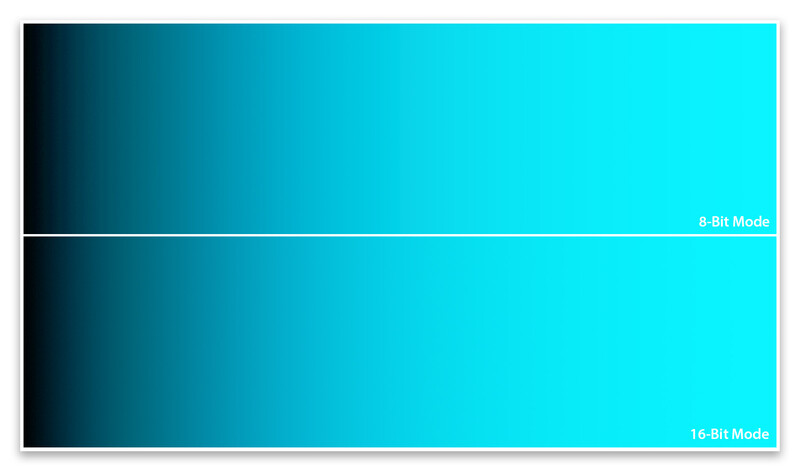
Color bands appear in an 8-bit image after applying a Curves adjustment to brighten the darks of what was initially a uniform gradient.
The effect can be seen in the figure above. You may have noticed it in some of your own photographs as a not-so-subtle banding of, for example, a clear blue sky. In 16-bit mode, however, the full 12 or 14 bits of information produced by the camera are retained. This provides as many as 64 additional tones within each of those 8-bit bins, allowing for much smoother color transitions even after fairly significant manipulation. Make sure when you’re finished to save the image in 16-bit mode rather than 8-bit so that the full complement of information is retained in case you want to make any future adjustments.
Convert to sRGB Color Profile and Reduce to 8 Bits/Channel
Finally, we’re ready to actually generate something that can be posted on the web or shared with our friends. In Photoshop, duplicate your final image into another tab so that the original file doesn’t accidentally get overridden. Then, go to the Edit menu and select "Convert to Profile…" For most purposes, you’ll want to convert it to sRGB. You’ll notice that all of its layers will be flattened. This is precisely what we want at this point. Think about each layer as performing a mathematical transformation. When you flatten the image, each of those separate transformations is performed using the full 16-bits of color information to obtain the final result. Once that final result has been computed, the image can safely be converted to 8 bits and saved as a standard JPG appropriate for uploading to Instagram, Facebook, your website, etc. (The order of the operations is important. Make sure you convert to the sRGB color profile and flatten the image before switching to 8-bit mode.)
Note that if you decide you want to do any further manipulation of the image, you’ll want to go back to the 16-bit TIFF you saved, make any alterations there, then duplicate the image and go through the process of switching color profiles and bit modes again.
How Much of an Impact Does This Really Have on Image Quality?
Obviously, it depends on the image. If you’re confident in your exposure and typically do only minor post-processing, the differences may be minimal. And there are certainly circumstances where selecting the appropriate white balance, noise reduction, sharpening, etc. in camera and shooting directly to JPG can be desirable. This might allow you to turn images around quickly for a client, for example, with little need for additional processing or hardware.
On the other hand, if you suspect you might at some point want to do more significant post-processing of your images, or if you want to leave yourself with a little more latitude in case of exposure errors, the above workflow can provide more flexibility and cushion while likely yielding the best technical results.


Join the Fstoppers community for free
-
Post comments and join in the discussions
-
Browse the site ad-free
-
Share your work and get featured in the community
-
Compete in the photo contests for fun and prizes
4 Comments
Thank you for this information sir. Myself, I have always found that shooting slides/negs are the best way for me, but I do shoot in RAW when I use digital.
Should I resize before or after converting to 8 bit? TiA
Ah, great question! Forgot to mention that. Technically, you want to resize right after you duplicate your final image and just before you convert between color spaces (that is, two steps before converting to 8-bit mode). The reason has to do with how any potentially clipped colors get handled when any averaging or interpolation is done across multiple pixels. Thanks for pointing that out, Eduardo!
Really well written, thank you. This makes sense. I'm finding that Capture One 20 is somehow more demanding in terms of wysiwyg, or in other words the RAW previews (even in preview mode) are not matching the JPG output so closely as Lightroom seems to do (for me). Anyway, thank you for a well written and thoughtful piece.