When shooting catalog images of product it is very important to have consistency throughout the project. Oftentimes a single product might have several versions and each has to be shot separately. Since we want to ensure a consistent look for our clients we have to make sure the product lines up perfectly from shot to shot across all versions. Here is how I personally tackle that for tabletop images.
In this quick example I am going to use a box of chocolates I was sent from a manufacturer. These chocolates come in a variety of flavors and each box is unique in its packaging. If the changes were minor we could do them in post, but because these boxes are truly unique other than shape and size, we have to re-shoot each package separate.
It is imperative to have exactly the same angles from product to product so that the client can populate their e-commerce store or print flyers with a uniform look. Otherwise the online shop or flyer can look cluttered and unprofessional. Here is how I achieve perfectly lined up images.
When shooting consistent angles you need to think about two perspective points: yours and the products. While we need to lock the product into a constant position we must also do the same thing with the camera. If you only lock the product in but fail to place the camera in the same position for every shot, you will still have inconsistent results.
Keeping the camera in one position is as simple as using a tripod. This prevents the camera from moving in between product changes and as you press the shutter. I personally use this Manfrotto tripod with a ball head mount, but most any tripod will do. Just make sure it's a sturdy one.
Now that you have your camera perspective taken care of, how do you tackle the product side? Here is what I do when shooting on tabletop.

I shoot on a piece of whiteboard. Yes, the same kind that you might find in a typical office with all sorts of flashy sales pitches scribbled on it. What I use is actually called “marker board” and you can pick it up at any Home Depot. It is essentially the same gloss finish as any office whiteboard. Up here in Canada it runs about $40 for a 4x8 foot sheet. I use this large size to accommodate bigger products and since I have my own studio I have the luxury of space. This product comes in a variety of sizes though and you can purchase one that fits your needs.
There are some great benefits to using a marker board for your product shots. It is incredibly resilient. Using seamless paper is the traditional approach but paper can scuff easily and gets damaged when moving products around. The same piece of marker board can last you years and years. Secondly, the natural gloss of the marker board gives off a subtle reflection that can be very pleasing when shooting product.
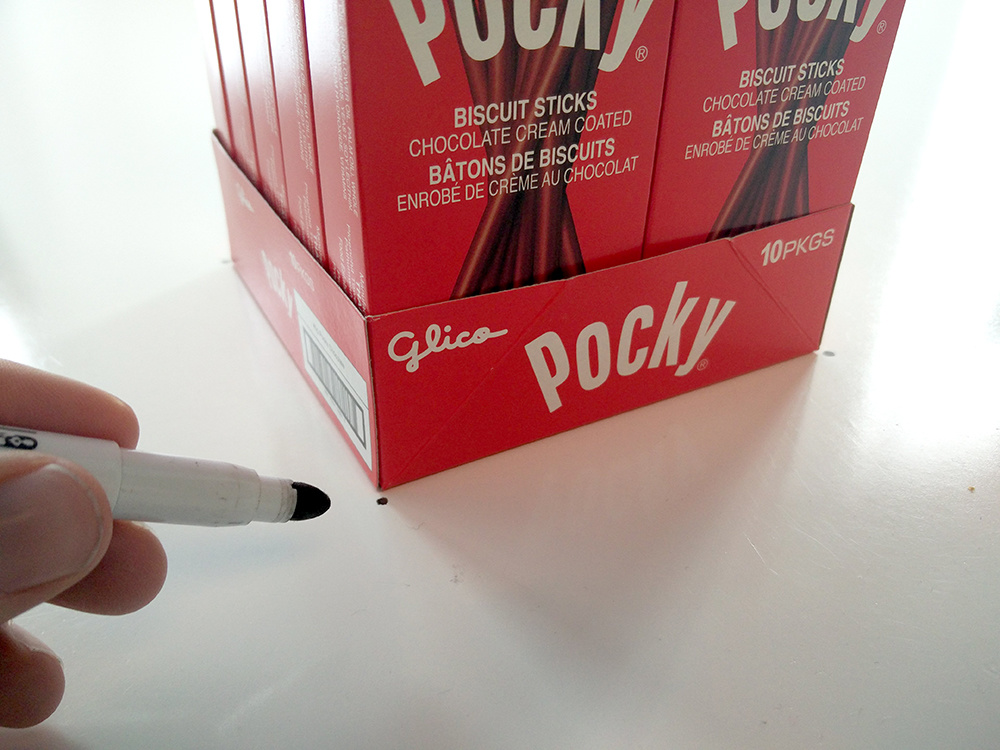
When shooting with marker board I will place my first product on the board and then take my test shots. Once I am pleased with the placement and results I use a dry erase marker to mark various points around my product. I place the marks directly on the board. In the instance of these boxed chocolates, the marks will go on each of the four corners.

When it is time to shoot the next product in the series it is simply a matter of picking up the previous version and lining up the next one with the marks on the board. Since the camera is locked into position on the tripod, neither the camera or the product position has changed, and we can shoot the entire line consistently.
Once we are finished shooting one series of product we can begin shooting the next by simply erasing the points on the board and drawing new ones for the next product. These points wipe away easily and without residue just like any other white board.
Hope this quick tip helps you out, and if you have any examples to share after using this method please do so in the comments.


Now I need to go find a box of Pocky...
Better believe I indulged after this example haha.