
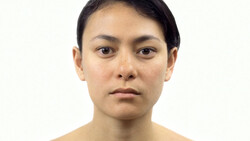
Knowing when to stop is the hardest lesson to learn for those new to retouching. In this tutorial we will look at how to recover lost texture and over smoothed skin tones, even when your file has been flattened. In this image the texture has been over retouched resulting in a significant loss in the skin texture. The transitions between skin tones have also been slightly overdone. Frequency Separation is a term we see in retouching all the time its also a technique I'm working on using less and less and bring in as a last resort. By using frequency separation here we can borrow texture and tone from the original, straight out of camera, image. This saves us from having to scrap the work that has been done and can save us hours of work.

Above is a sample from another image in the same series. The middle image is the original and un-edited image. On the left is an over edited version of the image, in this version the texture information has been stripped out. On the right is the correct or properly retouched version. There is much less of a change from the original. Larger texture has been replaced and tones have been smoothed out, but with dodge and burn instead of frequency separation. There is no frequency separation work done on the right hand version at all.
To Review the steps from the video tutorial, I am starting with the over retouched image. I then located the original image, it had to be converted into the same color space as the retouched image. The original was in ProPhotoRGB and the retouched file was sent in sRGB. This was all done prior to the start of the video. After which I followed these steps.
1) Run Frequency Separation on the Original File
2) Run Frequency Separation on the Retouched File - using same value for the Blur
3) Copy the Texture or "High" Layer from the Original Into the Retouched Frequency Separation
4) Clip the original texture to the retouched texture
5) Mask out the original texture and paint it in where needed
I then followed the same steps from the tonal or "low" information. I copy the layer from the original and placed it directly above the "low" layer in the Retouched Frequency Separation. That layer is also masked out and painted in where needed.
Once the information has been recovered, I create a stamp visible layer and copy that into a new file. This new layer and file still needs to actually be retouched. The end result of this video is NOT a final image because in order to "recover" information we had to bring in texture and tone that was unedited.
In a follow up video, I will complete the retouching from where I left off.


Join the Fstoppers community for free
-
Post comments and join in the discussions
-
Browse the site ad-free
-
Share your work and get featured in the community
-
Compete in the photo contests for fun and prizes
6 Comments
Thanks Royi, I will definitely check that out and give it a spin!
Wow new feature i did not now before .. thanks . very useful for me.
Thanks
You're welcome Robert. Really glad you found this helpful!
My only comment is , where do you find these models with flawless skin and please do articles on real life people that have flaws ........ Thanks
Stay tuned david...