
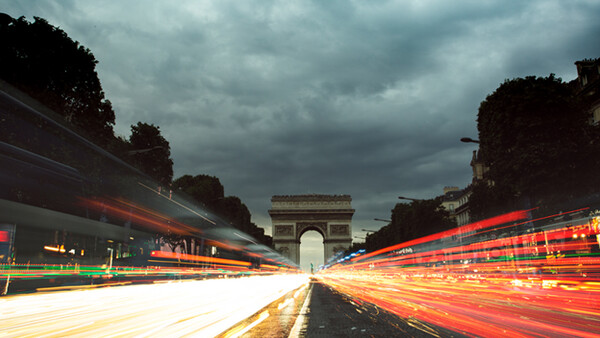
Shooting time-lapses can be a good skill to have as a photographer and as a video producer. I like shooting nighttime traffic. It gives me an urban energy, with the lights dragging over the shot to give an indication of motion, power, and electricity.
1. Different Exposures Make for Different Messages
Shorter exposures create the feeling of time passing, each car coming and going. Exposing for longer per shot gives an overall feeling of energy, and there’s no focus on specific cars passing by, and time isn’t really relevant.
2. Shoot in Manual Mode
If you shoot in aperture priority mode, your camera is going to try to find the perfect exposure, and each image will have a different exposure and not flow or create any continuity in the time-lapse.
3. Choose a Specific White Balance
As with shooting in aperture priority, having auto white balance can make you end up with different color renditions per image. Although it can be fixed in post, it is better to get the correct white balance and be confident that all the images will have the same setting in camera.
4. Have an Intervalometer
It’s important to have a constant period between shots. Many new cameras now have these built in, but if yours doesn’t, it’s a piece of equipment you’ll most certainly need.
5. Pack a Tripod
For the experienced time-lapse producer, this might seem obvious, but if you're only getting started, you must get and pack a tripod.
6. Shoot Raw
Raw gives you so much more file latitude that I think if you’re going to go through the mission of shooting, do it in the best quality you can.
7. What I've Noticed in the Industry
When shooting for yourself or shooting for a client, it has almost become a standard to shoot both video and stills, obviously depending on the product. I went to to meet Jon Reid and get his tips on how to become a travel photographer, and it was evident that travel photographers need to shoot video too. Through experience, it is also fact that when a go-see is arranged between a fashion photographer and potential client, it is often asked whether the fashion and beauty photographer does video too. Photographers can therefore get more work and are better paid if they can shoot video as well. The new generation cameras are being made to shoot both as easily as possible, like the Canon XC10 which makes it easy to get a high resolution image out of captured video.
8. Stacking Images
The advantage of shooting urban time-lapses of cities and cars passing by is that the images can also be stacked to create photographs with light trails in the shot. You can choose the blending mode and how many images you want to use, so it’s up to you to decide what works best for the image you want to create.
9. How to Do It
Take the raw images you’ve captured, back them up, and copy them to a folder you want to work from. With Adobe Bridge or Lightroom, open the first image and apply your settings, then close it. Now, right-click on it and copy the development settings and paste it over the images you want to include in the stacked exposure. All the images you want to use will now have the same effects and settings. While you are still in Adobe Bridge, select all the images you’ve just developed and export them to JPEGs. It’s best to do this to a different folder, because it gets the raw files out of the way.
To do the stacking, a guy called Markus Enzweiler developed an app that is mainly used for star-trails, but because stars and cars both create trails, the app can be used for both. The app is called StarStax, and you can download it for free. I have never met Markus, but I am eternally grateful for the freeware that offers so much to the type of photography I love to make. It would take hours to do the work if it wasn’t for this app. Browsing his site, it seems like he’s an engineer developing self-driving car technologies, so he just developed this software as a side project. I really like the intuitive way the app works. Images of star-trails are stacked images. Therefore, the multiple stills taken of the galaxy can also be used to create time-lapses of the stars and galaxies. In essence, it’s the same process.
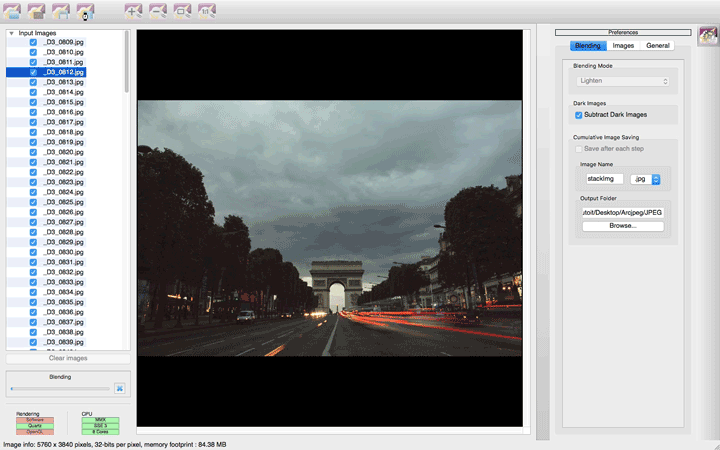
You can open it up in the app, load all the files, choose the blending mode (I find lighten has the best effect for car light-trails) and save it to wherever you please. It’s a user-friendly way to get a still image out of a bunch of images shot for a time-lapse, so you can now get the stills and video in one go.
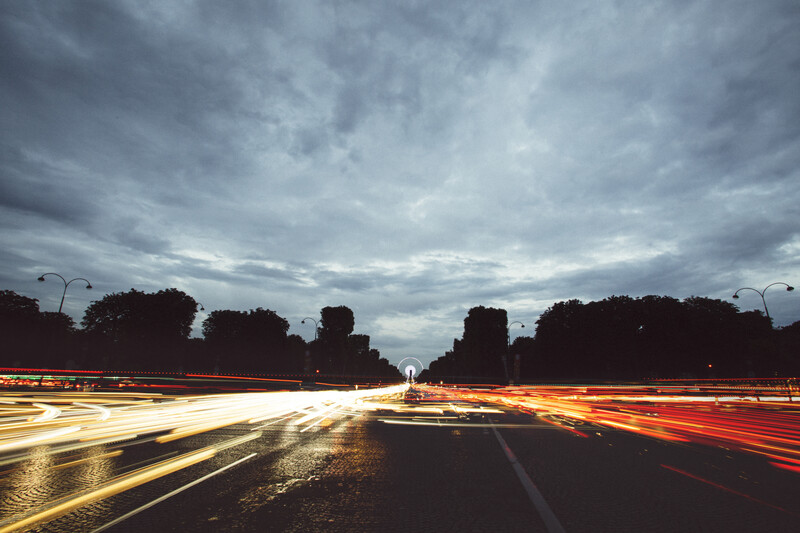
10. The Finished Product
The time-lapse can be loaded on a stock library website for sale or to become part of a film. The stacked image can be used as the preview image for the video or as a poster image for it. The image can also become part of your portfolio depending on what type of photography you want to specialize in.
It will take some practice to see what type of blending mode does what, how many images you need to make the image you want, and how many are too much. You will need to spend some time experimenting with the different exposure lengths per frame, what effect you have when using graduated filters and full filters if you want to lengthen the exposure time during the day, and what it takes to shoot and post-produce a time-lapse. What is important is for you to get out there and shoot!
The Final Video
If it’s the first time you’re attempting to shoot a time-lapse, or if you're an experienced time-lapser, be it of the stars or the cityscape, please post your images in the comments.


Join the Fstoppers community for free
-
Post comments and join in the discussions
-
Browse the site ad-free
-
Share your work and get featured in the community
-
Compete in the photo contests for fun and prizes
14 Comments
Good intro for Timelapse Wouter and I would add: Get a strong ND filter
ND filter are cheap ($50-$100) and will allow for long exposure during daylight hours, thus adding blur to the moving part of the timelapse which gives a much better look IMHO.
https://vimeo.com/172828815
Amazing piece of work. Are all the cuts made of stills or there are video footage too?
Thanks. There are a few aerial video yes.
Hello Abel, all the scenes were made of still RAW images and then taken into Adobe Premiere. It's possible to 'simulate' slowing it down using the Twixtor plugin for Premiere.
i have one question in long exposure how can possible to shoot moving object ??
it will blue i try it please advice?
Yes, on long exposure at night or during daylight with a strong ND filter the moving subjects will be blurry but it looks much better this way. Same principle as the 180 shutter speed rule in video. That being said you must find a correct balance between exposure time and motion. For people walking in the street, past 5-10 sec it will be hard to notice the persons. Most of the time a 1-3 sec exposure is a good number to start with.
Long exposure also allow to "get rid" of pollution such as birds or pigeons. Due to their small size and fast motion, you won't see them with a 1-2 second shutter speed.
can you please give me link how to shoot that video 180 shutter speed rule in video?/ thanks
Hi. There is plenty of info about it on google but long story short the 180 shutter rule or shutter angle means that you should film with a shutter speed double the the frame rate. For instance, 1/60 shutter when filming at 30fps. or 1/120 when filming at 60fps. The point is to get pleasing motion blur but as with every rules it can be broken. Just a rule of thumbs.
Awesome ! what is your fav application / soft wares used ?
You should look at this software for creating timelapses. Though it is not free.
http://lrtimelapse.com/
Thanks, I'll check it out, although i believe Photoshop RAW and Premiere does a great job in color and quality.
Hi. The main purpose of LRTimelapse is to post process "holy grail" (day to night or night to day sequence) timelapse by changing the settings of each image individually with the help of Lightroom via XMP file. Basically the software will do an auto-flicker fix based on the key frames set by the user.
The software also allows to set a lot of keyframes for all the Lightroom parameters such as white balance. This is very important because during a day to night timelapse the white balance can go from 7000k to 3000k in only 30 minutes.
i made one timelapse of this tattoo in the making at a tattoo convention.. 8 hours ca.
https://youtu.be/UrB35xwhQG4
Your video "When you go to Paris" reminds me of the old movie "Baraka" Well done!