What should a photographer do when surrounded by thousands of dead fish, some of the fastest ocean tides in the world, and wild bears that want to eat anything in sight? You take a deep breath and attempt to capture the beautiful scenery. Welcome to Valdez!
Earlier this month, I had the chance to visit Alaska for several different projects. One project involved photographing local salmon, and when the fish stopped biting, it gave me a chance to capture one of many amazing landscapes Alaska has to offer. This short landscape tutorial takes place in one of the fishing capitals of Alaska, the small sleepy town of Valdez. Each year, thousands of international visitors drive the unbelievably scenic route from Anchorage to Valdez in hopes of catching their limit of pink, silver, and chinook salmon (not to mention halibut and rockfish). As you can see in the video above, Valdez is a remarkable town located in Prince Edward Sound and is home to wildlife like bears, sea lions, sea otters, eagles, and of course, tons of fish. The entire bay is also surrounded by beautiful, green mountains in the summer months that quickly become covered in snow in the winter.
Capturing Valdez
The photograph I wanted to create that captured the beauty of Valdez actually didn't take place in the small town. Instead of photographing the more typical scene of fishing boats, the marina, and local businesses within the city limits, I decided to shoot the town from the opposite side of the water along a popular fishing spot called Allison Point. Since Valdez doesn't have a super iconic skyline or any high rise buildings for that matter, I thought it would be nice to try to capture the natural beauty of the fishing town instead.
The entire time I was traveling through Alaska, the weather was just about perfect. The temperatures were around 70 degrees during the day and only 50 degrees at night. The skies were crystal clear every day, but as you can imagine, clear blue skies are far from a landscape photographer's dream shooting scenario. I knew I wanted to capture my photo early in the morning when the water would still be smooth and the mountains would be lit from the side. On this particular morning, the sunrise coincided with a super-low tide, which gave me many options for foreground elements. As you can see in the photo below, I wound up using the rocks and the tip of Allison Point to create some interesting lines and angles in the lower part of the photo. What I didn't expect was how fast the tide would move in and completely change my overall composition.


Blending Multiple Images
One of the most powerful reasons for shooting landscapes on a tripod is that it allows you to capture multiple photos throughout different lighting events and blend them together effortlessly. It's very rare that the perfect sky will line up with the perfect exposure of a city. If you want to add an unexpected element like kayakers, boaters, wildlife, or moving cars, your chances of everything lining up perfectly in that one definitive moment are almost zero. This is where blending different exposures can really make a photograph come to life.
Blending multiple exposures together has been a staple in landscape photography, but I never understood just how powerful this technique could be until I started working with Elia Locardi in our "Photographing the World" tutorial series. Elia is a master at blending "moments in time," and it's a great technique to master even if you shoot portraits, architecture, weddings, or fine art.
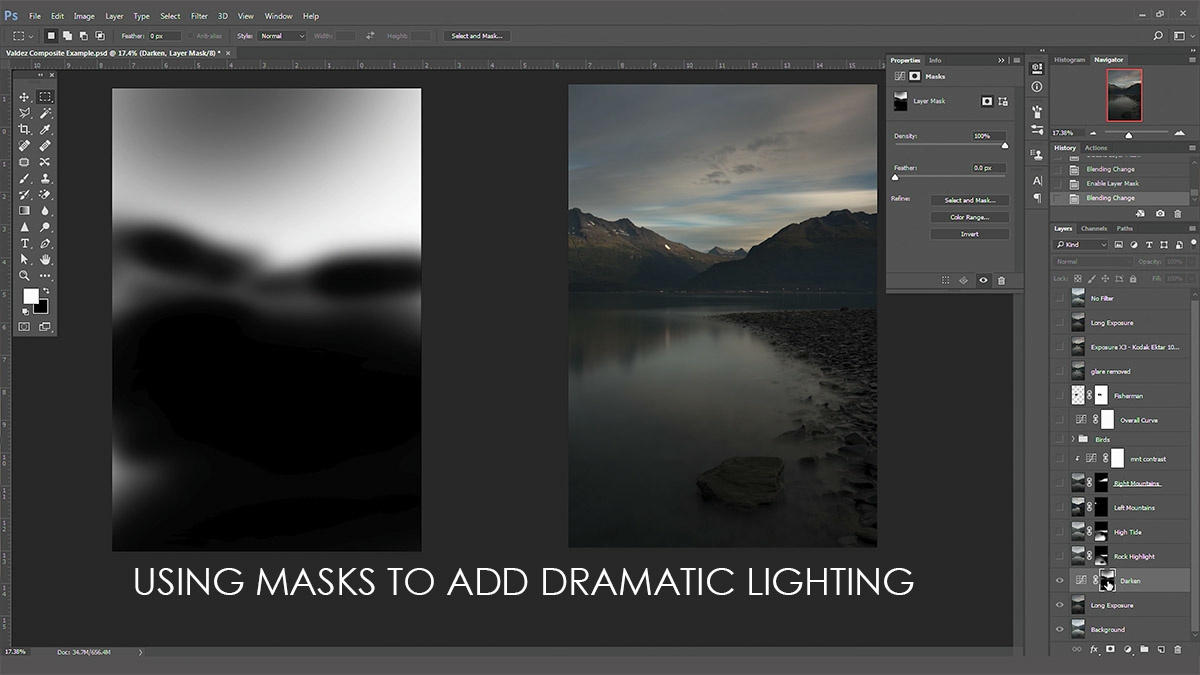
For this particular image, I believe I only used four full images to get the final photograph, but I also blended in a few supplemental elements, including seagulls and a fisherman from a few other frames that I had captured over the course of 30 minutes. The main exposure that acts as the main base image in the final composite is a single 4.5-minute exposure. I then used two more images to showcase the beautiful lighting that happened on the mountains, and the final image I used allowed me to blend in some nice highlights on the rocks near the shore. All of these lighting events took place within 15 minutes of each other, but unfortunately, there was no way to capture everything all at once in a single frame. However, using frame blending, you can easily capture the scene as you remember it even if everything in the scene wasn't perfect from a photographic standpoint.
The Gear
Like most genres of photography, landscape photography requires a specific set of tools to produce the best results. I don't subscribe to the idea that expensive photo gear is a make-or-break element in creating beautiful photographs, but having professional tools definitely helps give you the best results especially when things don't quite go as planned. Below, I'm going to quickly outline all the gear I used to create the photograph above.
For the camera, I decided to use the Nikon D850 DSLR. I've been shooting with Nikon cameras for about 15 years now, and when it comes to sharpness and dynamic range, I don't think there is another DSLR camera that can produce the same quality as the D850. With 46 megapixels on a full frame sensor, this camera not only allows you to capture super-high resolution files for printing fine art and poster-sized prints, but it is also one of the best low-light cameras in its class. For landscape photographers, it also has a bunch of long exposure and silent shooting modes that help eliminate camera movement, which is really nice if you don't want to have to carry an intervalometer trigger. Also, the ISO 32 setting is pretty useful as well, especially if you want to drag your shutter without using a neutral density filter.
For this particular trip to Alaska, I only packed two lenses with me. The first lens was the Tamron 70-200mm f/2.8 VC G2, and although this lens is huge and heavy, I wanted to make sure I had a decent telephoto lens in the event that I stumbled upon some wildlife. The main lens I was excited to travel with was the new Tamron 17-35mm f/2.8-4.0 OSD zoom lens. This lens covers the most useful wide angle focal lengths for landscape shooting, and it's also much more compact and lightweight than the 15-30mm f/2.8 professional lens. It is, however, a variable aperture lens, with its fastest aperture of f/2.8 only being available at the 17mm end (which is perfect for astrophotography) and an aperture of f/4.0 at the 35mm end. However, since I was going to be using this lens primarily for landscape photography and shooting at f/8.0 most of the time, I hardly noticed the slight change in aperture when shooting wide open. Lately, I have been trying to travel with less gear and lighter lenses, and as you can see in the photo below, the 17-35mm lens significantly saves you on weight and space when packing a single backpack full of gear.
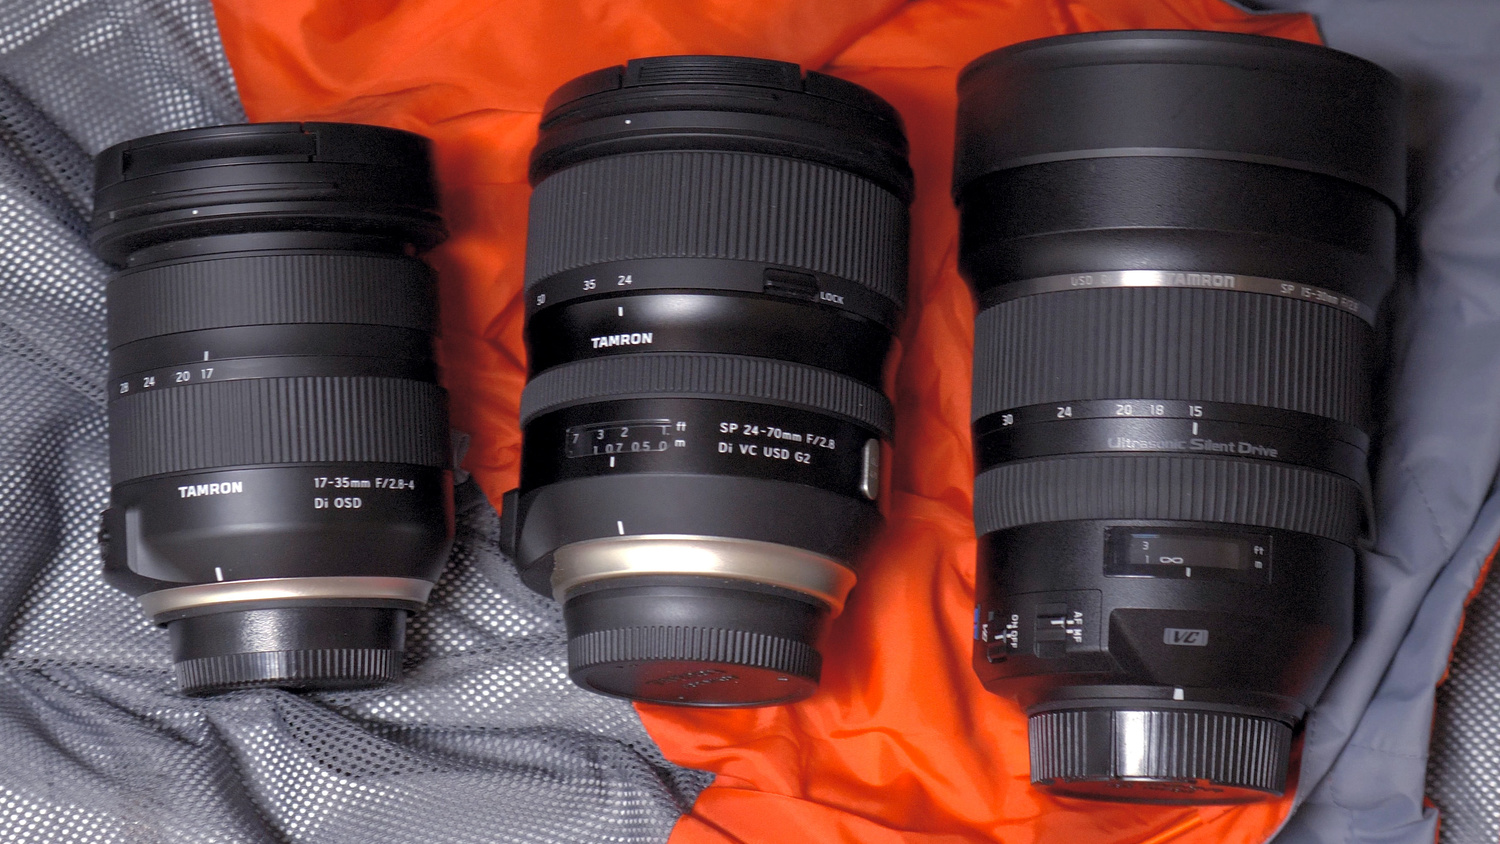
Tamron's 17-35mm lens is considerably smaller than the 24-70mm and 15-30mm lenses.
Whenever I shoot landscapes that contain moving water, I always try to capture a few frames with extremely long shutter speeds. This allows you to blur the water and get that silky smooth effect. I'm not one of those photographers who believes every single water scene should have completely blurred water, but it's always nice to have a few frames, so you can decide later in post-production which version you like best. While shooting Valdez, I actually really liked both the fast-shutter images and the long-shutter images and therefore tried to blend the two together for mixture of the two exposures. My favorite neutral density filter recently has been the Polar Pro ND100k. I got the 82mm filter so I could use it on any lens that is smaller than my pro lenses, and I've yet to notice any major color casts or lack of sharpness in the final images. Another favorite filter of mine is the Breakthrough filter, which I included in this ultimate neutral density filter shooting video we did a while back. No matter what filter you wind up getting, it's always nice to have a few 8-15-stop filters, so you can really drag your shutter if you need to blur the sky or moving water.

A 10-15-stop neutral density filter helps smooth water and blur skies.
The final piece of gear you need is a good tripod. Tripods are only really needed if you want to take multiple exposures and blend them together or if your shutter gets too long to handhold the image without camera shake. I have used a bunch of tripods over the years and found that I prefer to have one really nice tripod for studio work and local photoshoots, but I also like a lighter-weight and cheaper tripod for traveling. My absolute favorite tripod for the money is the Benro TMA38CL carbon fiber tripod, but while traveling in Alaska, I wound up bringing our Oben AC-1351 tripod, because it weighs a lot less and I didn't mind putting it in salt water. Recently, we wrote a big tripod shootout article after traveling the world with some of the most expensive tripods on the market, so you might want to check out that article to see why both Lee and I chose the Benro as our personal favorite. Regardless of what tripod you buy, being able to lock down your camera and shoot through the quickly changing morning light will allow you to have many more blending options later in Photoshop.
Conclusion
This photograph was initially not a photo I was trying to capture. To be honest, I was hoping to catch more fish that morning for another photography project I am currently working on, but I'm glad I took the time out of my day to capture Valdez in the early morning. The initial images on the back of my camera weren't all that exciting, but from experience, I knew that if I was just patient and continued to capture the changing sunrise light, the final photo would be worth the effort.
I'm not a professional landscape photographer and when I compare my own work to the work of photographers I greatly admire, I feel like I still have a long way to come in this genre. It is nice to capture a scene that I don't think anyone else has really photographed before, and I know this photo will mean a lot to me personally, because it represents an amazing fishing trip I did with my father. I actually grew up in Alaska, and it was fun revisiting the oldest memories I have as a child. So even though this photograph was taken more to pass time than to create any sort of art, in the end, I think it wound up being a very memorable image that I'll be happy to hang on my wall.


I new there were some weird natural phenomenon way up north, but water that doesn't reflect birds or people. Who knew! ;)
Very few things will reflect in the water if you use a long exposure. Many people think using a 30 second or 5 minute exposure will give them smooth water and therefore a perfect reflection. What they fail to understand is that a long exposure usually will just wash out the shadows and highlights and won't actually make a reflection at all.
As for the birds shot with a fast shutter, in order for a reflection to show up in an image the angle of reflection is equal to the angle of incidence. If the camera isn't perfectly aligned to that angle of incidence, a reflection won't show up. Plus, even if the angles are perfectly aligned, even with just the slightest bit of water movement, the reflection could show up in the dark part of a wave. I've posted the actual photograph to help illustrate this point.
Good response, schooled him well. I think in your final image you couldve had the reflection of the fisherman though since he wouldn't have been moving much
lol. Patrick, obviously my comment was tongue in cheek. And you didn't have to go through the physics of reflections and exposure time. I'm just saying that since you took the artistic liberty to include short exposures of the birds and the fisherman, i think it would benefit to stay within those perimeters and ad the reflections, especially since you can clearly see the crisp'ish reflections of the mt tops and clouds.
Ah sorry, I wasn't sure exactly what you were getting at in the comment. Just thought I'd explain it because a lot of people on Youtube are saying the same thing. I do like the edit though and might revisit this image now that I've had a few days to sit on it and look at it with fresh eyes.
I always appreciate these editing breakdown articles or videos. When it comes to processing, patience is definitely my greatest weakness, other than my consumer grade software. I can’t always use the exact methods shown, but it’s always a helpful reminder that sometimes you have to put in extra work for extraordinary results.
Nice job, Patrick. I would like to see more examples in sense of "What I learned in photography tutorials" and the practical output and personal improvements.
great video, makes me want to shoot some landscapes! +1 for the moon boots too
Great tutorial Patrick, really well explained and concise.
Patrick Hall which software did you use to record the desktop?
OBS probably, it seams like the standard.
We use an Atomos Ninja Flame to screen record. We also use OBS but we like having a hardware solution in the event that the file corrupts or something goes wrong with the screen recording. Just make sure you put the monitor in 24hz so that it syncs correctly with 24fps on your video cameras otherwise you will get a ton of audio drift.
Atomos It's very cheap! ;)
I tried OBS but I do not really like it, so have to find some alternative