

Most photographers meet bracketing exactly once, in a tutorial about high dynamic range landscapes, and walk away thinking it means "shoot three exposures and merge them." That is one kind of bracketing. There may be two more sitting in your camera's menu right now, and most people never touch them.
The core idea is simple. Bracketing means shooting several frames of the same scene while the camera shifts one variable a small amount between each shot. You pick the best result afterward, or you blend the frames together. The variable is what changes everything, and most cameras can bracket several. The three most broadly useful are exposure, focus, and white balance, and those are what this guide covers, though as you will see below, some bodies bracket more.
Exposure Bracketing
This is the workhorse, the one everyone learns first. The camera takes a sequence of frames at different brightness levels, usually one at your metered exposure, one darker, and one brighter. A typical spread is -2, 0, and +2 stops, though most bodies let you set both the increment and the number of frames.
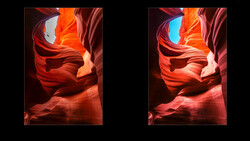
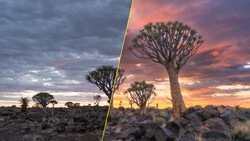
You use it two ways. The first is insurance: in tricky light, where you are not certain the meter nailed it, you fire a bracket and keep whichever frame looks right. The second is high dynamic range, where you deliberately capture the full tonal range of a high-contrast scene, shadows in the bright frame and highlights in the dark frame, then merge them into a single image that holds detail everywhere.

The reason this matters comes down to a hard limit of the sensor. Any camera can only record so much range between the darkest shadow and the brightest highlight in a single frame, and plenty of real scenes exceed it. Point at a room with a sunlit window and you get a choice: expose for the interior and blow the window to white, or expose for the window and lose the room to black. There is no single exposure that holds both, because the scene is simply wider than the sensor. Bracketing sidesteps the limit by recording the dark end and the bright end in separate frames, then letting you combine the parts that worked. It is the difference between fighting your sensor's range and stepping around it.
That merge is where the technique actually pays off, and it is worth learning to do well rather than letting an auto-HDR button decide for you. The landscape photographers who shoot the most demanding light, sunrise over a dark foreground, an interior with a blown-out window, tend to treat blending as a craft of its own. Elia Locardi's Photographing the World 4: Advanced Landscapes walks through the field-to-finish workflow for exactly these situations, and his Photographing the World 2: Cityscape, Astrophotography, and Advanced Post-Processing covers the blending side in depth.
Focus Bracketing
Here the camera holds exposure steady and shifts the focus point a little farther into the scene with each frame. Stack those frames together afterward and you get front-to-back sharpness that no single aperture could deliver.
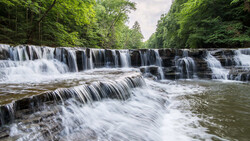
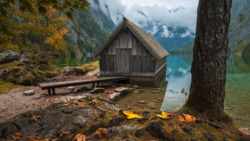
Two genres live and die by this. Macro is the obvious one: at life-size magnification, depth of field can be a sliver of a millimeter, so a single frame of an insect or a flower will have a sharp eye and a soft everything-else. Shoot a focus bracket from the nearest point to the farthest, stack it, and the whole subject snaps into focus. Landscape shooters use the same trick to keep a foreground rock and a distant mountain equally crisp without stopping down so far that diffraction softens the image.

That last point is the real reason focus bracketing exists rather than just closing the aperture. The instinct, when you want more in focus, is to stop down to f/16 or f/22 and call it solved. But past a certain aperture, diffraction sets in and the entire image gets softer, so you trade shallow depth of field for an overall mush. You cannot win that way at extremes. Focus bracketing lets you shoot at the aperture where the lens is actually sharpest, often somewhere around f/5.6 to f/8, and build the depth of field across multiple frames instead of forcing one frame to carry all of it. You get both the sharpness and the depth, which a single exposure physically cannot give you.
Focus stacking is its own editing discipline, and macro is where it matters most. Andres Moline's Mastering Macro Photography covers both the capture and the stacking workflow if you want to go deep on close-up work.
White Balance Bracketing
The quiet third option. The camera takes one shot and produces several versions with different white balance shifts, often cooler and warmer, and on some systems along the blue/amber or magenta/green axes rather than temperature alone. Unlike the other two, it usually does not require multiple shutter actuations; the camera processes the variations from a single capture.

It is the least essential of the three, and most photographers who shoot raw skip it entirely, since white balance is fully adjustable after the fact in a raw file. But it has a place: if you are shooting JPEG, or you want to evaluate color options quickly in the field under mixed or unusual lighting, it saves you guessing. Mixed lighting is where it earns its keep, a room lit by warm tungsten on one side and cool daylight from a window on the other, where no single temperature setting is correct for the whole frame. Seeing the options side by side on the back of the camera is faster than nudging a slider blind and hoping.
How to Find It on Your Camera
This is where the brands diverge, so here is where each one hides these controls.
- Canon (EOS R system): Exposure bracketing lives under "Expo.comp./AEB" in the shooting menu; turn the dial to set a range of up to plus or minus 3 stops. AEB commonly defaults to three frames in the order standard, darker, brighter, though some bodies let you change the bracket count. On supported EOS R bodies, focus bracketing is a separate menu item, but not every model in the line has it; the original EOS R and R100 are among those that do not. Where it is available, AEB is disabled while focus bracketing is active, so you use one or the other.
- Sony (Alpha bodies): Both are reached through the Drive Mode menu, but they work differently. For exposure, you choose either single bracket or continuous bracket, then set frames and increment under "Bracket Settings"; exposure brackets run from 3 to 9 frames depending on the increment. White balance bracketing is its own separate drive mode (shown as BRK WB), where you set the increment directly, usually toggling between Lo and Hi, rather than through the Bracket Settings sub-menu. Sony also offers DRO bracketing, which varies its Dynamic Range Optimizer. In-camera focus bracketing came later than the other brands: the Sony a7R V shipped with it, the Sony a7 IV gained it through firmware version 4.00, and several newer bodies include it; older Alpha cameras vary, so check your model.
- Nikon (Z system): On bodies with a dedicated BKT button, such as the Nikon Z8, you hold it and turn the command dials to set the bracket; on others, like the Nikon Z6 III, auto bracketing lives in the Photo Shooting Menu instead. Nikon offers exposure, flash, and white balance bracketing, plus ADL bracketing, which varies Active D-Lighting frame to frame and is Nikon's own by name (other brands have rough equivalents, such as Sony's DRO bracket and Fujifilm's dynamic range bracket). Focus bracketing is listed separately as "Focus shift shooting" in the photo shooting menu.
- Fujifilm (X system): Rotate the drive dial to BKT, then pick your bracket type under Drive Setting. Fujifilm offers the widest spread of any brand here: exposure, ISO, film simulation, white balance, dynamic range, and focus, all selectable. Its auto focus-bracketing mode, where you set a near and far point and the camera calculates the steps, has been present since at least the Fujifilm X-T4 and carries through the Fujifilm X-T5 generation.
A note that trips people up across every brand: most cameras will not bracket reliably from a handheld position if you want to stack the results, because the frames need to align. For exposure and focus stacking, a tripod is close to mandatory, and a remote shutter release or the two-second self-timer keeps you from nudging the camera between frames.
Which One You Actually Need
For most people, exposure bracketing earns its keep immediately and the other two are situational. If you shoot landscapes or interiors, learn exposure bracketing first and learn to blend the frames by hand. If you shoot macro or want tack-sharp landscapes front to back, focus bracketing is the one worth the menu diving. White balance bracketing is the one you can safely ignore until the day you need it, which, if you shoot raw, may be never.
Your camera's menu may have had more of these tools than you realized. Now you know which is which, and which is worth your attention.


Join the Fstoppers community for free
-
Post comments and join in the discussions
-
Browse the site ad-free
-
Share your work and get featured in the community
-
Compete in the photo contests for fun and prizes
No comments yet