
Although these eight features may not be the sexiest that Photoshop has to offer, they all really do help to make my life as a photographer so much easier.
There are literally a million ways to do everything in Photoshop and while that is a good thing for creativity, it does mean that you probably don't know every single feature or shortcut available to you. I have been using the program for over 18 years now and still feel like I have only scratched the surface in what Adobe has to offer. Recently, I noticed that a few of the techniques that I use regularly without even thinking were not known by some of the other creatives that I work with. For this reason, I thought I'd share some of these lesser-known features in the hope they might help some of you in your workflows.
Quickly Cycle Through Blend Modes

If you do any kind of work with layers in Photoshop then you probably use blend modes in some shape or form. I use them a lot myself and while some photographers may tend to stick to a handful of the main modes I have used almost all 26 on offer over the years. For this reason, I like to quickly see what a layer will look like using all the blend modes Photoshop has. Thankfully you don't have to painfully click on each one manually to see how it will look. While holding shift and then pressing "+" or "-" on the keyboard you can actually cycle through each one to see the differences between them. It literally takes a few seconds to go through all 26 modes if you do it in this way. Sometimes I find a random blend mode which was never intended to be used will catch my eye and take me down a totally different path for the look of the image. All thanks to knowing a handy shortcut.
Easily Group Layers

If like me you tend to have more than a few layers in Photoshop then things can start to become a little cluttered if you don't attempt to keep them organized. For this reason, I like to group layers as often as possible. I'm sure you have seen the "Create New Group" button that sits at the bottom of the layers panel but you might not know that by pressing command (on a Mac) or control (on a PC) followed by the "G" key you can automatically group the layers selected. Not only is this much quicker but Photoshop actually places those layers into a new folder for you. The alternative way involves you having to place the layers in the folder manually which just takes longer and also risks layers becoming placed out of order as you drag things over.
Auto Select Layers

Even though I always try to keep my layers in Photoshop organized, there can be times when I lose track of which layers are which. I find this happens quite often when I have a lot of text or other supporting shapes on the go and I'm at the stage of finalizing the position of everything. Thankfully there is an auto select layer function that lets Photoshop move from layer to layer based on where you choose to click on the screen. To switch this feature on make sure you have the move tool selected and then click on the stacked layer icon in the top left of the screen. This is another feature which I find helps to save a lot of time when using Photoshop. Being able to just click on the screen to pick the layer that you want always feels much more intuitive to me compared to scrolling down a long list of layers and struggling to find the exact element you want.
Take Advantage of Blend-If

Blend-If is a powerful blending tool which is hidden away in the layer style dialogue box. To access this tool double click on the layer you are working on where you will be greeted with a screen of sliders which will let you quickly and effectively blend layers together. This one feature alone is something I really couldn't live without. I love it so much that I wrote a whole article on the many uses of it.
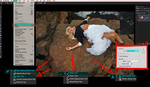
Lock Transparent Pixels
This feature has been staring me in the face for many years but I had no idea it even existed. If you work with any kind of layer which has transparent elements in them you can tell photoshop to ignore those areas when working on the layer. This is great for things like composites or text layers where the alternative would be to have to mask those areas. With the lock transparent pixel button pressed it's like having an instant mask at the click of a button. To use this feature all you need to do is click on the square checker box icon at the top of the layers panel.
![]()
Open Large Photoshop Files as a Flat Image Instead
The title of this one might not sound like a big deal but this feature has literally saved me hours sat in front of my computer screen. If while opening a .psd or .psb file you press shift option (on a Mac) or shift alt (on a PC), Photoshop will ask if you would prefer to read the composite data instead. Basically, this means a flat image of the file rather than seeing all the many layers.

This really is a huge time saver if, like me, you have large files which the first thing you were going to do in Photoshop was flatten them anyway. I quite often have .psb files which are as big as 10-15 GB in size and to watch all those layers slowly and unnecessarily load up and then take just as long again to flatten everything really is torturous. Thankfully after learning this feature, I don't have to put myself through the pain of watching Photoshop load for what could be as much as 15 minutes.
New Guides for Perfect Alignment

There will be times when you need to know exactly where the middle of the image is and while there are a few ways to do this, I find guides to be a quick and easy way. Click on "View" then "New Guide" to bring up the new guide menu. You may have used this from time to time when wanting to know where a particular measurement of your image was but you can actually type percentages in there too. I use this all the time when I'm building pages for a book and I need to know where certain elements will fall. This technique is also a great way to quickly divide up a page both horizontally and vertically. Need to split a file into four equal sections? Guides can do that in a breeze.
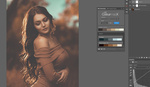
Have Additional Windows of Your Image on Screen

Did you know you can actually have multiple windows of the same file on the screen at once? Click on "Window" and then down to "Arrange" where you will see the option for a new window for the file you are currently on. I find this feature incredibly useful when retouching faces as I can see how it looks at various degrees of magnification without having to keep zooming in and out. I tend to have one window of my image always set at 100% and then another set much closer while I retouch. There's nothing worse than working on something at 300% to find it doesn't really work when zoomed back out. With additional windows on the go, you can literally look across the screen to see how things are looking without having to lift a finger. I can't imagine how much time this has saved me over the years.
So there you have it, eight lesser-known features which I couldn't live without when using Photoshop. Many of the features mentioned will hopefully make your life easier while editing and also save you some time in front of the computer screen. I guess I could survive if Adobe decided to remove all my favorite features in the next update, but I guarantee that my speed on the program would very quickly start to resemble that Luddite relative who types with only one finger and tries to move the mouse while holding it in mid-air.
Do you already use any of these features to make life easier in Photoshop? Any you think I missed off the list that deserve an honorable mention? I'd love to hear from you in the comments below.


This saving time tips are always helpful. I usually use shortcuts on my wacom tablet, but the combination of keys has been always great.
One that people sometimes don´t know is that you can Undo more then only one history state with "Cmd+Alt+Z".
Thanks for the tips, Paul!
You're very welcome Pedro, "Cmd+Alt+Z" is a very worthy one that should be in the article. My fingers have formed the position of that shortcut so much I don't even have look!
how did I not know this!! Thank you!
You never stop learning with Photoshop!
Great article. Learned something new today and I’ve used photoshop for 15 or so years. Thanks for posting.
Much appreciated Ken, Photoshop is definitely one of those programs which I'm still mastering even after all this time...
The only one I don't use is multiple views of the same image. It would be useful sometimes but I never think about it. :-(
Multiple windows is my favorite of them all. Even more valuable when you have a couple of monitors on the go at once.
I still never get tired of watching the windows update in realtime while I'm working. Feels like witchcraft!
Ashamed to say I didn't know any of those tips! Great article Paul.
Peter
Well I hope they will make your life editing a little easier Peter! : )
I've bookmarked the article for later thanks!
Peter
dannnnngg. Great article, saving to read for later
Thanks Reece! Hope you find it helps... : )
Very cool. Thanks for sharing these tips. Some I knew, but there's a lot I didn't.
You're very welcome Stephen, Photoshop is such a vast program that I don't think I'll ever get to the bottom of it! Hopefully, a few of the unknown ones will help make editing a little more productive... :)
I've been a user since...man, I think Photoshop 3 or something, and a few of these tips I've actually never heard of! Thanks- will definitely be using the latter four for sure.
Well that's great to hear Douglas! I have to admit that a few of these on the list have only been learned in the last few years.
I still don't feel like I've scratched the surface of the program even after all this time...
I don't use a mouse to edit anymore (wacom tablet), but one of the things I miss is using the scroll wheel on the mouse to roll through all of the blend modes. You're right in that it can give you an idea for the image that you weren't originally thinking of doing!
I was literally scrolling through blend mode just before I replied to your message! For the sake of 5 seconds, it really is worth a quick look at all the modes on offer. Except for dissolve, I have NEVER had a reason to use that one!!
Out of curiosity, do you know of a way to make a shortcut for the dual windows one? I love using it, especially for retouching, but going through the menu system seems so antiquated compared with how I have everything else setup...
Great question, I literally just worked it out especially for you! If you make an action and then while recording choose "Insert Menu Item" you can select the new window option and PS will record it. Then it's just a matter of adding a shortcut of your choice to the action.
Does that help??
Wow, that's awesome! Thank you so much!
No thank you! I now have a shortcut myself. :)
Great tips, thanks!
Thanks for stopping by John, it's much appreciated. : )
Great article Paul, thanks for sharing!
You're very welcome Andres, hope they are of some use... : )
For "Easily Group Layers", the illustration is correct (Cmd-G), the description is wrong (Opt-G).
Thanks for the heads up Joe I've just corrected it. Trying to write for both Mac and Pc sometimes gets me in a twist...
I also could've sworn it's Ctrl + G on windows, not alt+g.
Just corrected it many thanks David. Writing for both Mac & PC messes with my brain sometimes...
That last one is especially amazing. Going to use that so much!
It really is a game changer Carl, I love using them when I have two monitors on the go especially...
Did not know quite a few of these - the last one is gold ta
Thanks Robert, great to hear so many people finding them useful! : )
Don't know why but SHIFT and + or - doesn't do anything in me PS 2018....no blend mode changes....tried a lot, nothing helps...
Thats odd, are you on mac or pc?
Make sure you don't have any kind of brush tool selected (Brush, clone, history, blur, burn) as instead of cycling through the blend modes of the layer you are on it will be changing the blend mode of the brush instead...
and it is sad to say but loading flat image also doesn't work pressing SHIFT + ALT or both separately... with shift I receivew this and it still loads all layers
I have no idea why you are getting that error message.
In photoshop go to FILE, OPEN, then click once on the .psd file you want to open. Next hold SHIFT and ALT and THEN click OPEN.
I don't have PS 2018 but the two issues you are having work on every other version of Photoshop. These features have been around for a very long time.
Hope you get it sorted. Let me know...
please make a video
If I get time in the future I will Nissor, you'll see it here on Fstoppers first... 👍
Great stuff! Thanks Paul!
Glad you enjoyed the read Joe, thanks for stopping by. :)
Ohhhhh...that last one of the "picture in picture"...that is awesome, I can't wait to try that! These are great thanks for the share.
You're very welcome Jason. It's may favourite feature of the lot too. :)
Nice post. However. I use an IMac desktop. When I hit the shift and + or - button it does not cycle for me. Confused in Mac land
Excuse my copy and paste from a post I made above:
Make sure you don't have any kind of brush tool selected (Brush, clone, history, blur, burn) as instead of cycling through the blend modes of the layer you are on it will be changing the blend mode of the brush instead...
Does that help at all??
I think the key with this one (I just discovered this one in a Creative Live video from Ben Willmore) that the safe bet is to be on the 'move tool' selection as it doesn't have anything to scroll through...I haven't tried it myself yet though.
Excellent advice Jason it's what I do myself. I really should have added that to my article.
There's nothing worse than setting a bruse's blend mode to something else & not realizing to later on.
Thanks a lot for sharing these. The Additional Windows is really helpful for me. :)