
I am trying to brush up my photography skills in areas I am not overly familiar with. This week it was beer photography, and boy did I learn a lot.
I have made it my mission to do as much personal work and practice as possible in 2018. No amount of marketing and networking will ever replace a high skill set and good portfolio. In the U.K. we have finally hit summer and it's gloriously hot (for here). Summer always makes me think of fresh cold beers in a small country pub beer garden, so I thought I would take on the challenge of learning how to photograph a pint of beer. Here are a few tips that I picked up to make your beer photography better.
The Kit
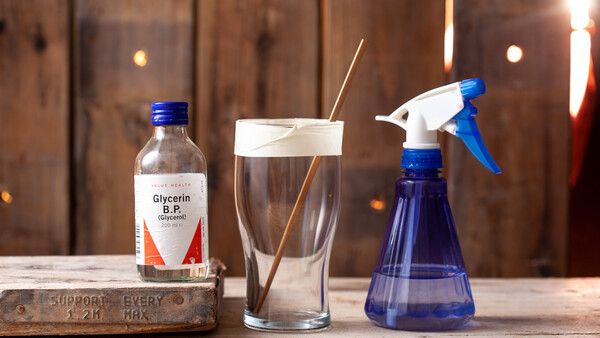
Obviously you need a camera and lights, but I am going to assume that if you are reading this that you already have those. Instead I am going to talk to you about the styling kit. As a minimum, you are going to want some form of spraying device. You probably already have something in your house that can be used. In this you want to make a mixture of glycerin and water. Somewhere around the 50-50 mark. There is a lot of fine tuning that goes into this and most stylists will never give up their secret recipe. This mixture gives the warm beer the chilled look, but it also stays in place, unlike a beer from the fridge which would drip and run. Alongside this a wooden chopstick is great to stir the beer with. There is an enzyme in the wood that helps to create a fizzy larger and a nice looking head. The final bit of kit is masking tape. I used this to mask off the top of the glass before spritzing it with the glycerine and water mix. It’s important to not have the frosting effect at the top of the glass where the head is as naturally it wouldn’t occur.
Time
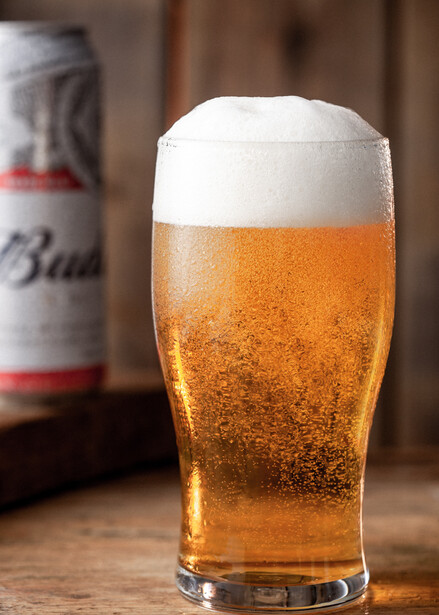
You will need time. It took me far longer than I anticipated, and I am certainly not 100 percent happy with my final image, so it's more likely to end up on Instagram than it is in my portfolio. I would set aside two hours for an image like this. Trying to rush it will result in hours of retouching. This image was just color corrected in Lightroom. Moving a light one inch has a massive impact on the final image, so there was a lot of trial and error as well as fine tuning.
Lots of Beer
I assumed I might need two pints of beer for this photograph. In reality, I ended up wasting around six pints of beer. Obviously if this isn’t your first time you will more than likely be more economical. However, if it is your first go, make sure that you have plenty of beer sitting about. Always buy more beer than you think you will need. Worst case scenario, you can invite your friends over to help you finish off the leftovers.
Polarizer
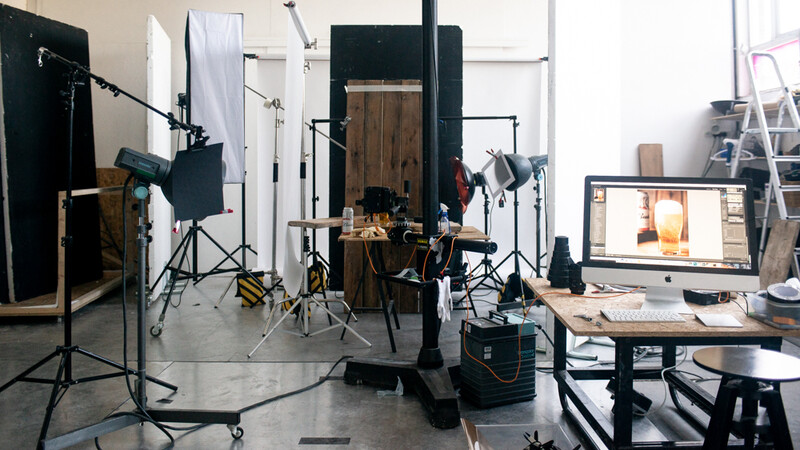
Photographing glass with studio lighting is a recipe for disaster. You will be plagued with reflections and glare. Having both lens polarizer and also polarizing gels for your flash will help you control these issues. You can pick up both for very little money online. You get far higher quality by spending more money on these items, but a budget one will suffice. These are probably the most important bits of photographic kit for this sort of work. You can get away with pretty much any camera, lens, and lights, but without these it would be a difficult task.
A Pipe
Once you have everything set up, you don’t want to move the glass (smudging your beautifully crafted frosted glass is not ideal) each time that you need to refresh the beer. Instead, use a length of pipe and a bowl to siphon the beer into without touching the glass. Remember to have the vessel into which you are siphoning the beer lower than the pint glass. Try to avoid drinking all of the beer during the shoot. Some of the glycerine will end up in the drink and it has a catastrophic effect on your bowls.
For those seasoned food and drink photographers out there, do you have any tips? If you have a go at this, please post your images in the comments.

Join the Fstoppers community for free
-
Post comments and join in the discussions
-
Browse the site ad-free
-
Share your work and get featured in the community
-
Compete in the photo contests for fun and prizes
8 Comments
What, no foam stabilizer?
A turkey baster also works as an inexpensive and efficient beer pump to remove dead beer.
An alternative to the masking tape is to use a nitrile glove (cuff over the glass). It fits snug and is easily removed without adding residue and/or fingerprints. An added bonus is that you can suspend and turn the glass by holding the fingers of the glove.
John
I think you meant "bowels", not "bowls". ;-)
Glycerin does not have a catastrophic effect on your bowels. It's actually edible and it's required in making fondant for cakes.
I never heard of the polarizer trick. I'll try that.
Great, now I want a beer!
rggedu.com has an excellent free tutorial on beer photography (it is a huge download).
It's even free right now. Sweet, thanks!
I know myself and folks at breweries have used these beer foamers from Norm Architects to foam the beer up for shoots. It's a silly gadget if you plan to drink the beer (although it does allow more aromatics to escape and in places like Japan they love beer foam) but they work great for putting a frothy head on a beer again and again when shooting.
https://craftbeertime.com/beer-gadgets/beer-foamer