
For me, flat lays are the king of food photography. Telling a story with a large flat lay is a challenge, here is how I approach it.
When I first started food photography, like many of us, I shot individual dishes for restaurants and cafes. A bit of window light and probably a 50mm lens wide open. As I started to get more clients and larger clients, the style of work and the client requirements began to change. Speedlights made an fleeting appearance before moving onto large studio heads and a variety of lenses.
Camera Settings
My flat lays are usually shot in the studio. With this in mind I have a lot of control over my camera settings. With the Canon system I shoot at ISO 160, 1/100 s, and f/8–f/10 (depending on the lens characteristics). When I shoot Phase One I use ISO 50, 1/120 s, and f/10.
The large depth of field allows me to capture more detail, sharp images, and also to be sure to have the shot completely in focus. I don’t think that it looks nice when the top of an wine bottle blurs away nearer the camera and becomes more in focus toward the table. Again, that is personal preference.

Lens Selection
Assuming that you don’t have some crazy cherry picker in a warehouse, your lens choice will probably start off my being a practical choice. If you shoot 35mm cameras then probably a 35mm lens would be a good starting place. You won't get too much distortion at the edges, but it will capture a lot. If you have a good studio stand or C-stand for your camera, then maybe a 50mm lens would be a better option.
I tend to use a 35mm or 50mm on the Canon system and then a 45mm lens on the Phase One system. High resolution is also a good idea here. Lenses that resolve a lot of detail will really help to bring the image to life if you print it.
Lighting
Lighting is key to food photography. For most of my flat lays, I opt for a soft light as its what my clients are looking for. Of course, it can work with loads of different lighting styles, but I am assuming you are a beginner if you are reading this, so let's stick to a big soft light source.
The key to a nice evenly lit flat lay comes from the good old inverse square law. Even if you work with only available light, it is vital that you know this inside out. I tend to use a large softbox placed far enough back to only lose a third of a stop of light from top to bottom of the shot. I then often add a scrim nearer to the shot and sometimes I add flags to create shadows or cool hot spots. There is a lot of trial and error that goes into finding a lighting style that you like. Then because of the distances and size of the shots, I often need between 750 and 1,000 watts of light to achieve the camera settings I want.

Composition
Live view is pretty much a must for me. If shooting Canon I use the Canon EOS Utility with auto-upload into Lightroom. If I am using the Phase One system I use Capture One with its built-in live view. I then have this go to a large screen in my studio so everyone in the room can see it as we work. Being able to point to a screen when talking to a stylist or art director significantly decreases the chances of any confusion when direction is given.
The key to composing a large image is to have a system and to start small. If not, it will quickly become a mess of items. My method of placement is as follows.
Place any issues that will cause lighting problems down first. Chrome, bright white foods that may clip if too close to the light source (rice is a real pain), etc. Then it is time to add the heroes of the shot. These key items often want to apply to the rule of thirds, but remember that rules are their to be broken. At this stage I will usually adjust the lighting to make sure that it is in sync with the composition of the hero item or items. Once I have these items places, I start to build around them. I look to build triangles out of all the items I place on the board, being sure to avoid creating straight lines where items seem to stack on top of one another. It can take a while, and there is a lot of trial and error involved. You will need to re-shuffle as the build takes place. The trick here is to keep the context of the items and their relationship in the food world to one another in tact while simultaneously building physically strong compositional shapes with the items. I would always take relationship over composition though if I were in a pinch and running out of options. Breaking the image down into lots of smaller three-item images will help greatly with this. Then you just need to make sure that each three-item image works with each other. It sounds tricky, but its really just a case of taking your time, and it does take a lot of time.
Styling and Style
Styling comes down to two key areas. The styling of the food itself and the styling of the shot. For example, the image below is a Scandi-inspired food image, with food that has been well styled by Elle Jane.
So the first step is to come up with a style. It is key to have a constant style or theme throughout the shot. In the case below its Scandi; it could be a Parisian brunch, student living, or pretty much anything you chose, but you need to go all in.
Props and backdrops can make or break a food shot. I have an article about backdrops here so I won't go into too much detail on that front. Props, however, are a bit of a minefield. You really need to know your stuff to be able to curate a consistent theme with the props. Once you have the food, props, and backgrounds all synced, you are on your way to a strong food image. Having great props will help you more than having a great camera.

Next up is the styling of the food. The bigger the shot and the smaller it will be displayed, the more slapdash you can be. If you have 100 items on a table and its for Instagram, it doesn’t need to be perfect. If you have 20 items and it's going on a billboard, you are going to want a couple of food stylists to lend you a hand making sure that the food looks how you want it to taste. If the food doesn’t look amazing, you are fighting a losing battle from the get-go. No amount of trickery in camera or post will help you get over bad food.
The main take home is that it takes a long time to get these shots. You need planning and patience in equal measures.


This style of photography has a lot of storytelling potential. Many photographers overlook storytelling and just arrange a bunch of ingredients in a way that’s beautiful, but doesn’t actually make any sense.
A typical one I saw recently had all the raw ingredients for pasta, including raw eggs, piled up directly on the table beside finished bowls of pasta! The only story it told me was one about someone with a strange psychological illness that makes them meticulously arrange everything for cooking, then give up and just order out.
I agree, story telling is so crucial in almost all forms of photography, but camera and lighting trickery are often prioritised.
It is very time consuming. We would often only do 2-3 in a day with a team of people working on them.
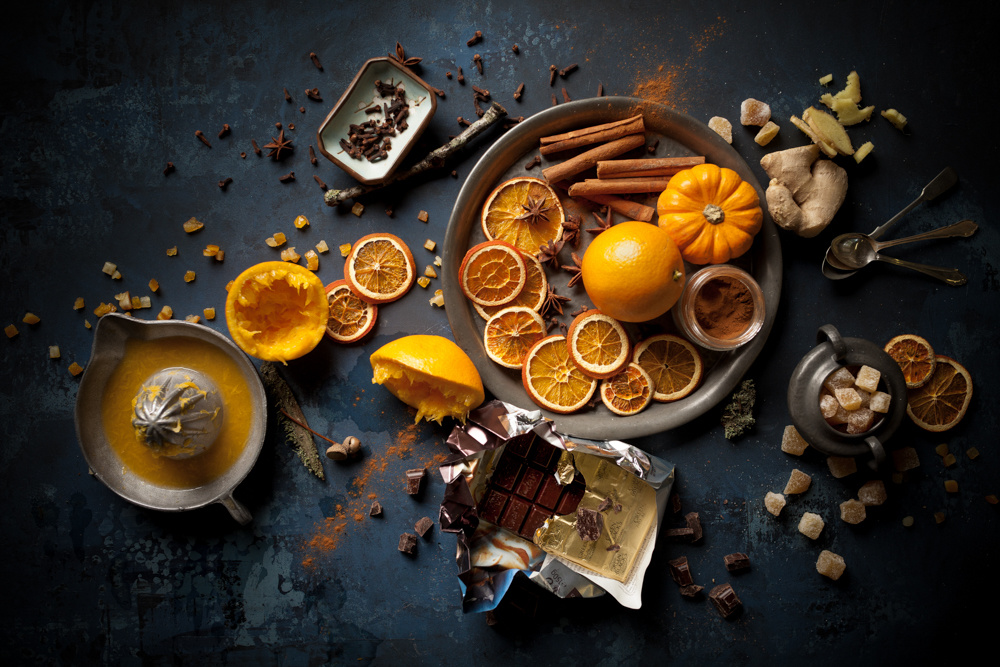
The biggest lens I have used is the 80mm int he breakfast shot. The raw meat is a 45mm and the oranges on blue is a 35mm to give some idea as to what the lens will do to the shot.
Nice article. :)
Thanks
I have always felt that- when employing large/safe sources as most pros employ- the kudos for most food imagery lies with the stylists... Not a whole lot of complex artistry on our ( the photographer’s) side honestly... Thankfully most food images people are used to are taken with no lighting control and an iPhone- not tough competition I’m afrad!
haha,
Yeah food stylist are the most under appreciated people in the world of photography. The rest is painting by numbers and understanding trends and style.
I took this two weeks ago when I was bored with all my outdoor photography. The one thing I don't like is the hot spot bottom left on the black table, but I couldn't get the light I had arranged in a way so it would illuminate nicely and not be visible on the table.
I used those cheep lights for it https://www.amazon.de/gp/product/B00S87X6Q2/ for 25 EUR.