
Weather conditions aren’t always perfect when shooting landscape photography; let's be honest they are usually not ideal. One way to turn poor weather into something special is by using a 10-stop neutral density filter which allows you to take very long exposures during the day resulting in some unique images.
Weather is likely the most important factor when shooting landscape photography, yet we have absolutely no control over the conditions. To make things even more complicated, sometimes the worst weather can result in the best photos and great weather results in very lackluster photos. So how do we go about predicting the weather? The reality is, we don’t. Our best option is to be prepared for any condition and work towards finding something captivating in what is presented to us. Many tools exist for helping battle these varying conditions and one of the most important is the neutral density filter (ND).
The ND

There are many types of NDs that are used by landscape photographers: 3 stops, 6 stops, 9 stops, and even 16 stops (plus many more). I specifically want to focus on the 10-stop neutral density filter. It doesn’t necessarily need to be a singular ND filter that blocks exactly 10 stops of light. As long as you are blocking enough light to require a long shutter speed while still daylight outside, say 45-plus seconds, that is all that matters.
There are many applications and scenarios you would want an ND filter for, Elia Locardi discusses how to use them in “Photographing the World” all the time. I specifically want to focus on using NDs to create long shutter speeds for dramatic effects in the sky. I’d also like to be up front and honest that I don’t use my 10-stop ND very often as it requires certain conditions for results that I find pleasing, more on that later. So don’t feel like you absolutely need to have this if you are just starting out, unless of course you enjoy the results it gives.
Bad Conditions
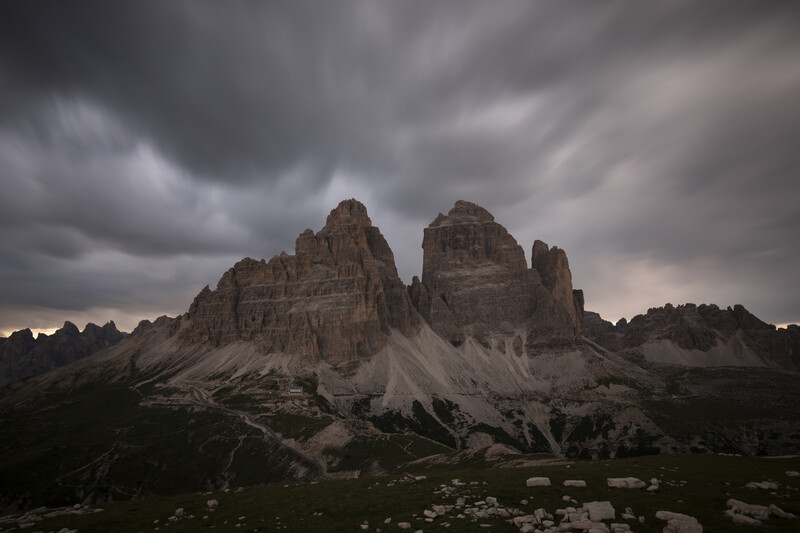
Hiking to a spot for sunset and having overcast skies can completely ruin your shot. This is exactly what happened to me last night in the Dolomites of Italy. Thankfully I was able to salvage the night using my 10-stop ND by turning some fast moving overcast skies into something unique. Let’s start by looking at what our shot looked like without the filter.
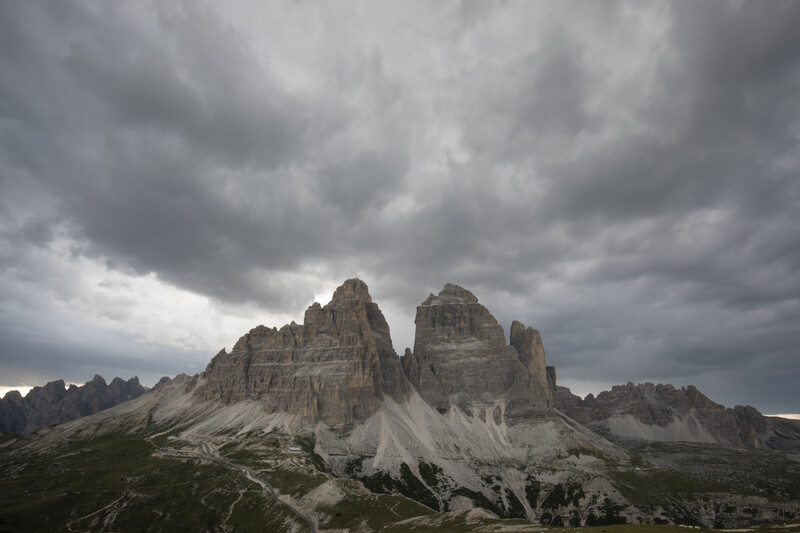
You might be asking why I even took this shot. I’d love to say it’s for educational purposes but alas, it was just a boring shot I snapped while waiting for sunset. Believe it or not, I have catalogs full of boring shots, we all do right? This is completely unedited and straight from the camera as if it wasn’t boring enough already. As you can see the weather was pretty lackluster and certainly not what I was hoping for. Thankfully the conditions seemed great for shooting long exposures.
What conditions qualify as “great” when shooting with with such long exposure times? Personally I want the clouds to be moving away from my subject and towards my camera, creating a bit of a zoom feel. It is also ideal for the sky to be densely filled with clouds which is why overcast tends to work well. This doesn’t always happen and the best thing I can recommend is simply going out and shooting to see what looks best to you. Remember that our ultimate goal is to salvage the bad weather by adding drama to the sky which can be done in many ways.
Adding the ND
The first thing you’ll notice is how dark the image is, that is because I’m showing you my incorrect guess at exposure. Getting the correct exposure can be difficult even when using a calculator. Obviously by adding a 10-stop ND I should simply be able to increase my exposure by 10 stops however that might not give the results I want. I want the clouds to look wispy but not completely blurred. This is something you have to do by trial and error because the speed of the clouds determines how long you need your exposure to be. Something else you will notice is a slight purple tint in the image. This is typical from most high density ND filters. You can correct it a decent amount in post but sometimes I like the added color.
Another challenge when shooting with such high density NDs is finding your composition. Using a square/drop in filter system makes this a little easier because you can slide out the ND and reposition your camera easily. Using a circular ND requires you to find your composition before putting the filter on which is what I had to do here. I own both types but only had my circular ND with me at the time. Just keep in mind that you should lock in your composition on either system as it will save you valuable daylight.
Perfecting the Shot
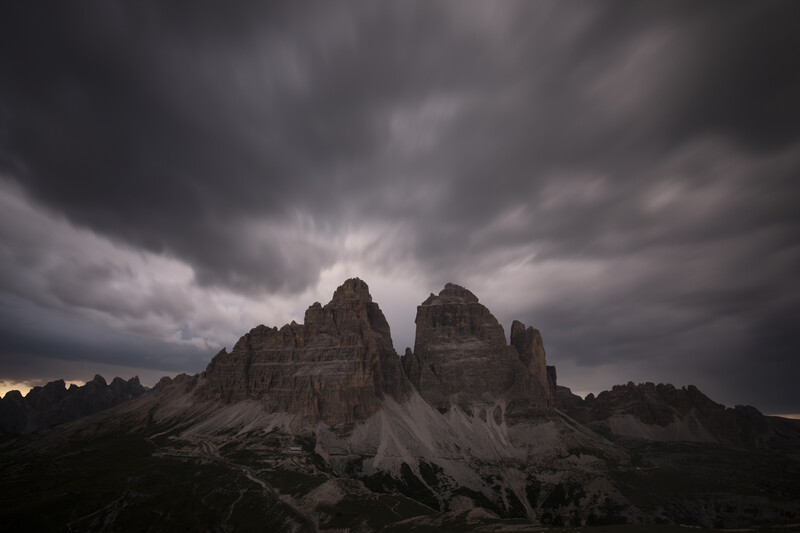
Let’s take a look at a few exposures to show how I found the results I was looking for in my final shot. Note that my composition changes as I am shooting. This is contrary to what I recommended earlier. While I was shooting and trying to find out the best exposure settings, I was also looking for a better composition.
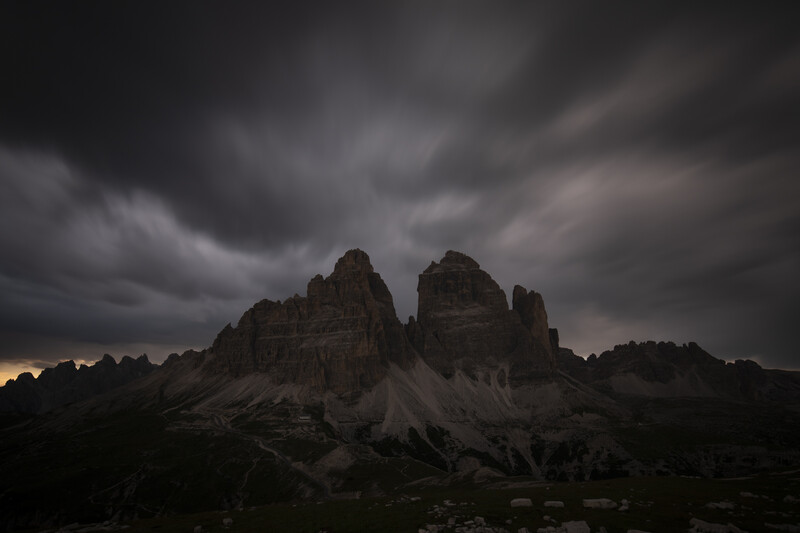
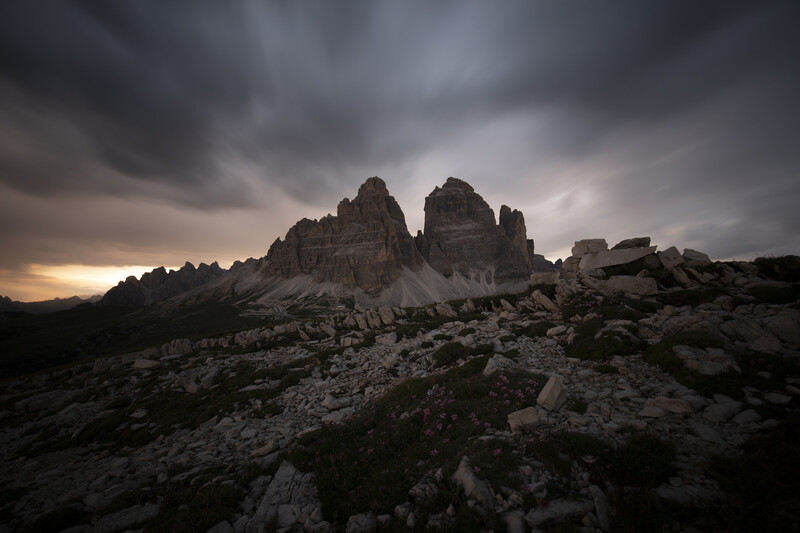
All of these are completely untouched, straight from the camera, and in chronological order from when I captured them. I omitted one image I completely botched the exposure on by accidentally increasing my aperture. Here are a few things of note when comparing the images:
- Comparing the first and second images, notice how doubling the exposure time effects the look of the clouds.
- You can see how your focal length effects the clouds in the 3rd and 4th images by changing from 24mm to 16mm. My thought process when shooting was to make sure the subject was pronounced, in this case Tre Cime (the three rock spires). Zooming out results in my subject being smaller but really showing the drama in the sky which I ended up preferring.
- Don't be afraid to boost your ISO when shooting with such a strong ND. My final image is the same as the 4th image here just with the ISO set from 250 to 400. It is always a goal to keep ISO as low as possible so don't go overboard.
- Don't forget your other photography knowledge. Just because your shooting something unique doesn't mean your composition should suffer like mine did in the beginning.
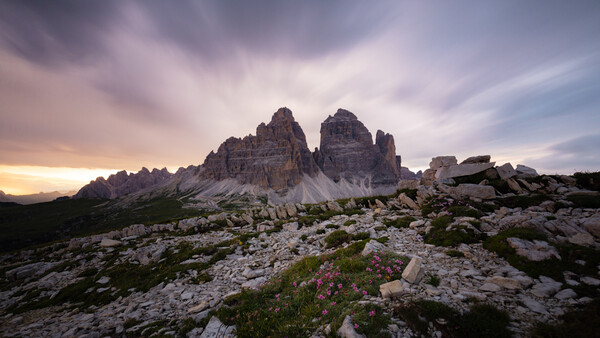
The Results
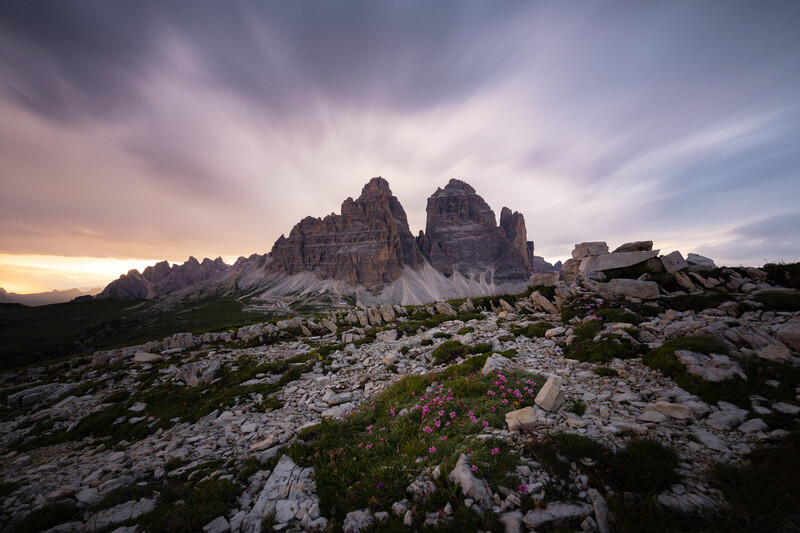
Maybe this photo isn't winning any awards but it certainly looks better than our initial image before adding the ND filter. That isn't saying much though, did you see that first image? I also kept the edit very light as I wanted the results to be accessible to everyone. No Photoshop was used, just a few sliders adjusted and one radial filter on the flowers. Typically I would spend much more time editing but wanted the final result as honest as possible. I also got a tiny bit lucky as I was shooting that a bit of light started poking through on the left hand side to add a bit of color into the clouds.
So what do you think, did using a 10-stop ND improve the results to your taste? If you have ever shot long sky exposures like this I'd love to see some of the results in the comments. If you have any questions don't be afraid to ask away.

Join the Fstoppers community for free
-
Post comments and join in the discussions
-
Browse the site ad-free
-
Share your work and get featured in the community
-
Compete in the photo contests for fun and prizes
25 Comments
Good post. It's one of those options I rarely think about until someone like you reminds me.
Love the effect here and certainly think it turned what was likely an ordinary shot into something much better!
Great article Alex! I love the images.
Thanks Michael! You're too kind.
great article. I totally agree, that's why I always have this filter in my bag. Just one question why Iso 400
ISO 400 along with a 90s shutter and f/8 aperture gave me a decent exposure EV and the look in the clouds that I wanted. Also it started raining shortly after these were taken so I didn't have more time to possibly drop the ISO lower and extend the shutter speed a bit. No specific reason for ISO 400 aside from that. Hope this answers your question!
thanks for your reply, I understand
I have a 9 stop Hoya ND400 filter that's one of my favorite accessories. I printed this shot (16X24) and then coated it with Art Resin. It makes for a very dramatic image to hang on the wall. A 30 second exposure.
Awesome! I bet it looks even better on the wall. Such a great feeling printing your work isn't it?
It is nice to see it in print. I see so many terrific shots on Fstoppers. It would be an interesting exercise to see just how many do print, whether through a pro lab or at home. We all have an image or three that just makes us smile. Those images deserve not only to be printed, but displayed.
I've been told that it's an ego thing that makes one hang their own prints in their home or office. Horse Hockey (thanks, Col. Potter :-) ). We should be proud of a nice image and displaying it is a fitting end to the work flow.
If it's an ego thing than apparently I have one too! Haha. I love printing my work, it's extremely satisfying.
I love my 10-stop filter, almost never leave my house without it. I even combine it with my 6-stop for some super long exposures during mid day.
Maybe I don't use mine enough!
319 sec exposure (thanks Olympus Livetime)
ND1000 filter at dawn
Nicely done!
The photo you ended up with is no prize winner and does not fully exploit the technology you are touting. Next time, bring a small ladder with you and get 3 feet off the ground to correct the excessive amount of foreground in the photo.
I realize that carrying a ladder into the country can be regarded as overkill, but when you use one once to alter your foreground/background perspective for landscapes, you won't leave home without it.
I have a small aluminum 3 footer that I have mounted a wooden carrying handle on to facilitate hiking in the desert.
Maybe Alex likes the foreground elements in the image. I certainly do. Although I am not the author, I find your choice of words offensive - "get 3 feet off the ground to CORRECT the EXCESSIVE amount of foreground in the photo"?? Really? Use of the term "correct" implies that something is wrong and needs to be corrected. Inclusion of foreground elements is frequently done in landscape work - it gives more of a 3-d feel to an image.
I'd be interested in seeing a fully edited version (e.g., some dodge & burn) of the "keeper".
BTW - good article.
Thanks for the kind words Philip! Once I get home maybe I can spend a bit more time editing this one. I'll be sure to tag you if I do. Everyone is entitled to their opinion and I think Gary had some good advice, even if delivered directly :)
Gary,
I certainly agree with you that my final image isn't spectacular by any means. I didn't do much work to it in the edit and even the original image is lacking the light/dynamics I'd want from a portfolio shot. As Philip Smith said, I could put much more work into a fully edited version. I purposely didn't edit this final image much for the sake of education and accessibility.
I'm currently backpacking through Europe so having a ladder isn't possible. Maybe you are in much better shape than I am but just the 8kg backpack after 8-12km is enough weight during a hike. Having a ladder sounds like a great way to get new perspectives and certainly something I've had in mind. As for having the foreground take up so much space, you can see in the first shots I had no foreground. Personally I like the look of the flowers in the foreground but will gladly admit it's busy and not ideal. If I were to spend more time editing this, I'd likely expand the size of the mountains in relation to the foreground which I may do once I arrive home to my desktop :)
Wow, seriously a ladder would be the very last item that i would carry up on a 2000 meter mountain. How do you even place a tripod on a ladder?
@ Alex: Good read
I live in the desert and before it was over developed, spent much time doing landscape photography. I'm pretty good with my hands and built a 10 foot high tripod from aluminum channel. I would then take it, an 8 foot ladder, and my 4x5 view camera, out into the desert, piece by piece.
Yeah, I was in my early 30's at the time, and had the stamina and determination, and it resulted in some marvelous photos.
You just need to have the will -- or deep enough pockets to hire 1-2 assistants to help.
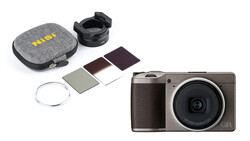
Thank's Alex for this article. I've been thinking of purchasing a ND filter for the same reasons you've written about. But being on a budget have not decided between a ND6 or ND10, I've been leaning more towards the ND10, can you give any advice with this? I'm also curious to which brand you use? I've been looking at Nisi.
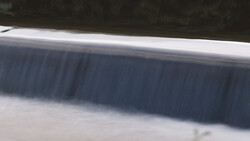
Gareth, Personally I think the ND6 is a bit more versatile but won't give you these types of results. The ND6 is more for controlling your aperture in the sun where as the ND10 is for pushing your shutter speeds to extreme times. The ND6 is also good for shooting waterfalls in the daylight and getting movement in the water. This isn't a complete list of course, there's plenty more you can do with both filters but they do accomplish different tasks. Thus you just have to decide what you want. The ND10 is a bit more niche but does what you seem to want.
As for brand, Nisi is decent although I don't have any personal experience with them. Mine is a B+W but it certainly has a color cast to it. I know breakthrough filters are well regarded too and their new magnetic system seems nice. Are you trying to get circular or square? I don't think you can go wrong with Nisi or Breakthrough.
Hi Alex thanks for the reply. I'll need a square filter to use with my Tamron 15-30mm. After reading this I'll be going ND10. I've recently seen that Nisi has a square filter system that also holds a circular polorizer too. Thought this looked very interesting and definitely something I'm considering in the future.
Gareth, The Nisi system has great reviews. I used one from Wine Country Camera which you can find a review we did here:
https://fstoppers.com/architecture/fstoppers-reviews-wine-country-camer…
I actually wrote a personal review of it here if you'd like another perspective:
https://www.alexarmitage.com/blog/2018/4/20/wine-country-camera-filter-…
That said, it's a bit pricey and bulky so I wouldn't absolutely recommend it over everything else. I would highly recommend it for the points I made in my review but would also understand if you want something a little smaller and a little less expensive but clearly I found the price to be worth it.
Hope this helps!