
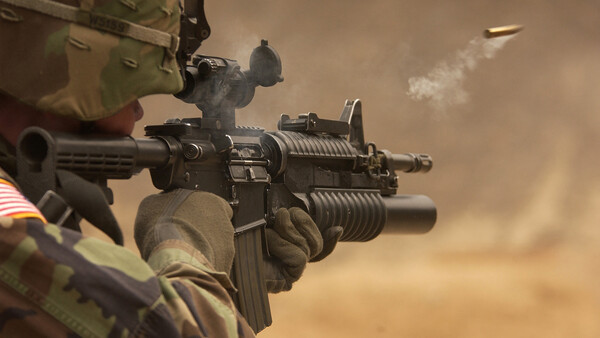
We use the verb "shoot" when we take pictures. The similarities between photography and the actual shooting of guns nearly stop there. Nearly.
Some years back, I was photographing a motorsport event for the first time. I had been practicing with my frankly dreadful Canon 75-300mm telephoto lens, but was having a little trouble. You see, I wanted to do panning shots and low shutter speeds, and any movement I needed to make would be along the x-axis or none at all. My issue was that I was moving up and down a little too much, or up, down, left, right, forwards, and backwards if I wanted no movement at all. This was a long time before IBIS and lens stabilization were commonplace, so I headed to a photography forum I was a resident of to ask the question.
The bulk of the answers were useful, albeit seldom applicable to my particular situation. I was told to use a monopod, brace against a wall, or lie down to take the shot. All of these are sound advice, but they weren't what I was after. Then, a veteran marksman chimed in to see if he could help; he could. He told me to always shoot at the end of an out-breath. Don't hold your breath, as that will unsteady you further, as will shooting as you inhale. The moment at the end of an exhalation is the most still you will be, he told me. Well, it worked. I've since learned it's called Natural Respiratory Pause.
A few of you will know I was testing the Fujifilm GFX 100 last week in Tokyo. At the launch event, I went up to the rooftop at late dusk to see what the lowest shutter speed I could go to was and still retain tack sharp results. The camera has an impressive IBIS system, and so, I wanted to see what I could achieve when combined with this marksman's technique. (It was about 1/8, though I think I could get that down further in all honesty.)
This got me wondering on my flight back to foggy old London town: Are there any other tips marksmen have for a steady shot that can transfer over? Here are the best I've found.
https://www.instagram.com/p/BwGwh01n6VC/
Top 3 Tips From Marksmen
1. Shoot With Both Eyes Open
This will feel counterintuitive to many, and it took me a while to figure out. A lot of us are taught to find our dominant eye, and then close the other when looking through the viewfinder or rangefinder. I once was told, anecdotally, mind you, that shooting with both eyes open allows you better control over your scene and subject. It made a lot of sense to me, and now, I do this technique for all but just a few genres (macro is too difficult to be as effective).
The advice to marksmen is broadly the same, with the general consensus being that it can improve your tracking of a target and awareness.
Always try to shoot with both eyes open. Using all of your peripheral vision enables you to pick up the target earlier than it would if you close or dim one eye.
Replace "target" for "subject," and this becomes pertinent to photographers, particularly those shooting street or events.
2. Standing Positions
I've heard so many conflicting pieces of advice on this one, I barely know where to start. So instead of starting, I'm going to outsource to the wisdom of a guide for marksmen: A Marksman’s Guide to the Standing Position.
There are three primary variations of the standing position. I bucket all of the other techniques I see into one of these categories:
- Tactical: Characterized by a forward lean and aggressive stance
- Erect: Upright with the spine nearly vertical and over the center of gravity
- Target: Slight rearward lean with the supporting elbow braced against the hip to provide a rest
It's easy to scoff at the idea of considering a standing position, particularly as cameras don't have stocks, recoil, and so on. But it can have a more profound impact than you might realize. Try to take a shot at 1/30th while standing in the described "erect" upright position above. Then, try to do the same with your arms extended away from your body. I guarantee you, 9 times out of 10, the three postures above will yield sharper results than careless and loose technique.
It's funny, because the author's comments in his conclusion are echoed in photography too: it's not an important skill until you need it, and when you need it, you need it now. I shot an event last summer where just as things were kicking off, someone managing the venue came over and told me I couldn't use flashes after I had explicitly asked her employees more than once if it was ok. There was about 10 to 15 seconds between me having to start shooting in a very dark venue and this bom shell. Had I not had experience of standing correctly, bracing, breath control, and so on, I'd have come away with nothing.
3. Natural Aiming
I'm going to alter this point slightly to fit our discussion, but it is relevant. In every guide to marksmanship or competitive shooting, there is talk of where the gun aims naturally. The phrase I've read just about everywhere is this: "The rifle must point naturally at the target without any undue physical effort." What they mean — as far as I can tell — is that the gun should be centered on the rough location of the target to begin with, and its resting state should be looking in broadly the right direction.
This is great advice for photography too. Not only will you capture far more if your resting state is with the camera facing directly where the action is happening, but not having to twist and tilt the camera will result in better final images. If you're twisting and tilting the camera to get a shot, you're likely to fall off the focal plane if it's narrow or land the subject in distorted areas of ultra-wide angle lenses, for example. Not to mention loss of sharpness, motion blur, and a plethora of other issues. This is a good practice to get in to, even if not as directly translated.
Conclusion
Honestly, there is far more crossover than I had anticipated. It's perhaps not as pertinent to some genres of photography, but for disciplines like wildlife or even events, there's some great information to be had. I'll reiterate the conclusion of one of the marksmen educators that I think is particularly true for us photographers to when it comes to being able to shoot handheld in low light: it's not an important skill until you need it, and when you need it, you need it now.
I'm a Brit, and guns are alien to me. A large portion of our readership is from America, so I want to see some more tips from you gun-folk in the comments below!
Lead image by Pixabay via Pexels.


16 Comments
Actually I found the opposite...photography has helped me in my HFT shooting...I can hit a quarter at 50 yards with a .22 pellet no prob.
Hmmm
Make a loop at the end of camera strap... slip on arm near armpit... pull tight until blood stops flowing thus negating your heart beat that can throw off your camera aim.
Wrap sling around forearm thus locking camera into a solid shooting position for offhand setting or prone shooting positions.
Do not aim camera...aim body... close eyes relax and open them... if on target begin brass... if not move your body and try again.
With body aligned begin brass
Breath... take in breath and let out halfway then hold...half way is better than when fully exhaled... this way your heart will not increase its beat to compensate for lack of oxygen.
Relax... this will prevent pushing or pulling the shoulder in anticipation of the shutter release that can ruin your aim.
Aim... put a rule of thirds intersecting line at the 6 o'clock position to your target
Slack... gently press the shutter button until all slack is removed
Squeeze... continue to slowly squeeze the shutter button until the camera shoots.
If you have done this correctly you will not know when your camera will fire.
If desired use a carbide lamp to apply lamp black to the eye piece to prevent wraparound glare.
use a non slip glove on shooting hand for a better camera grip
don't forget your shooting log book to check hyperfocal distance for each shot.
It is best to snap in with your camera as practise... otherwise find a suitable target and practise using brass( Breath, Relax, Aim, Slack, and Squeeze) in various shooting positions until it is second nature.
Da Daaaa perfect shot.
Butch
Lots of similarities.
I hate the constant firearms comparisons with photography. There are plenty of activities where a tool is pointed at something else we could be comparing.
Maybe building model airplanes. Optics are often involved. A steady hand is required. Observation and attention to detail are paramount. It’s perfect!
Tell all the Brotograohers in their that photography is just like building models. Also that Photoshop can be used for more than making gushing Jordan Peterson memes.
1. Carry your camera with you at all times.
2. Look for carry solutions for your camera, lenses and other photography gear that facilitate not only safe transportation but also quick access even from awkward body positions.
3. Be prepared to exploit even the smallest window of opportunity.
4. Practice with your gear until all manipulations become second nature and can be executed without consciously thinking about.
Some more rules from tactical shooting that obviously carry over to photography...
I'm both a firearm shooter and a photo shooter. The crossover is very strong. I use a support with both whenever I can. When using long lenses (600mm, etc.) I use a tripod with a gimbal head and approach the action much as I did when I shot the .50 Cal M2 machine gun. Planning ahead - even by a second or less greatly improves your output. You learn to lead your subject. I set up the tightening knob on the lens shade like a front sight and look over the hot shoe as the rear sight.
I watched a special on tv about snipers in our military; they gave a quick comment on how they will fire on the exhale of a breath for a steadier shot. I've actually used that whenever I need a slow shutter hand held.
I think I got it
Source: GallowBoom redddit
I love this! Hilarious!
A few years ago, I found this article from a Pentax forum about ways to steady the camera.
https://www.pentaxforums.com/reviews/long-exposure-handhelds/introducti…
If you happen to hold your breath, shoot within 5 seconds. this is because there is less oxygen in the blood of your eye and your vision will get slightly blurred. USMC
Semper Fi
To add to the above... if you find your shots are consistently to the left or right of your proposed target or horizontal camera blur this means you are anticipating the shutter release and are pushing forward or pulling back with your shoulder when you tense up... this is easily rectified in the following manner. Lay on the ground on your back. Have a friend stomp firmly on your shoulder wearing a heavy soled boot. Then when you tense the pain will remind you... don't do that.
If you are consistently below your target or vertical camera blur you are not slowly pressing the shutter but jerking downward causing the camera to move downward... this too is easily rectified. Lay on your back with your arm extended... fingers outstretched ... Have a friend stomp on your shutter finger firmly. Then when you come in contact with the shutter button the pain will remind you.... don't do that!... USMC
I used to shoot 10m air rifle, which is probably very analogous to photography since there's really no recoil. Yeah I definitely see a ton of comparisons. I was shooting a motorsports event last weekend, sprinting up and down hills and stairs to get to shooting locations. I was thinking I need to train for biathlon! hard physical exertion then stop and take an accurate panning shot before sprinting again.
As someone who does both, there are some good similarities between the two.
Always have the camera handy, already set for action, S,A iso, all set correctly for the condition, DO IT right now.
Brace yourself wherever possible.
If you're using iron sights, two eyes are fine, if a scope, one eye closed. Use a rangefinder ?, then shoot with two eyes open if you can.
Legs apart more stable. One ahead of the other ideally. Not too far as you may be wearing a kilt.
If it's crucial, take that shot at the end or near thereof of the exhale. Never hold it though. Select a higher iso or shutter speed if it's crucial.
Gentle on the trigger, be a gentle lover to your shutter release. No snatching, ever.
Use the strap to get it steady, around your wrist, adjust it accordingly.
RMAS
I would add an instruction from hunter training that I see violated constantly by photographers. Look to your target and beyond. Duh!