
Everyone and their Auntie seem to sell Photoshop action sets these days, as if they're the answer to something. I'm primarily referring to action sets which create entire "looks" for your image, but there are uses for actions which are less comprehensive and arguably more useful. For example, I use an action for sharpening my images which creates a layer I can lower the opacity of or mask until it is satisfactory. Actions like these are easy to create and can result in accrued time saved. This guide will ensure even people whom have just picked up Photoshop for the first time can create actions.
Action sets can be as simple or as complex as you like and while there are nuances for creating more comprehensive actions that I may create a walkthrough for if there's enough interest, this will be a simple guide for how to get started. If you're somebody who edits large batches of images or finds that they conduct certain techniques time and time again, action sets can speed up your work flow. My first example action will be nice and simple as a foundation using images straight out of the camera (albeit converted to black and white in this case):
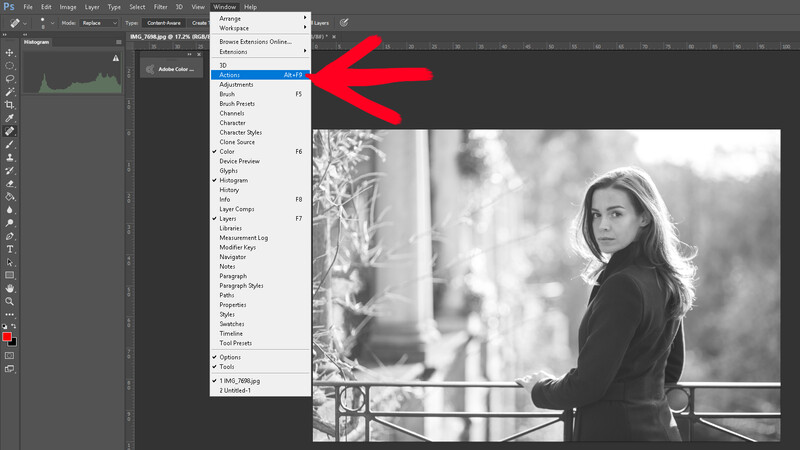
Step 1: The Action Window
No explanation necessary here, just navigate to "Window" and click "Actions" or press Alt+F9 (Option+F9 on a Mac).
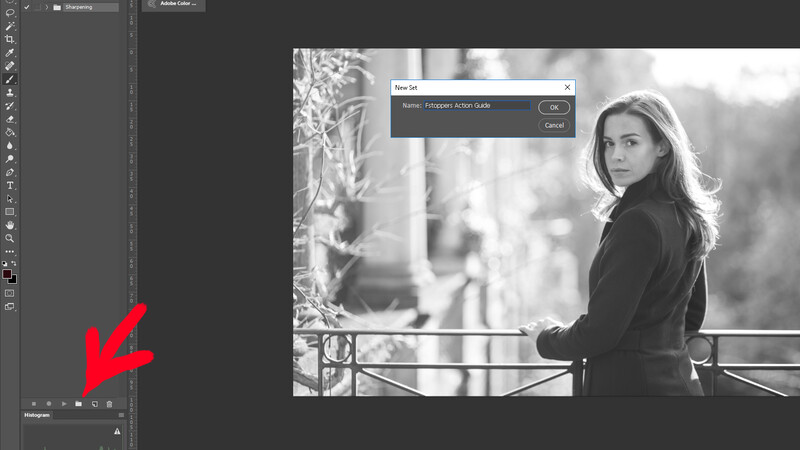
Step 2: Create a New Action Set
Simply click "Create new set" at the bottom of the Action window and name this folder which will contain actions you create in this group.
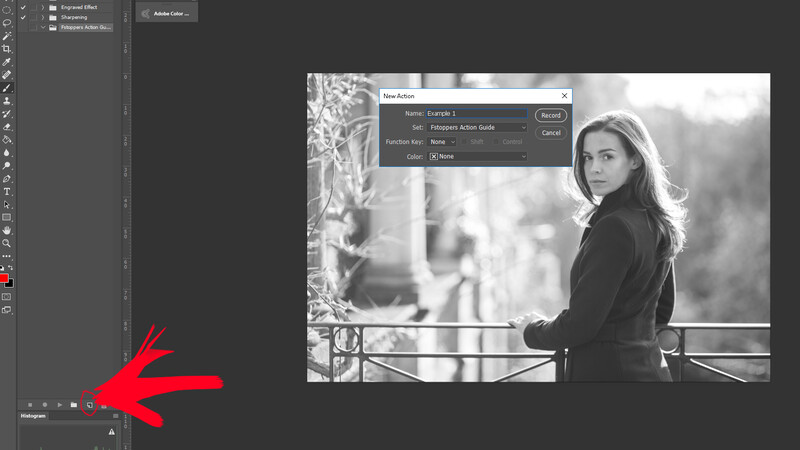
Step 3: Create a New Action
Inside your new actions set, click "Create new action" and name the first action you will create for this set.
Step 4: Recording the Tasks
This is the step where you get Photoshop to record each task you perform. For all intents and purposes, there isn't a limit to how many steps you can add for your action to perform when you click it, but complicated actions ought to be created carefully. One aspect to keep in mind when creating your own actions is whether or not what you're doing relies on something that isn't in the action. Every action you create must be self sufficient and everything it needs must be present when you press the action or created by the action in an earlier step. For example, if you have named a layer "skin" and you create an action in which that layer has the midtones boosted slightly, the next time you press play on that action, it will hunt for a layer called "skin." If there isn't one, there will be an error.
As a simple example, for this action I want to do three things: Firstly, I want to duplicate my background layer which is always a great habit to get in to. Secondly, I want to use a cinematic technique called "crushing the blacks" which is performed by creating a curves adjustment layer, raising the shadows, lowering the darker midtones, and then raising the midtones back to where they would have been originally. Then, thirdly, I want to crop the image to a 16:9 ratio.
I press the record button at the bottom of the Actions window (denoted by number 3 in the image below) or in the pop-up when you name the action and I then perform the three above steps, in order, and finally pressing stop.
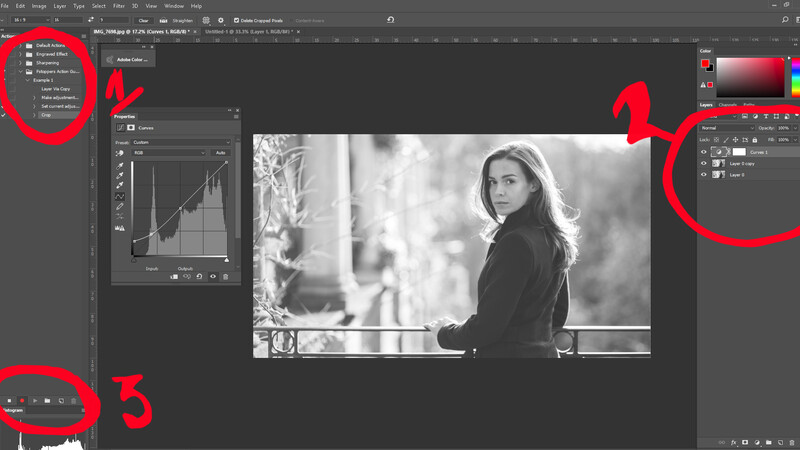
In section 2 of the above photo, you can see the tasks I am performing, and in section 1 you can see what the action has recorded. Once I press the stop button to the left of record at the bottom of the action panel, everything in section 1 will be what the action performs when executed. Presently, whichever photo I use that action on will have the background layer duplicated, that exact curves adjustment layer applied and then it will be cropped to 16:9 ratio.
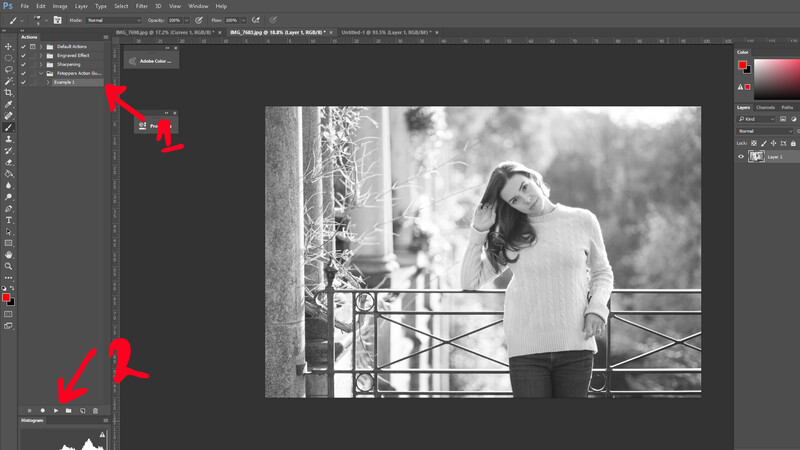
So on your next image, simply open the Actions window, highlight the action you made and click play. Example:
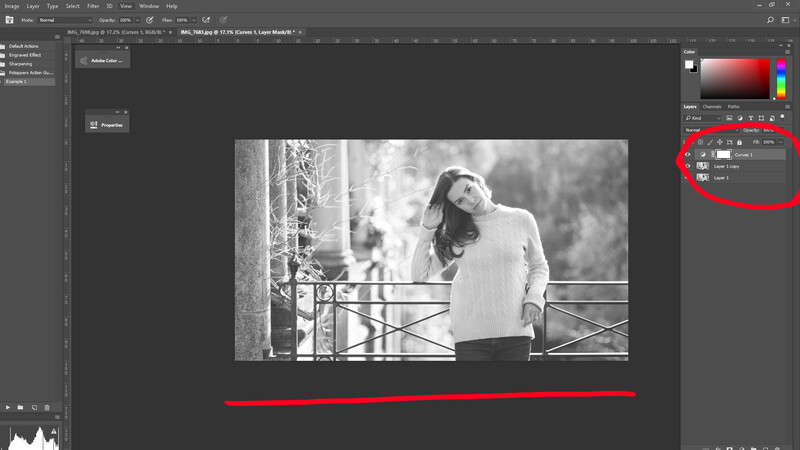
It's worth noting that after you have created your action you can select individual tasks listen in the relevant panel and delete them from the action's to-do list.
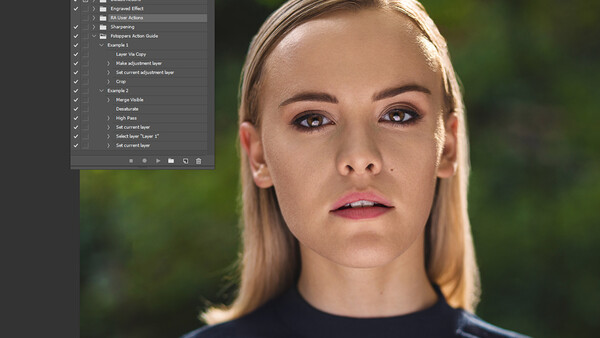
Creating My Most Used Action
As I mentioned above, one of my most used actions is how I tend to sharpen my images. My particular method may not be optimal, but it's the most effective I have found and I was taught it by a proficient retoucher. What my action tells Photoshop to do to my image is the following:
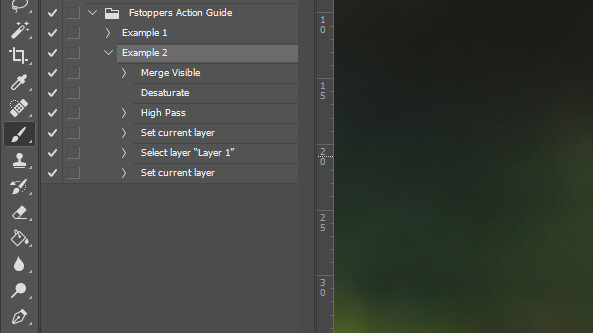
- Create a stamp visible layer (CTRL+SHIFT+E / CMD+ALT+E)
- Desaturate the new layer (CTRL+SHIFT+U / CMD+SHIFT+U)
- Apply High Pass filter with a radius of 2.5 (Filter > Other > High Pass)
- Set layer's blending mode to "Overlay"
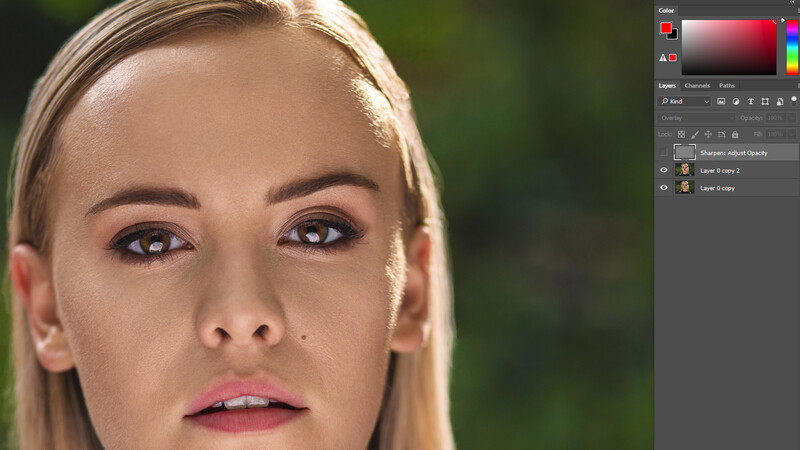
- Rename layer "Sharpen: Adjust Opacity"
To explain the above, a layer is created at the top of my document which shows how the image looks with all visible layers considered. That layer is then desaturated as I don't want my sharpening to affect my colours. The technique of sharpening "high pass" is applied to the layer. I have always used around 2.5 radius for this but you can experiment; I believe it could be lowered slightly although I opt to use 2.5 and adjust the opacity. The layer is then set to "Overlay" so it sharpens the image below it instead of remaining a grey solid layer, then it's renamed to remind me what the layer is doing and to adjust the opacity to suit my tastes/image. These steps correctly recorded in an action ought to look like this:
Below is the before and after of this exact action, zoomed in to highlight the effects and left at 100% opacity. It's slightly over-sharpened but that's only to display the result clearer.

Conclusion
The number of steps you can build in to an action is more than you'll ever need in my experience. Remember, everything you do will be recorded, from selecting a specific layer to changing the opacity. I have built actions for almost everything I do regularly; dodge and burn layers, curves adjustment layers, sharpening, resizing... the list goes on. I also use some actions I have downloaded from other retouchers which slightly boost the highlights of skin and make hair shinier for example. The depth to actions is unthinkable and if you can get in to the habit of using them, it can shave large percentages of time off of long edits. I also find action sets remarkably useful when editing a set of images all in the same style as I will often create an action tailored for that particular collection of images to ensure they have the same "feel" to them. Remember you can apply a layer mask that's filled with black to any layer the action creates and then mask it back in after.
This guide was intended to be a beginners' introduction and I realize a lot of photographers and retouchers who frequent Fstoppers will already be au fait with actions. If you would like a more comprehensive guide which includes advanced techniques and uses of actions, leave a comment and I will consider a follow up.


Join the Fstoppers community for free
-
Post comments and join in the discussions
-
Browse the site ad-free
-
Share your work and get featured in the community
-
Compete in the photo contests for fun and prizes
5 Comments
Converting to LAB and sharpening jut the L channel would do the same thing.
Oh, now you've done it! Showing us how every photographer can make their own actions. Now everyone will be making (and selling) their own actions. Oh wait...
what's next ?people learning how to press a button on a camera and selling their photos? OMG!!
Oh wait...
Most of my actions were rendered a bit useless by using the retouching panel (highly recommend, btw). But I still find them incredibly useful when saving out my pics in jpeg form. I have different resolutions & settings for my website, FB, IG, 500px, etc. I just pull up a PSD file, hit the proper action, and the file is waiting in the correct folder for upload.
I would be very interested to learn more about creating actions to enable me to better understand photoshop :)