
Automations can make life a little easier. Learn how to create a unique Instagram gallery by using a simple action in Photoshop.
Presets and Actions are very common tools for advanced photographers. They can significantly speed up your workflow. If you haven’t been introduced to Photoshop actions before or you don’t quite know how to integrate them in your workflow, I’ll give you a simple example for everyday use.
Create a Unique and Coherent Instagram Gallery
Instagram is an easy way to check someone’s portfolio on the train, in a café, or while waiting for the hairdresser. Although great images should speak for themselves, a good presentation of your portfolio might be helpful, too. You don’t even need to invest a lot of time to tweak you Instagram gallery a little bit. Sure, there are many apps which support you in your post-post-processing. But why shouldn’t you integrate quick automations into your workflow in Photoshop?
Presets Versus Actions
You might have heard about presets before. These are very common tools in Lightroom to apply a bunch of settings to your images with only one click. Presets allow you to give the same look to a series of images without altering the original file. They come in handy, whenever you want to apply a look to a session, which was shot under equal conditions and light. Often, they are also used to recreate a look of a certain film or camera.
Of course, there are filters on your smartphone camera app or Instagram. In advanced software, however, you can not only create your own unique look, but also readjust it according to the photograph.
Lightroom’s presets come in handy in many situations. Photoshop’s actions, however, take it a little further. While you need a copy of your image to not destroy the original file, Photoshop generally gives you a lot more freedom to edit your images. You can locally mask every adjustment on each layer and remove, crop, or copy-stamp whatever you like. Some of the local adjustments are possible in Lightroom as well, but not all of them. Actions like frequency separation and proper dodge and burn require an accuracy which Lightroom can’t offer.
And there are also some actions for your Instagram gallery.
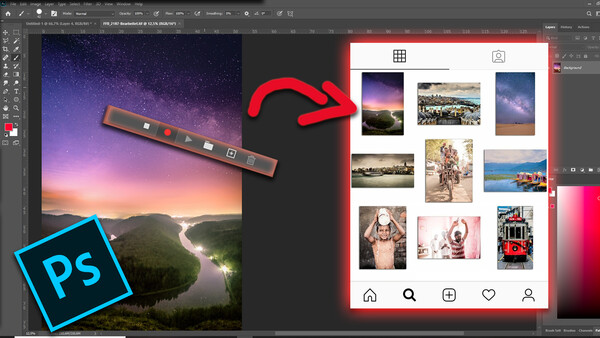
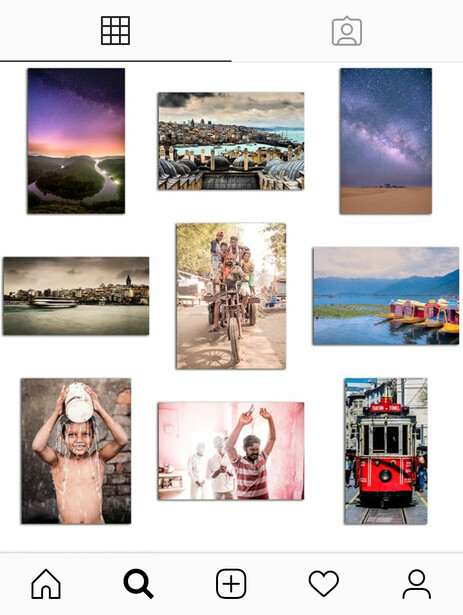
Make Your Instagram Gallery Look Like Hanging Artwork
The image above shows my preferred way to showcase my photographs on Instagram. It's just two clicks more work.
Once set up, an action in Photoshop allows you to copy a process and apply it to any other picture. The creation of the action can be quite complex, and you must make no mistakes while recording it. Creating an action might take a while. In the long run, you’ll safe hours.
Here is how I did it:
1. Open in Photoshop
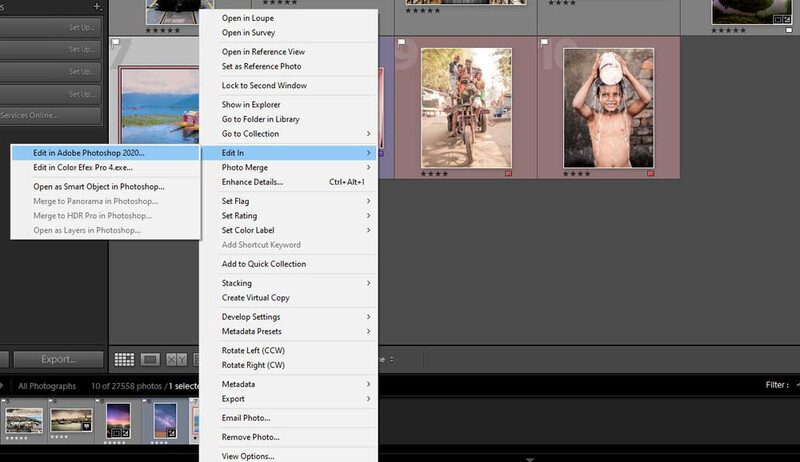
I always start my workflow from Lightroom. Here, I collect the images from all of my sessions. Lightroom allows you to keep an organized overview. Even if I edit something in Photoshop, I’ll take it back to Lightroom.
Select your first image for your gallery and right-click on it. Choose Edit In-> Edit in Photoshop. A small window might open and ask you how to handle the file. I always select the checkbox “Edit a copy with Lightroom adjustments.” This way, you’ll get a copy of exactly the same image that you saw in Lightroom. There's no problem in deleting it afterwards. Create, post, and destroy.
2. Start Your Action
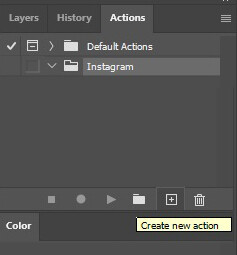
After Photoshop got ready and loaded the image, you can start your action. In the standard arrangement of Photoshop, you’ll find the Actions Panel in the same window where you find your layers. If you don’t find it, click on Window->Actions or press Alt + F9.
In the Actions panel, you need to start a new action by clicking the square with the plus symbol in it. A new window opens and asks you about the details of the action. You can subordinate it to a group of actions and create a shortcut for it, which is quite useful. Especially when you're planning to you use it frequently. Once you hit record, Photoshop will track all your edits and add them into the action. From now on, you’ll need to work flawlessly.
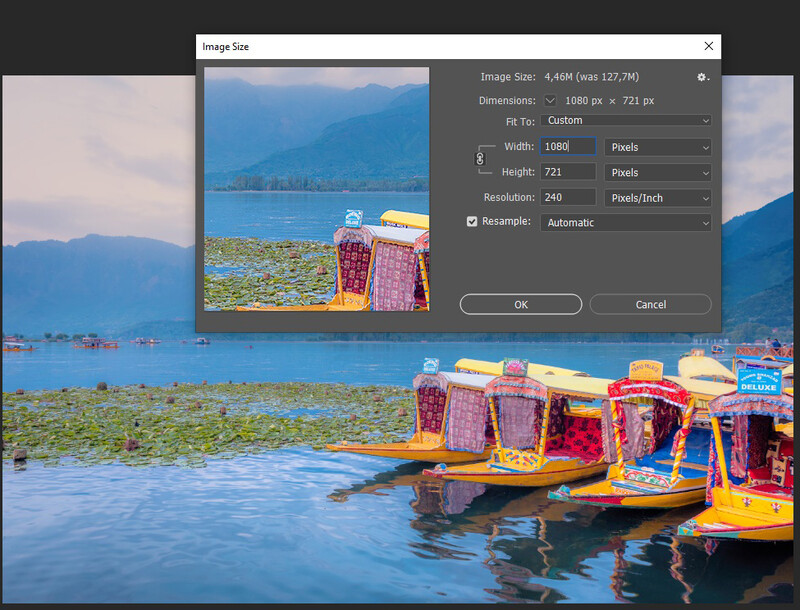
3. Image and Canvas Size
We want to create an image on a white background. As for Instagram standards, we also need an image size of 1080 x 1080 pixels.
For that, I click on Image -> Image Size and choose a width of 1080 pixels for a photograph in landscape format, or a height of 1080 pixels for a portrait format. Unfortunately, you have to make a separate action for each format when you're using this method. After applying the image size, you might zoom in to properly see the image.
Now, we'll take care of the white background. Remove the partially locked symbol by clicking on the lock next to your background layer For a white background, we need to create a white layer. Click on the symbol for adjustment layers and choose Solid Color. Make it pure white.
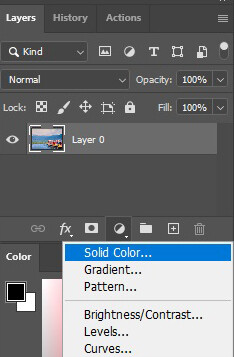
You image should appear completely white now, because the color layer is placed above your image. Drag and drop it below. Your image should be visible again.
Now we’re going to make the canvas square. Click on Image->Canvas Size and type 1080 pixels in height as well as width. After confirming the changes, your image should have a white border at the long edge. That’s the advantage of using a solid color as a background. When you widen the canvas, it’ll grow as well.
We’re not done yet. To avoid cutting off the drop shadow, which we will apply later, we need to resize the image again. Select the layer of your image again and click Ctrl+A to select all. Now hit Ctrl+T to transform your selection. The best way to do it, is typing “90%” into “W” (width) and “H” (height) on top of your image. You can choose any percentage you want, but 90 works fine for my drop shadow. Apply the changes and you're almost done with the confusing stuff.
Be Creative
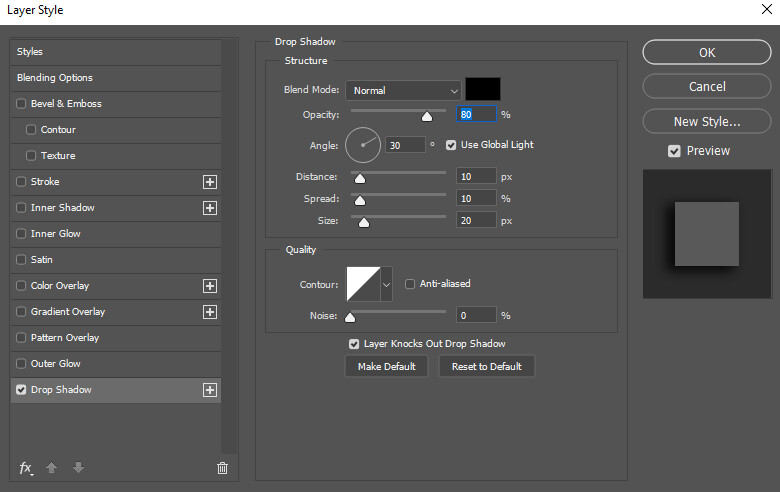
As you can see, it’s almost done. It just doesn’t look three dimensional, yet. By double-clicking on your layer (don’t hit the name, though), you can get into the Layer Style. You can also right-click and choose Blending Options.
In my example as well as my real Instagram gallery, I’m using a drop shadow. Find it in the menu and adjust it the way you like it. For me, the settings below work fine. Play around and try to find your preferred settings. You can also try out other looks and blending options. After applying your settings, you only need to export your image.
Hit File->Export->Safe for Web and confirm your export settings. I choose a .jpg with maximum quality and safe it on my desktop. Try not to change the name when you export your gallery images. Otherwise your old images will be replaced by newer ones whenever you need to export a bunch of images.
After the export, you need to switch back to your action panel and stop recording by hitting the little square button. If there was still a selection on your image, you might hit Ctrl+D to deselect everything, before you stop your action. It’s not too important, though.
You're Done!
Great work. Once that action has been set up, you can always reuse it. It’s just one click away. Remember that you have to make separate actions for vertical and horizontal images.
Now go and upload them into your Instagram. To make my gallery even look a little cleaner, I always upload a horizontal image after a vertical one and vice versa.
Create Your Unique Gallery
Basically, you can adjust the settings the way you want. You can change the color, put your logo on top of it, let a monkey hold your image, frame it, or spice it up in any other way. Just be aware that there is a little white line between the images.

I hope this tutorial helped you understand Photoshop actions and how you could use them. Of course, there are a lot more practical ways of including actions into your workflow.


Join the Fstoppers community for free
-
Post comments and join in the discussions
-
Browse the site ad-free
-
Share your work and get featured in the community
-
Compete in the photo contests for fun and prizes
3 Comments
Good idea, also to make an Action for this, thx! (for portrait format the Instagram image size is 1350 px)
Hey, thanks for the comment. It's true that portrait size is not only 1080, but the 3x3 gallery only shows 1:1 crops, so this is why I choose 1080 height as well.
You can also do this in Lightroom using the Print module. I use it to create my white frames and you can set up custom ones. Just select the photo, pick your layout, and then "print to file".
It can't to the wall art look but it makes your photo feed look more interesting.