
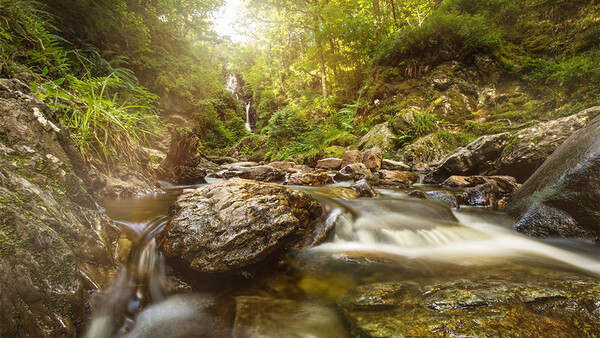
You're trekking across Scotland and you come up to a waterfall that's screaming to be photographed. In your mind, you already know you want that beautiful, streaky, long-exposure water. As luck would have it, you're hungry, shaky, and your tripod is enjoying a day off in your Airbnb. What's next?
First, let me be honest. I didn't forget my tripod. It was our seventh day of hiking around the UK and I was sick of carrying it. Along with it, I left my remote trigger, anything to rest my camera on, my ND filter, and (big surprise) my waterproof hiking boots. Who needs all that when your only plan for the afternoon is to go see a waterfall?
Fortunately, a little fast thinking and a lot of luck left me with a great shot despite my lack of preparedness.
The Challenge
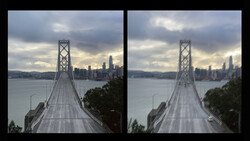
There are plenty of articles on long exposures, so I won't dwell on the settings, but I knew I wanted to leave the shutter open for at least two seconds. I also wanted to be down in the stream to get water rushing all around my frame. These two things mean that I can neither handhold my camera (too shaky) nor set it on a stable surface (wet rocks are slippery!).
Gear Matters
Generally speaking, I believe that you can get a great shot regardless of the gear in your hands, but sometimes you just need all the help you can get. Before this trip, I wanted to get a 16-35mm lens, but was torn between the Canon 16-35 f/2.8L II and the Canon 16-35 f/4L IS. Since I primarily shoot with studio lighting in my professional work, the extra stop with the f/2.8 wasn't a big selling point for me. I decided that the image stabilization in the f/4 would be more beneficial since I do occasional video projects and like that added fluidity.
If you find yourself in a tripod-less situation, a stabilized lens is a lifesaver. Canon says it reduces camera shake by up to four stops of shutter speed, and I believe it. Also, if you're in a stream, the weather sealing on the L-series lenses is a helpful bonus.
Get as Stable as Possible
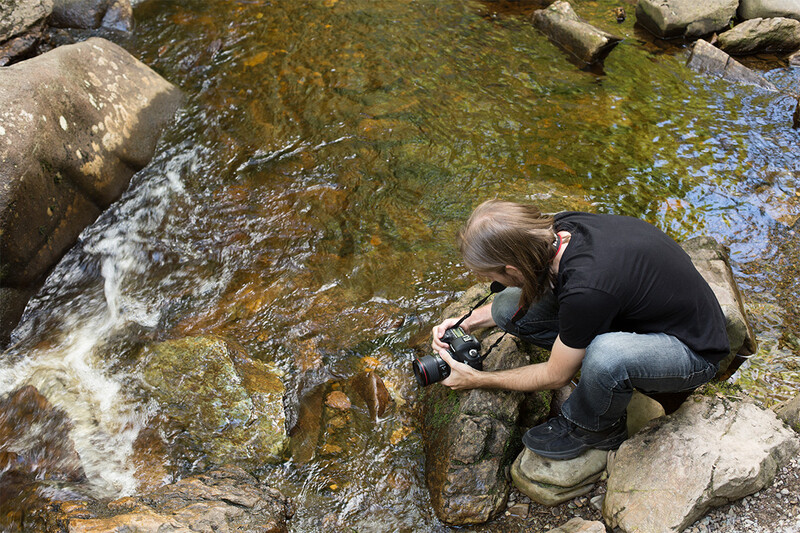
To minimize shake, I needed to rest the camera body against something. At the same time, I knew I couldn't let go because I wanted to use my camera for the rest of my trip. So, I found a flat-ish rock on a sandbar sticking up out of the water and set one edge of the camera on it. I put the camera strap around my neck and pulled back to create tension, then pressed the camera down with my hands to act as a weight. That counterbalance made for a much more stable shot than trying to simply hold the camera against the rock.
Live View
In that position, I couldn't see through the viewfinder to focus. Getting my shutter speed down to 2.5 seconds meant dropping my ISO down to 50 and tightening my aperture to f/22, so I had a little wiggle room in terms of depth of field. Still, I wanted that rock in the foreground to be crisp since it would be the easiest way for me to tell if I had any camera shake at all.
I switched over to Live View and dialed in focus manually at 10x zoom. The added perk here is that the mirror is already locked up, so when you take a shot, only the shutter moves and there is no mirror slap. This dramatically reduces the amount of movement in the camera and gives you a much better chance of keeping your image steady.
Breathe
Shooting like this requires a lot of focus. Every movement can potentially ruin your shot, so you have to be mindful of everything your body is doing. Slow down your breathing, try to get your heart rate down. Keep your finger light on the shutter release button and squeeze gently. As you exhale, depress the shutter button right at end of your breath and let your body stay still while the image exposes.
The Results
I was able to get five shots off before a group of people crossed through my frame and stayed longer than we did. Four of those five are free of camera shake, and one is a 12"x18" print in my studio's dressing room. It looks great even under close scrutiny, so I call it a win!
At the end of the day, it's always best to be prepared and have a tripod for this sort of shot. For me, though, I much prefer the story of a 2.5-second mid-stream exposure with the camera in my hands. It sounds way better when I tell it in person.
Join the Fstoppers community for free
-
Post comments and join in the discussions
-
Browse the site ad-free
-
Share your work and get featured in the community
-
Compete in the photo contests for fun and prizes
20 Comments
How do you get such natural looking rock colours?
Jeff - I always shoot at 5400K as a baseline, but to get this image as rich as I wanted, I pushed that up to about 6900K.
Ok thanks Aaron I'll try that. In Chiang Mai (north) Thailand I have lots of streams and waterfalls nearby and nice lighting, especially on the jungle trails. However, I can never seem to bring out the natural colour of the rocks. Green, Orange, OK but not the Greys but your colours looked so natural.
Thanks for the tip.
Why not just rattle off a whole bunch of short-ish easy-to-handhold images with the same exposure settings, and then use HDR software to combine them (without HDR tone mapping, etc., of course). Let's say that you can easily get sharp images handheld (with I.S.) at 1/8 s, then that means 20 exposures will give you your 2.5 s of total exposure time. Decent HDR software will automatically align frames to allow for movement. This approach, when used with a tripod, also lets you simulate enormous exposure times.
Thats not needed, just open in photoshop then Layer > Smart Objects > Stack Mode > Mean.
And miss out on the zen-like experience of a 2.5 second quasi-handheld exposure? 😉
You also reduce the base ISO with this method too so you get a cleaner image :)
Haha nice one. I advice you to always have a mini table tripod, just in case you want the drop the heavy one (e.g. Manfrotto pixi).
If I had a tripod, there would be no reason to write this article 😂😉
I've always taken my jacket off and just balanced the camera on that and used the self timer - maybe a solution if your lens doesn't have IS. With a lot of streams you can also find a few good rocks to give you a slightly higher angle as well!
I certainly agree! I don't have very many image stabilized lenses, so I use the good old fashioned rock. Not very glamorous, but it provides all stabilization I need at an affordable price.
With the 16-35, the IS lens is actually the least expensive since it's the f/4. I like a good rock when its feasible, though!
In this picture it's a 17-40, I don't think I'd fancy this with my 11-24...
On a recent backpacking trip, instead of a tripod I brought a small empty stuff sack which I filled with gravel whenever I needed a beanbag.
Another tip is to use the camera's delayed shutter release (mine has a 2 second mode) to reduce the shake from pressing the shutter button.
I have tried a similar technique, where I take 9 exposures and the camera combines them in camera. Seems to work pretty well, maybe not the quality of one done in photoshop.
landscape photographer, destination with rivers, no tripod carried, no logic.
Commercial portrait photographer, enjoying a vacation with my wife, took an afternoon off of carrying a ton of gear, got the shot anyway. Facts are important.
Flattered that you think I’m a landscape photographer, though 😂
not talking about you specifically, but in general for anyone considering himself a landscape photographer
if you can find the older Galen Rowell books you will see his techniques from years ago that are pretty much the same, also using ski poles as a 2 legged tripod etc. well worth the look at the local library, and remember, no digital manipulation to his photos