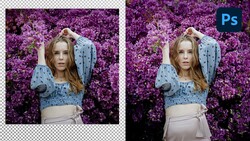
When you shoot an image, a tight crop might make it difficult to make the photo work at different aspect ratios later on. This helpful tutorial will show you how you can stretch the background of an image to alleviate that exact problem.
Coming to you from Aaron Nace with Phlearn, this great tutorial will show you how to take an image and stretch its background to fill more space without affecting the original pixels. The need for this might arise if you shoot an image with the intention of a certain crop and that need changes after the fact, as your client might want to use it as a banner or want to add text to it for one reason or another. Rather than throw away what is otherwise a perfectly fine image, you can use Photoshop to convincingly stretch the background. It is about more than just warping the background or cloning it into empty space; it takes some subtle adjustments to make the final result both convincing and to provide a seamless blend with the original canvas. It's not a technique you'll need every day, but it's definitely a useful trick to know. Check out the video above for the full rundown.


Join the Fstoppers community for free
-
Post comments and join in the discussions
-
Browse the site ad-free
-
Share your work and get featured in the community
-
Compete in the photo contests for fun and prizes
4 Comments
forgive me if I'm wrong but you can also do this with content aware fill
A video? Really, no thanks.
Content aware fill will do a better job than painting in the background... then add a new layer for the dots
"There it is." Ah, Aaron. I could watch you all day. #mancrush.