
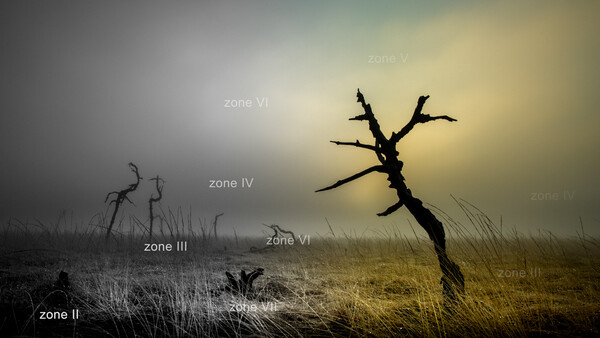
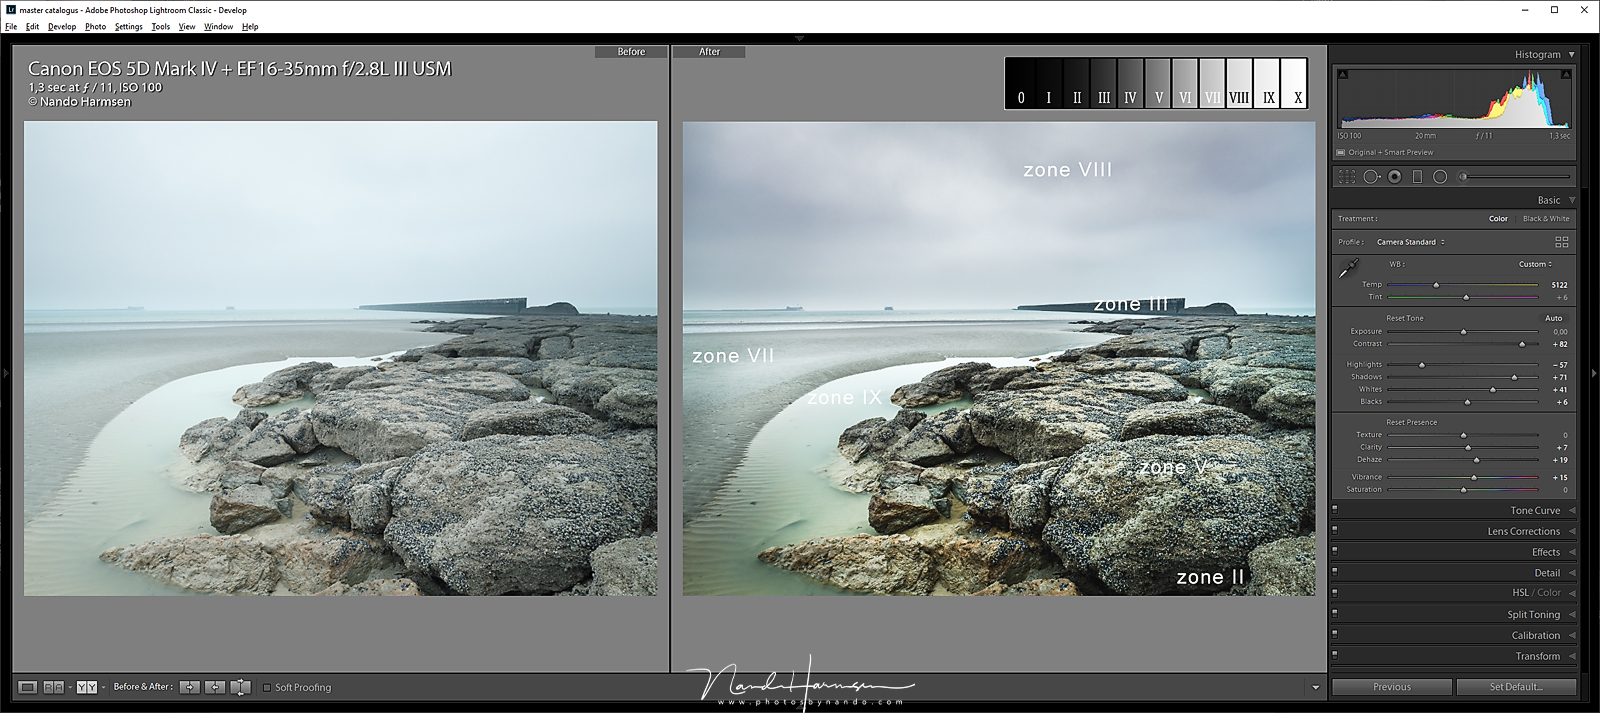
Our histogram shows 256 shades of gray. Besides pure black and pure white Ansel Adams used only nine shades to manipulate the contrast in his famous landscape photos. His zone-system can still be used for our modern digital photography.
Every landscape photographer has heard about Ansel Adams or will eventually come across that name. The famous American is mostly known for his black and white photos of Yosemite National Park. The 1941 photo Moonrise, Hernandez, New Mexico is probably his best-known photo.
One of the reasons why Adams is seen as a great photographer is because of his famous zone-system. With this system Adams was able to perfectly control the contrast in his black and white photos. Adams base rule was: “Expose for the shadows; develop for the highlights.”

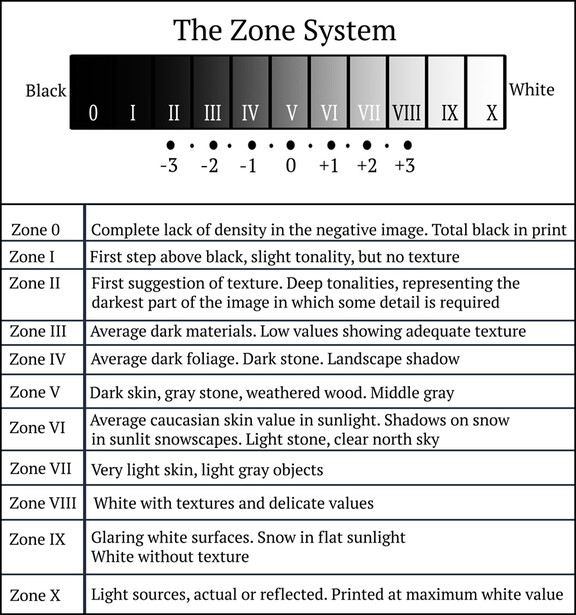
The zone-system of Ansel Adams divides the photo into eleven zones; nine shades of gray, together with pure black and pure white. You could assume that a normal photo does not contain pure black and pure white. Therefor the nine shades of gray would be the only zones you can find in a photo.
Adams, who photographed in black in white negative film made sure to expose for the darkest parts of his scenery. This way he prevented to have pure black in the photo. When developing his photo paper, he made sure to manipulate the dark and light parts in his photo in such a way, that the shades of gray would follow his zone system.
Because Adams made sure to prevent having pure black, he managed to make optimum use of the dynamic range of his black and white film. During the development he was able to dodge and burn the shades of gray to end up with the best possible contrast.
Unfortunately, it is not possible to adapt his way of photographing in the digital photography. When we expose for the dark parts of the photo, the risk of overexpose light areas will occur. We all know, with digital photography overexposed areas cannot be recovered in any way. We all have heard the term for that kind of over exposure: blown out highlights.
This is also the main difference with analogue film. With analogue film, underexposure is not recoverable, and overexposure is recoverable. With digital photography it is just the way around, up to a certain point, of course. This means the base rule of Ansel Adams is not usable for digital photography.
Does this mean the zone-system is cannot be used for digital photography? Fortunately it can still be used. Instead of expose for the shadows, and develop for the highlights, we need to expose for the highlights and develop for the shadows. It is just a small, but very important change.
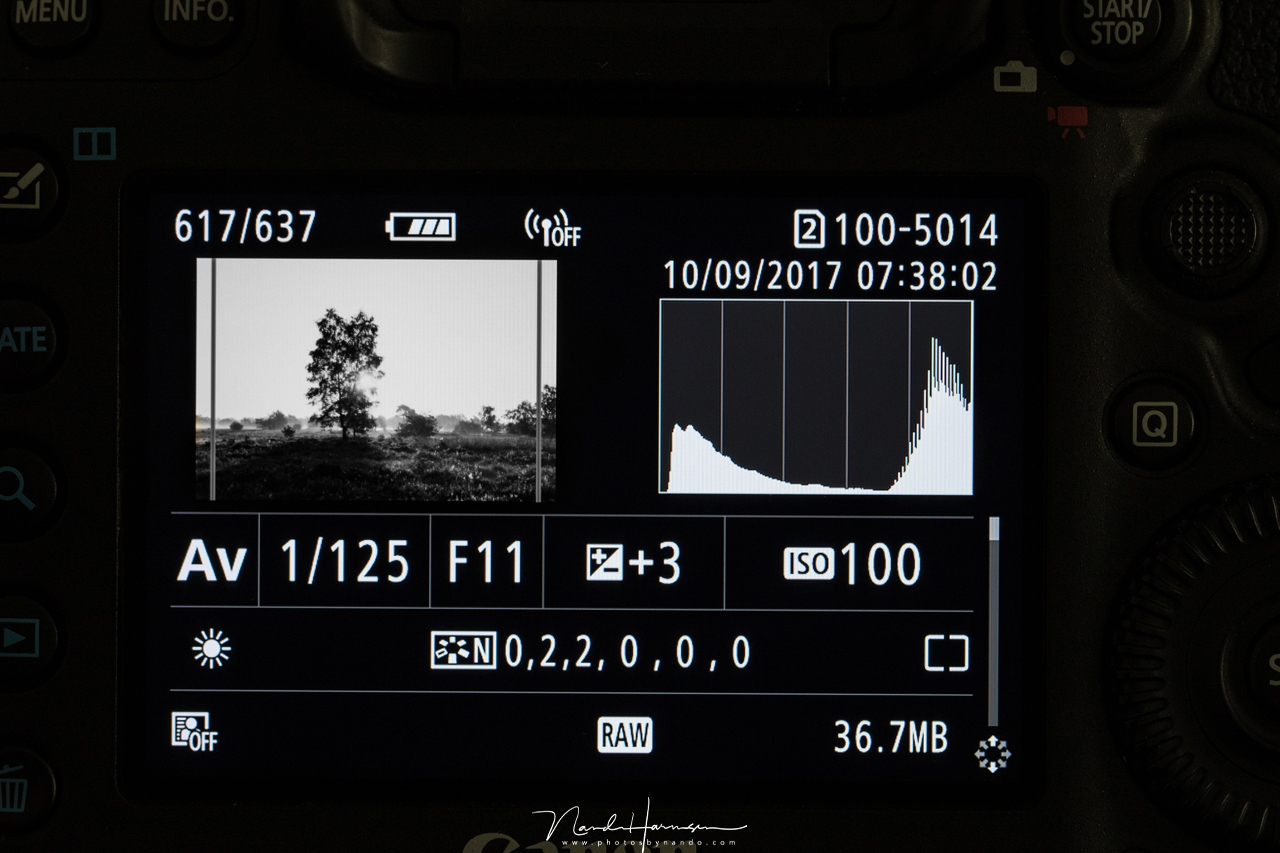
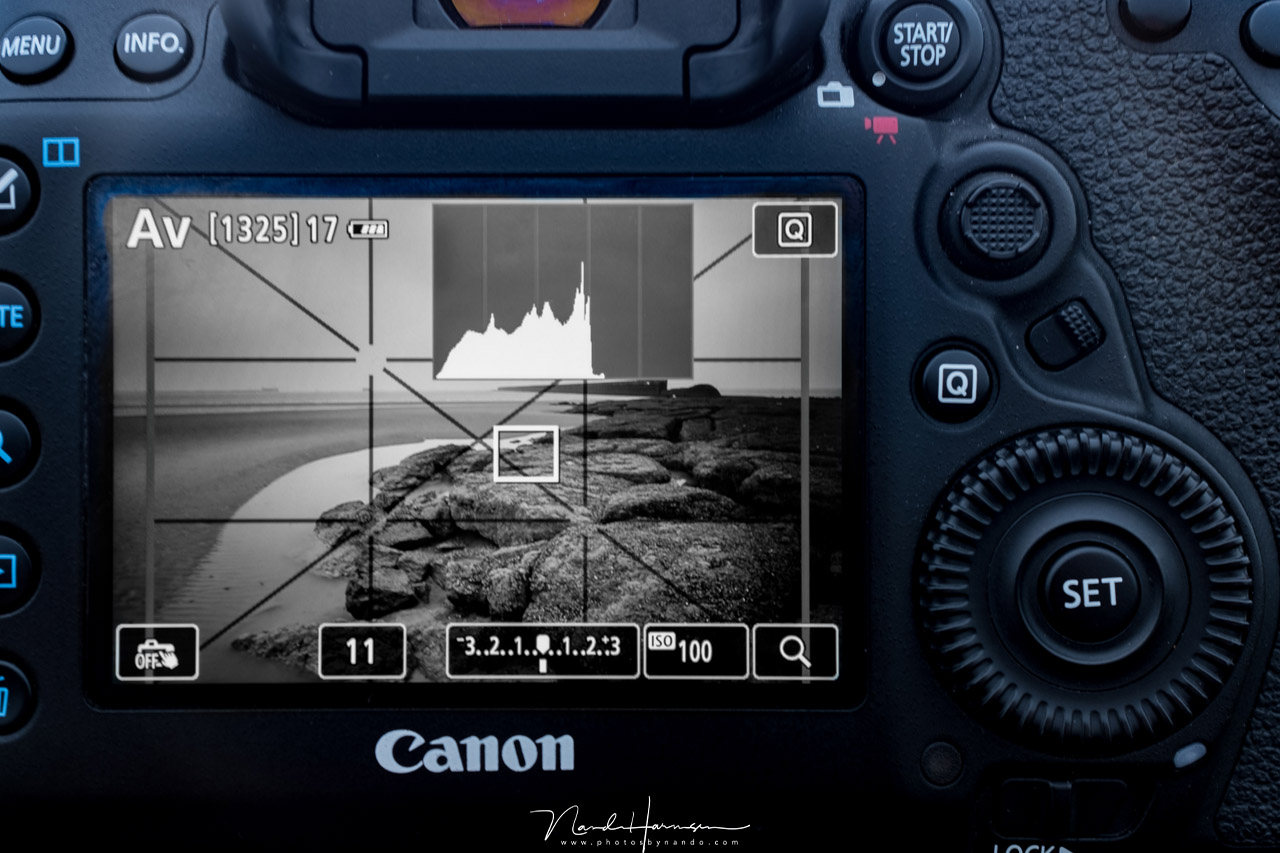
When we translate this to modern digital photography we see how this new base rule resembles Exposure to the Right (EttR). Exposure to the Right is nothing more than expose for the highlights, which translates to a histogram that is placed at the right side of the graph, while making sure no highlight is blown out. It is the only way to maintain as much information as possible in the dark shades of gray. And with a little luck, thus preventing to have pure black in the image.
Exposure to the Right, and expose for the highlights, will not deliver an image that is usable without a proper post-processing. It is essential to manipulate the shades of gray in such a way to end up with the perfect contrast. The use of a raw file format is very important, because only then you will have the ability to use the maximum dynamic range of the digital sensor. When post-processing your raw image it is possible again to use the nine shades of gray from the zone-system that Ansel Adams invented.
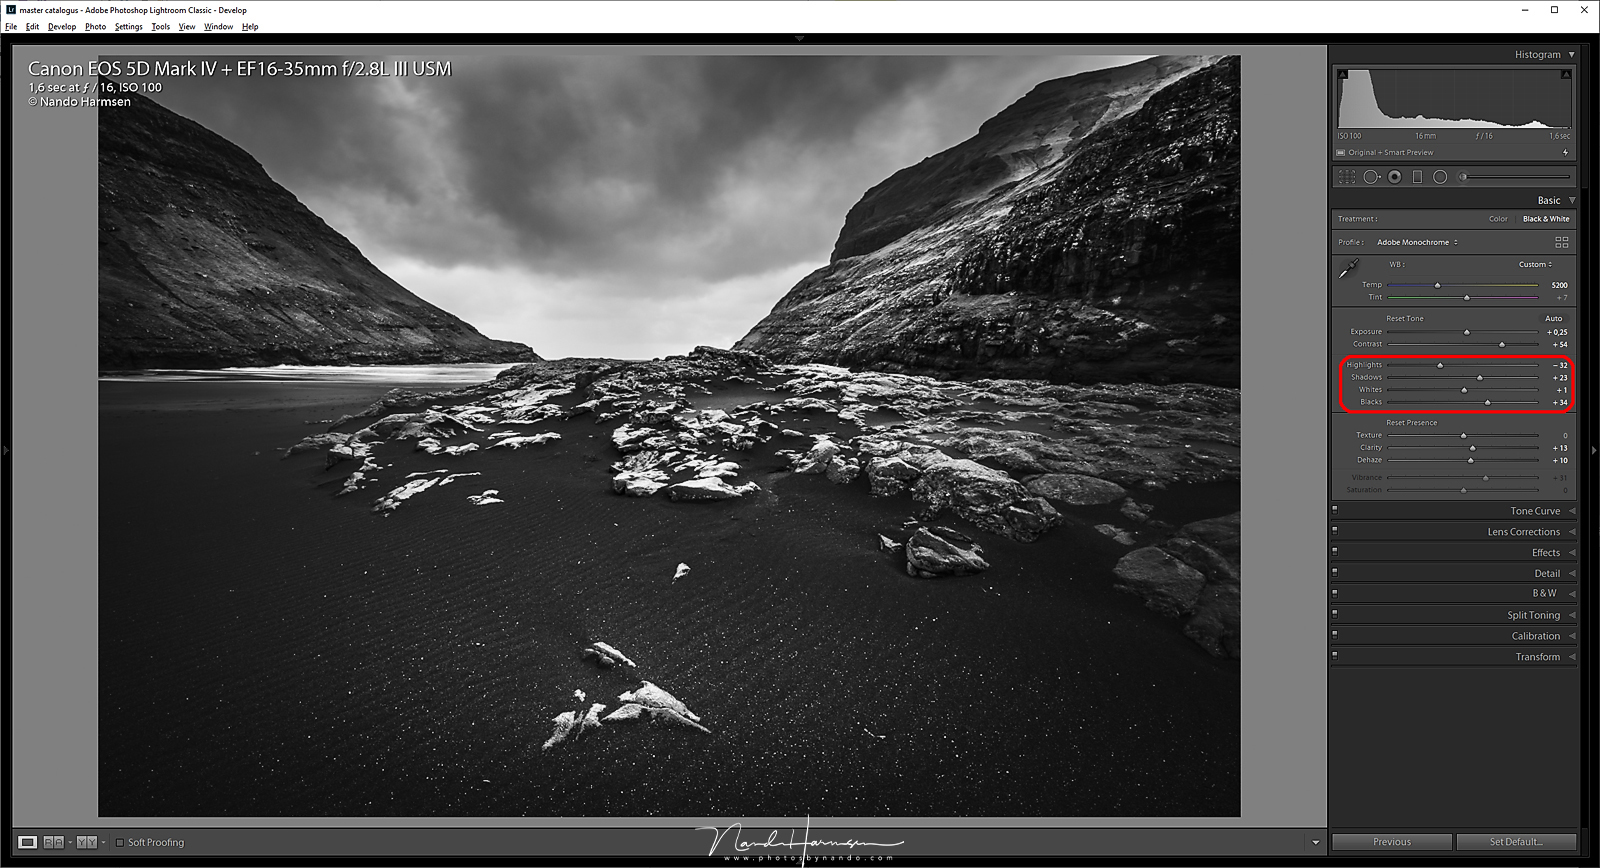
When using Lightroom you can use the sliders highlight and shadow to manipulate the shades of gray. The black point and white point slider will let you manipulate the boundaries, and locale adjustments make it possible to optimize any part of the photo to your liking. With proper post-processing you will end up with a perfect contrast in your black and white photo. It is almost as if we stepped into the darkroom of Ansel Adams again.
How about color? The zone-system of Ansel Adams is invented for black and white photography, of course, but it can be used for color photography as well. Sometimes it can be difficult to recognize the different highlights in a color photo. By temporary converting it to black and white, it might become possible to successfully use the zone-system of Ansel Adams again. You can read more about this method in my previous article.
Have you ever used the zone-system for your photography, either for black and white or for color? Or do you think this method is outdated and not suitable for digital photography. I love to read about your opinion in the comments below.
If you're passionate about taking your photography to the next level but aren't sure where to dive in, check out the Well-Rounded Photographer tutorial where you can learn eight different genres of photography in one place. If you purchase it now, or any of our other tutorials, you can save a 15% by using "ARTICLE" at checkout.

Join the Fstoppers community for free
-
Post comments and join in the discussions
-
Browse the site ad-free
-
Share your work and get featured in the community
-
Compete in the photo contests for fun and prizes
63 Comments
In the old days, you would burn certain parts the paper longer or shorter to get the right overall exposure. Digital dynamic range tries to mimic the same result, but it doesn't always work, which is why multiple exposures are used and the average HDR is worked out. In other words, less light is "burnt" on the sensor in bright areas (eg highlights), and more light is "burnt" on the sensor where it's darker (eg shadow). I don't know if I'm making sense, but I hope it helps.
I think the sensor has more dynamic range (in RAW especially) then you get in a jpeg, so you do have some room to move up and down in- just beware not to lose the highlights, because if you do, they are gone. I find I have a lot of room to bring up shadows.For landscapes I tend to do what the author says- basically make sure the sky is good, no clipping of clouds, then bring up the shadows in RAW as needed. When shooting film I tend to use filters to darken the sky (reduce overall dynamic range) and maybe shift exposure a little up or down.
In actual real world you get far less dynamic range than the number “advertised” by the camera manufacturers. If they say 13 or 15 you might get 10 in the real world.
Author needs to realize that you can’t control it in the digital world as you could with film.
That might be true. But it is not really that important. It is about the way of exposing and "developing" your digital photo. If the DR is larger than the sensor can register, it is always possible to make an HDR and use something like the zone system for developing that HDR file
Jan Kruize , you're right that once you've gone past the dynamic range of your sensor, the data is indeed lost. Also, it's more of a strict cliff than analog, where old films had a gentle fall-off in the "shoulder" or "toe" which still have some data, which you could use as-is, or compensate for by changing the development time, at least for highlights.
I think the analogy "expose for the shadows, develop for the highlights" to "expose to the right, and let the shadows fall where they will" is pretty accurate and good advice for a technically careful photographer wanting to use their gear to the best.
The "why it works" to the analogy is more that the default matrix meter in most digital cams expose for middle gray, which can leave sometimes shadows, sometimes highlights clipped. (If you are set to JPG, you are stuck with the dynamic range of that color profile; with RAW, you have the entirety of the dynamic range available in post, especially shadows).
The analogy is a real thing, for a few reasons:
1. the scene you're shooting might actually fit in the dynamic range, but if you meter for 18% gray default, you might still clip even in RAW.
2. when shooting in RAW, it might look like after shooting like you have clipped shadows, you might discover that the DR of your expensive camera surprises has saved your ass, and you can recover them; it's less likely you can get the highlights back
3. effectively all digital sensors (and film does too) have more noise in the shadows than in the highlights. It has something to do with the physics of light triggering electrical currents.
ETTR is a great tool, because it lets you use the least-noisy part of your sensor, minimizing the risk of clipping. The only trade-off is you have to do at least a basic grade in post: that only sucks if your client expects to see your best right out of camera and there is no time for post production.
The only thing where the analogy doesn't fit in the DR discussion of film vs digital, is that with film, you control the dynamic range during the development phase by deciding how much long you let chemicals act on the latent image; and with digital, you're locked in.
re"ETTR is a great tool, because it lets you use the least-noisy part of your sensor," This is misleading. Sensors are linear in nature and do not have a "noisy part" as indicated As with any electronic device all cells do have an inherent low level noise component, this becomes more evident in low light situations where the signal has to be amplified (by exposure compensation/ISO)
The trick to reducing noise is to have good light, or if not allowing more light through the lens (ie open aperture)..
Also ETTR increases the risk of blowing the highlights. The best advice I can find is to ensure that you don't exceed the boundaries of the histogram - note that this may require exposure stacking to capture the full dynamic range.
RE: "linear in nature" Perhaps I'm misinformed. I understood that being linear in nature means they capture twice as much light as values one step down. My reference: https://luminous-landscape.com/expose-right which albeit is an old link, I'm told by engineers may not reflect current cameras, is scientifically accurate.
I've only used the ETTR Camera feature in Magic Lantern firmware Canons about 5 years ago https://wiki.magiclantern.fm/ettr, which does exposure by analyzing histograms at several ISO settings, allowing you to choose the blown highlight cutoff. I presume the newest cameras equipped with computational photography algorithms and ML do this innately.
Yes, was thinking about it today, I think I do have it right. If digital sensors were logarithmic like stops, then you would get the same # steps (bits) per value at zone V vs zone VI. But they're linear, not logarithmic, so you get half the # bits at zone V as you do with zone VI.
Not all situation will end up with completely black. Most situations the dynamic range will be enough to recover at least a part of the dark areas. If you run into a higher contrast, you can always use bracketing
Interesting article. I have been thinking about this for some time.
I have never used the Zone System formally, but try and consider its principles when I shoot. For digital it is pretty easy (expose for sky, bring up shadows/mid-tones in RAW). For film, I only shot/shoot roll film, so custom development was not worth it, but I had interest. I had a spot meter, but it stopped working, and I just replaced it. Even if I don't change development (I have a couple of Graflex cameras to restore) I will try and use the spot meter to help place my exposure. I really do not need the spot meter for digital.
Really, the zone system is an attempt where you decide when you take a picture what you want it to look like after you've finished printing it. So you take a lot of notes on where your spotmeter says the darkest and brightest area is, and the put extra work into developing a few sheets of film, all so you don't need to futz around a lot in the darkroom wasting expensive paper until you're satisfied.
The zone system is a very technical process (but a simplification of the field of sensitometry) that encourages an artist to slow down and produce something really good that will hopefully put them on the map, or keep their clients coming back. For others, it's a boring distraction that's like reading a high school math book, so they say go have fun shooting instead, and your prints are going to look fine. This worked best when they followed the advise from their teachers: to choose a single film, and get totally dialed into it, so you know what it'll do and you won't mess up an important assignment. That line of thinking is equally applicable to digital photography.
True. Film purists will argue that there is no Zone System in digital, because the Zone System was so tightly integrated with the photo-chemical process. But some of the ideas around tonal control contained in the Zone System can be translated into digital as something else (DigiZonal Luminosity Control System?).
It's very true that the zone system is not just about exposing the negative. It's about exposing a negative for a particular paper. But not just as a time an money saving process but as a way to get the final print results you want/imagined.
I agree it is kinda boring to work only with such a system, but it can help even with the creative part of photography. Knowing the system is enough, but following it as a mandatory rule is not really creative
I agree with you guys to an extent. If you want to take an image, analyze it as fitting 10 zones, and call it Zone System, then most photographers won't argue with you.
Personally, I do film testing for fun (see attachment). 75% of my photography is on film or early historic processes. 90% of the rest is on an iPhone, but I do use a Sony a7 when my client (usually my wife) insists. So I own a densitometer, graphing software, all of which I use more than the full frame, and I have put at least hundreds of hours into testing film and studying photographic sensitometry. It helps me get really dialed into materials, and I like switching materials to experiment with a new look (ie I don't shoot tri-x all the time). Studying also helps me produce a look that is way way different from the norm. I would not say the results are better that digital photography, just really different.
IMO, it's all really overkill for the majority of photographers, what's more useful is just talking about getting that "look" you want by adjusting curves.
"Unfortunately, it is not possible to adapt his way of photographing in the digital photography. When we expose for the dark parts of the photo, the risk of overexpose light areas will occur. We all know, with digital photography overexposed areas cannot be recovered in any way. We all have heard the term for that kind of over exposure: blown out highlights."
That's limited thinking. One can't do it in all scenes but in many you can bracket and blend the exposures and use luminosity masking to dodge, burn, etc. and get Adams' 11 stops.
True, but this is not about those kind of tricks. Multiple exposures make it possible to have everything within the "dynamic range" of the image you look at on screen or print. But it is not always good to have everything within those boundaries. I see a lot of bracket shots and HDR or tonemapping photos that are flat and dull because of that. Even with HDR like imaging you can play with the tonal range of the zone system. I even thing that would be more necessary, to prevent those flat images.
I did full on Angel Adams Zone B&W years ago. I had a Weston meter, adjusted developer temp, used print paper numbers-every variable to place greys,etc. etc. Although your photos have dramatic contrast and value range they most certainly do not achieve Angel Adams effect. Sorry. The value relations are harsh, IMHO. You will never get close with 5DMk4. The closest you can get is with Leica Monochrome, Daniel Morrison B&W conversions, Sigma DP Merrill, etc.
Adams played the grays like notes on a piano-eg. white, black, zone 6 only. Or only grays from Zone 5 to white. He heightened as well as REDUCED and softened contrast. He COMPOSED values. Just having a lot of clearly defined grays is not enough. There should be a theme, an aesthetic to the value choices-a decision.
I like the comparison with music :)
"The negative is the equivalent of the composer's score, and the print the performance"
Agree, it's hard to match his mastery as a photographic printer. I bet nobody ever will. What's even more amazing is he was always working real magic with really poor negatives by todays' standards. He made thousands of incredibly fine prints with them and he would refine the prints he'd make from a single negative over decades.
"With analogue film, underexposure is not recoverable, and overexposure is recoverable." That's really only true (and only sort of true) for b&w film. Slide film is the opposite, and more like digital.
Isn't slide film worse than digital? Even Ekttachrome.
I don't shoot slide film very much, but yeah, I'd say even the new E100 Ektachrome is worse than current, good digital cameras as far as shadows/underexposure go. But it does retain a lot in the shadows.
The trick to shoot chrome is that it has a third of a stop EV Latitide . Your exposure must be spot on take your readings at the highlight with detail. Then adjust accordingly. Remeber that clear blue sky registers as 18% gray. I would put my chromes up against any Digital camera image any day of the week . All it takes is practice . Shooting chromes will slow you down in the beginning but is worth it .
"Isn't slide film worse than digital?" you mean with exposure latitude? In practice, yes, especially if you want them to look perfect on a light table. You can get a bit more detail out of a good drum scan. I have some stunning chromes from a vintage camera that has a shutter that's only good to 1 stop, so if you are looking for something unusual and willing to break some rules, chromes can be pretty cool.
Indeed... I did not think of that... slide film was so wonderful because of it's limited dynamic range. You could play with contrast more easily
Underexposure can't be recovered with film is a myth and this only holds for single bath development.
With 2-bath development you well can expose e.g. an Ilford HP5+ (box-speed ISO 400) @ ISO 25.000 by not sacrificing the shadows, even though it is underexposed by 6 (!) f-stops. https://flic.kr/p/Q2w9oJ
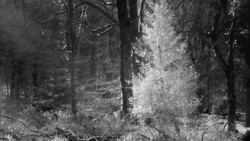
Slide film only has a dynamic range of 5 to 6 f-stops for zones with texture, no matter what. And it sticks like cat pee on a wall that it has to be exposed for highlights. It has to be exposed according the the zone system which is a relative one. Here an example: It is exactly 5 zones with details from the lightest to the darkest part of the angel shot with Ektachrome.
First a couple of mistakes There are 10 zones not 11.(Zone I black no detail, ZoneV 18% gray Zone X paper white no detail. :source The Negative,Ansel Adams). Second a digital sensor only records detail fron zone 3-7. Anything below 3 is blocked no detail. Anything above 7 is blown out. Metering is also different taking multiple spot readings at darkest area with detail, lightest area with detail and possibly a midtone at zone 5 The reading are done in EV. Not F stops or Dynamic Range. It a different scale. You also have adjust for EV Latitide to maintain the required stop difference ratio this is determined by the film sensitivity characteristics and if you are pushing or pulling the film . You must decide where to place the the subject into their correct zone .by doing a calculation N+1/N-1 . For example if your mids zone 5 is reading at zone 4 you must increase by a stop.Each zone equal a full stop difference. When you shoot the zone you must also use the same N+1/N-1 for both film development using a compensating developer amd also in tje print development when choosing paper contrast of filter contrast grade. You will also be dodging and burning to achieve final balance. It is essential to know tje EV scale and know where your meter is reading to achieve zone 5 18% gray. Or the system will not work. Hint Dynamic Range does not work with film amd EV does not work with digital . I have been shooting the zone for 43years and can recommend a few good books covering the subject . I do not shoot digital at all and would venture it would be rather difficult for digital users to get it to work . The system was meant for large format film and was adapted to medium(120)and small (35) format. The zone system uses exposing ,developng and print making in its you. IMO unless you have patience of a saint some things are best left to film.
Well...it works for me :)
I had the good fortune to know Ansel (he had several of my prints in his personal collection) and have inherently incorporated the concept and practice of the Zone system into my work. I don't calculate it when shooting (any more than I consciously work through shutter speed and aperture). All of it has become part of my unconscious work flow. I've been taking pictures for about 65 of my 77 years. With a camera with the EV range of my D850 it would be foolish to not have the Zone system or some comparable process as part of your routine. Ansel's approach to the Zone system is as much of a guide to understanding light and shadow as it is to a tool to actually use.
You had very good fortune indeed to have known Ansel, and I'm sure him to know you. Thank you for sharing your knowledge and years of experience.
If you're a Photoshop user and interested in the zone system concept, "The Zone System Express" by Blake Rudis is a great tool to streamline your Photoshop workflow. Breaks your tones into 11 zones/layers and separates your colors into separate layers so you can adjust each one individually for maximum control. Also has other Photoshop "shortcuts" for effecient post-processing.
It is not about mimic his work, it is about looking at the way light and dark in your picture. You would have known if you have read it.
I think it is foolish to give a comment about something you did not read.
Clearly you did not read the article
lol
Not to be picky, but the article omits a critical part of Adams’ technique. He “previsualized” the scene by measuring the tonal ranges with a spot meter. If he found that tonal ranges didn’t fit the zones, he manipulated exposure and changed film development time to create a negative that had a usable dynamic range. So, if exposing for a deep shadow forced the highlights beyond zone VIII, he reduced development time to bring the highlight back into a usable range. He could do this because film development time has a greater impact on highlights than on shadows. Likewise, in low contrast scenes, he would increase film development time to push the highlights higher without affecting shadows. This is very similar to what is done in digital by exposing to the right or left. If you read the book “The Negative” where Adams explains film development, nearly all of his photography utilized manipulation of development time to create printable negatives. This also demonstrates that he did not squeeze things into nine neat zones.
A good thing to know, and to get an idea how he worked.
We now have the LCD screen and a histogram to find out if the DR fits the sensor, and we can use multiple exposures to get the result we want.
Thanks for mentioning
Good point; I have to tell you the LCD screen itself can be misleading because it does not give you an accurate histogram of a raw file. I purchased an application called RawViwer. It enables you to visualize the histogram for the actual raw file rather than the jpg implant. You can read the raw histogram while it is on the card before you upload to a computer. It also allows you to flag and rate your images and those flags are carried into Lightroom. Typically, the jpg histogram can be one to two stops off the latitude of a raw file. When I am working on images, I now set the exposure using the histogram on the camera, and then do more brackets by exposing to the right 1 to 3 additional stops. That ensures achieving an optimal file for processing.
Indeed. the histogram is of the jpg. There is more room on both sides of the histogram in the raw file. Unfortunately it will be experiences how much room there is. If you know how much, you can anticipate with the exposure setting.
Nevertheless, the histogram, even for the jpg, is a wonderful tool to have
Completely agree with you Ed about previsualizing. Finally the voice of reason.
To make matters even more complicated, it's not just about getting the zones on the negative to be in one range, Ansel says in "The Print" that at the time of that writing, multigrade papers had not yet gotten to the point where that were as good at making fine prints as graded papers.
That matters to photographers who did their own printing because they would need to keep a stock of paper of every grade, in every size they printed. If you didn't apply the zone system, you would need to be switching between these papers with nearly every photo you printed. That's an unnecessary investment that a "pro" could avoid by learning the zone system from Ansel. Instead, just by using use your light meter in the field, over time you would nail it with every negative, and only need to buy one grade of paper (you might standardize on grade 2). Further fine tuning is still possible in the darkroom with various times using 2 baths, one a low contrast developer like selectol-soft, and one a high contrast developer like dektol.
"With analogue film, underexposure is not recoverable, and overexposure is recoverable." -- good luck taking that approach with colour reversal films like Fujichrome.
With digital sensors, the key is to optimize the data/light hitting the sensor. In theory, the best way of doing this is ETTR and shooting raw. But the problem is that the histograms built into cameras are based on JPEG which means there's always a bit of guessing going on (unless you're shooting JPEG). An optimally exposed raw image will likely not equate to an optimally exposed JPEG and vice versa.
An obvious answer would be if we had the capability of having on board raw histograms. That would be awesome.
That point came up earlier. I found an application called FastRawViewer. While not being an onboard application, it can be used while editing. It will read images on the card when it is connected to your computer and provides a histogram for your actual raw images. You are able to see your raw exposure histograms from dark to light, and it let's you know if you went too far in either direction. It also allows you to do a basic retouch to show you how it would potentially "edit". So, what I do now is to use the onboard jpeg histogram to get my recommended exposure, and then bracket by mostly pushing to the right. When I am ready to edit, I can go through and view the images before I upload them to Lightroom. By the way, you can make stars and flags right on the images in the card and when you upload to LR, it preserves those pre-edit marks. The application can be found here: https://www.fastrawviewer.com/download. A fellow fstopper told me about this application in another discussion.
Another one is Rawdigger: https://www.rawdigger.com/
Daniel, I also have rawdigger; I find that it is technically so far over my head that it is not usable for me. I find that fastrawviewer is straight ahead and is more user friendly. In fact, I think that it was you in another post that introduced me to both of these applications.
I think so. Yes, Rawdigger can be a head scratcher for sure. For me, anyway.
You could also extend the translation of the Zone System to Digital. With film, to appropriately implement the Zone System, you would usually calibrate every lens, camera, enlarger, film, developer, paper, etc using trials and a densitometer. This gives you predictability with your equipment and processes. You could do something similar with your camera, lenses, sensors, and ink-jet (or other) printers.