
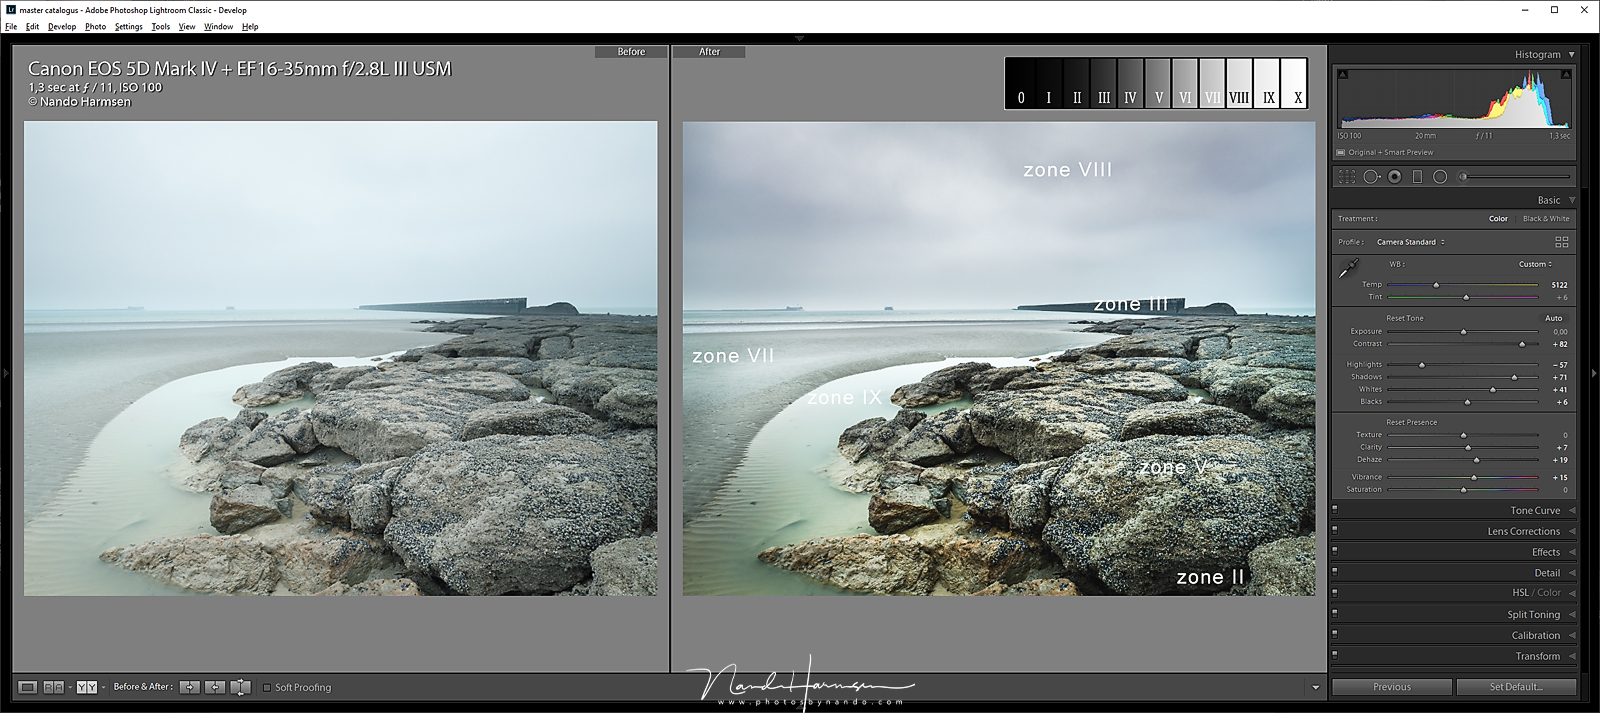
Our histogram shows 256 shades of gray. Besides pure black and pure white Ansel Adams used only nine shades to manipulate the contrast in his famous landscape photos. His zone-system can still be used for our modern digital photography.
Every landscape photographer has heard about Ansel Adams or will eventually come across that name. The famous American is mostly known for his black and white photos of Yosemite National Park. The 1941 photo Moonrise, Hernandez, New Mexico is probably his best-known photo.
One of the reasons why Adams is seen as a great photographer is because of his famous zone-system. With this system Adams was able to perfectly control the contrast in his black and white photos. Adams base rule was: “Expose for the shadows; develop for the highlights.”

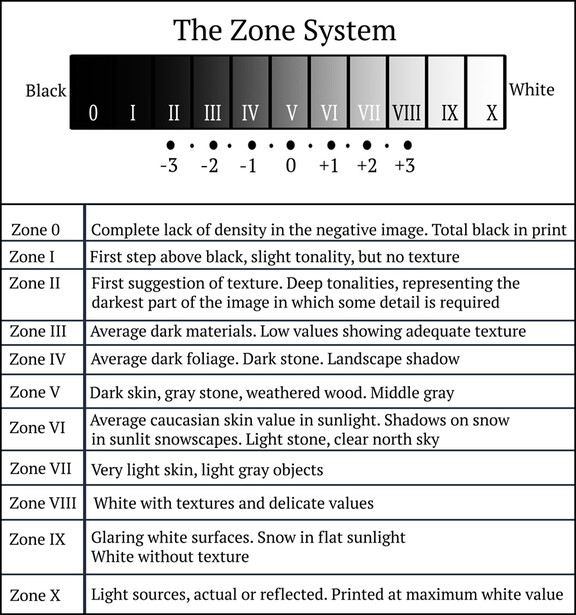
The zone-system of Ansel Adams divides the photo into eleven zones; nine shades of gray, together with pure black and pure white. You could assume that a normal photo does not contain pure black and pure white. Therefor the nine shades of gray would be the only zones you can find in a photo.
Adams, who photographed in black in white negative film made sure to expose for the darkest parts of his scenery. This way he prevented to have pure black in the photo. When developing his photo paper, he made sure to manipulate the dark and light parts in his photo in such a way, that the shades of gray would follow his zone system.
Because Adams made sure to prevent having pure black, he managed to make optimum use of the dynamic range of his black and white film. During the development he was able to dodge and burn the shades of gray to end up with the best possible contrast.
Unfortunately, it is not possible to adapt his way of photographing in the digital photography. When we expose for the dark parts of the photo, the risk of overexpose light areas will occur. We all know, with digital photography overexposed areas cannot be recovered in any way. We all have heard the term for that kind of over exposure: blown out highlights.
This is also the main difference with analogue film. With analogue film, underexposure is not recoverable, and overexposure is recoverable. With digital photography it is just the way around, up to a certain point, of course. This means the base rule of Ansel Adams is not usable for digital photography.
Does this mean the zone-system is cannot be used for digital photography? Fortunately it can still be used. Instead of expose for the shadows, and develop for the highlights, we need to expose for the highlights and develop for the shadows. It is just a small, but very important change.
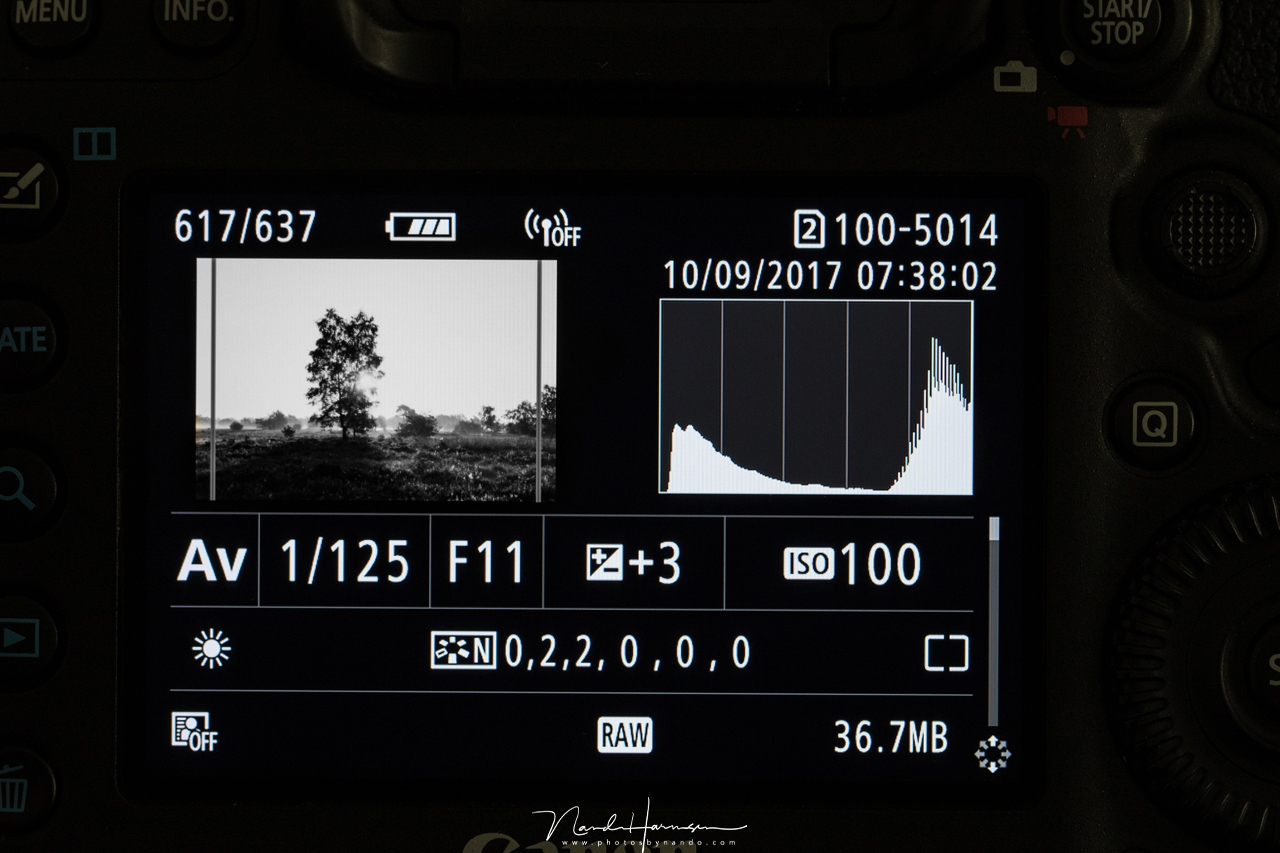
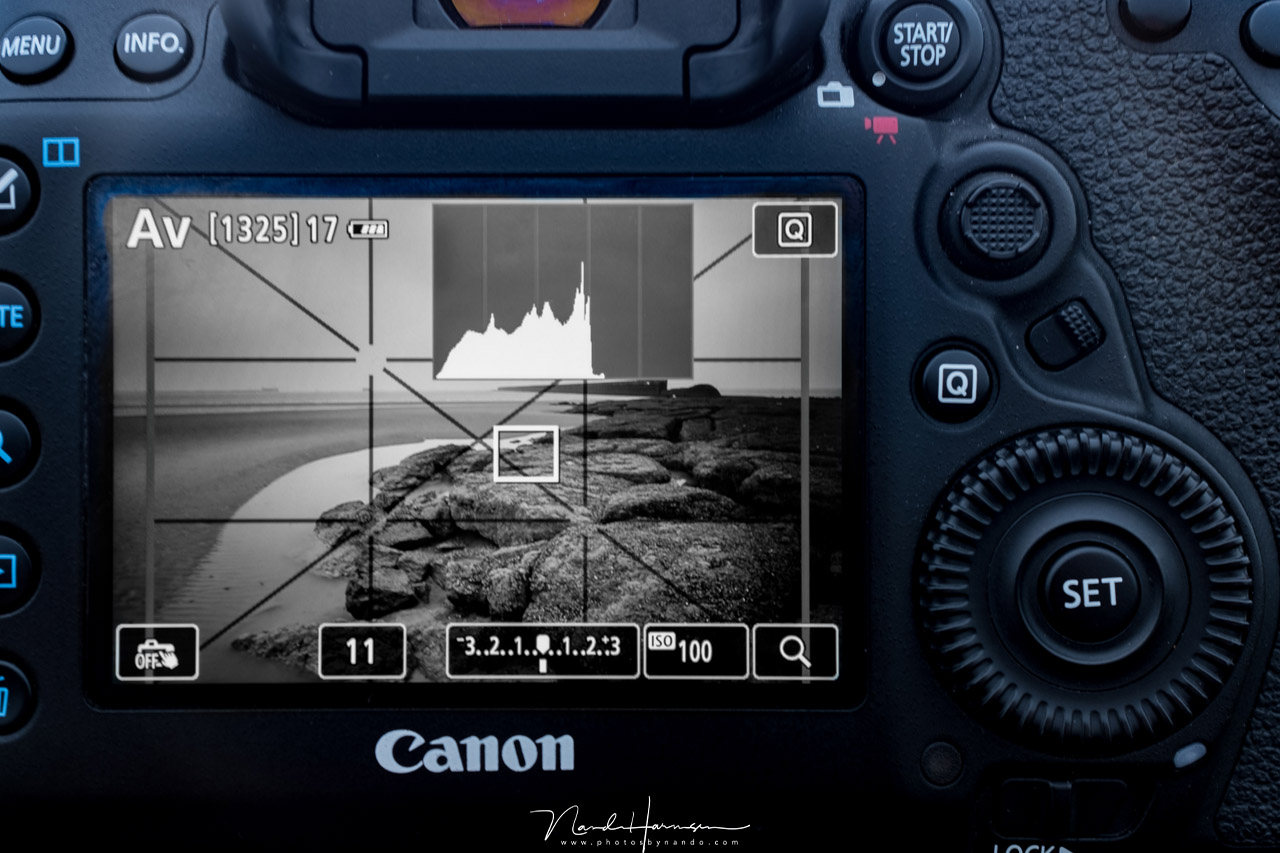
When we translate this to modern digital photography we see how this new base rule resembles Exposure to the Right (EttR). Exposure to the Right is nothing more than expose for the highlights, which translates to a histogram that is placed at the right side of the graph, while making sure no highlight is blown out. It is the only way to maintain as much information as possible in the dark shades of gray. And with a little luck, thus preventing to have pure black in the image.
Exposure to the Right, and expose for the highlights, will not deliver an image that is usable without a proper post-processing. It is essential to manipulate the shades of gray in such a way to end up with the perfect contrast. The use of a raw file format is very important, because only then you will have the ability to use the maximum dynamic range of the digital sensor. When post-processing your raw image it is possible again to use the nine shades of gray from the zone-system that Ansel Adams invented.
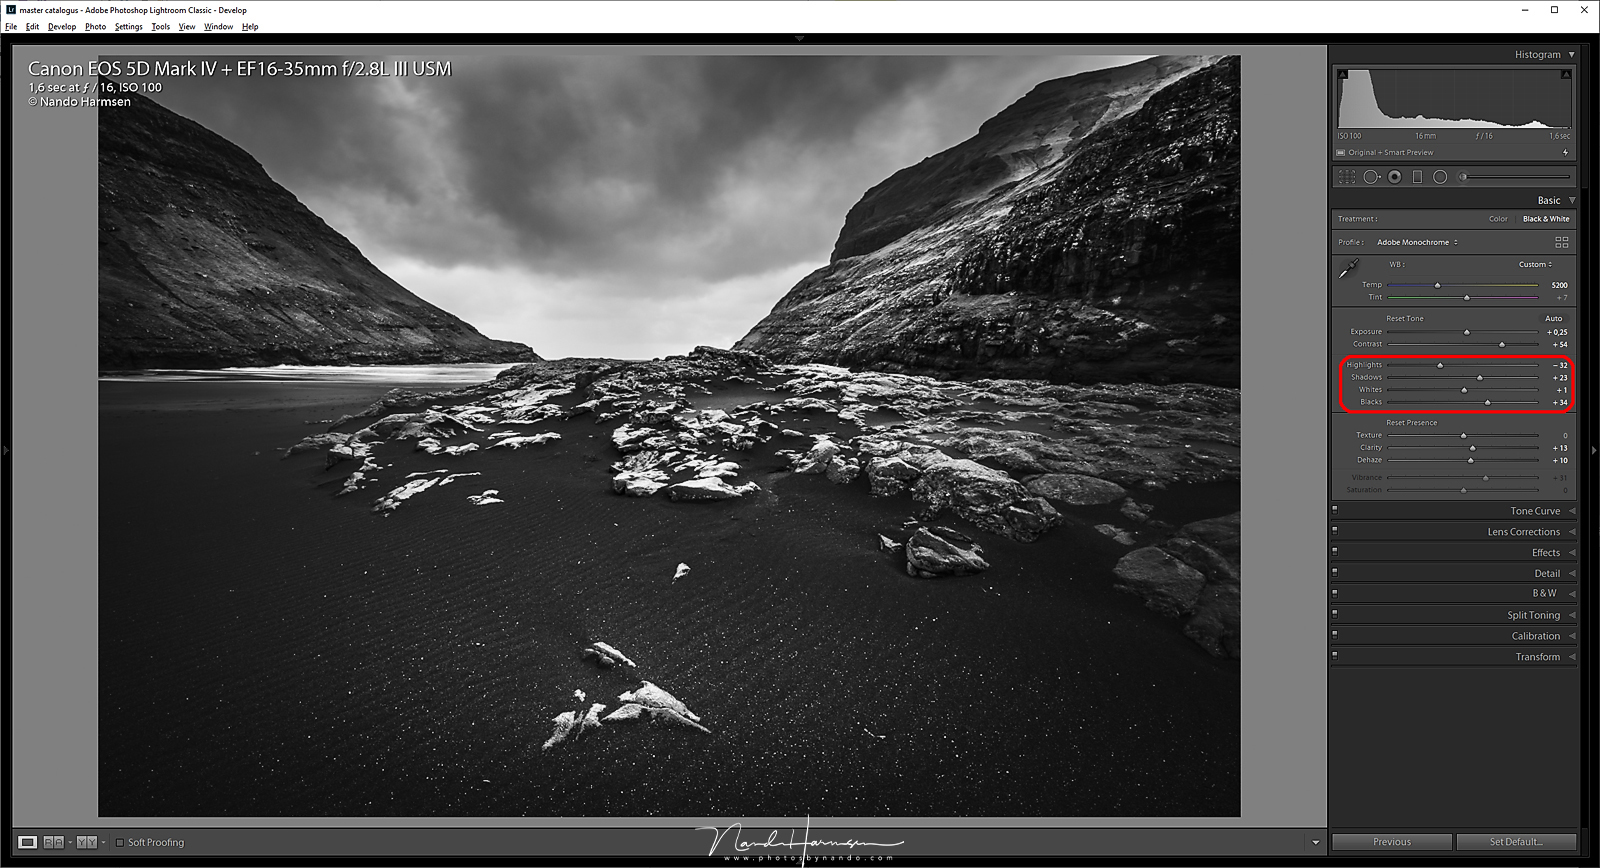
When using Lightroom you can use the sliders highlight and shadow to manipulate the shades of gray. The black point and white point slider will let you manipulate the boundaries, and locale adjustments make it possible to optimize any part of the photo to your liking. With proper post-processing you will end up with a perfect contrast in your black and white photo. It is almost as if we stepped into the darkroom of Ansel Adams again.
How about color? The zone-system of Ansel Adams is invented for black and white photography, of course, but it can be used for color photography as well. Sometimes it can be difficult to recognize the different highlights in a color photo. By temporary converting it to black and white, it might become possible to successfully use the zone-system of Ansel Adams again. You can read more about this method in my previous article.
Have you ever used the zone-system for your photography, either for black and white or for color? Or do you think this method is outdated and not suitable for digital photography. I love to read about your opinion in the comments below.
If you're passionate about taking your photography to the next level but aren't sure where to dive in, check out the Well-Rounded Photographer tutorial where you can learn eight different genres of photography in one place. If you purchase it now, or any of our other tutorials, you can save a 15% by using "ARTICLE" at checkout.


Join the Fstoppers community for free
-
Post comments and join in the discussions
-
Browse the site ad-free
-
Share your work and get featured in the community
-
Compete in the photo contests for fun and prizes
63 Comments
I used ML on my Canon digitals a few years ago. https://wiki.magiclantern.fm/ettr
It's scary to install, and my wife (then-girlfriend) hated the user interface. But it enables some very powerful features.
Changing your picture style if using canon or similar for other manufacturers to neutral, and turning off features such as Auto Lighting Optimizer, Highlight Tone Priority, Active D-lighting etc can go some way to making the histogram more accurate.
Als je nagaat is er niets veranderd aan het principe van fotograferen.
Of je dat analoog doet of digitaal maakt niet uit.
Je beschikt gewoon over een hoeveelheid reflecterend licht waarmee je een lichtgevoelig medium activeert, een laag die in staat is om de hoeveelheid van het licht op te slaan waaraan het is blootgesteld.
Dat is de reden waarom het zone systeem nog steeds van toepassing is.
Of dat op analoge of digitale manier gebeurt maakt niet uit.
Het grote probleem is dat men niet weet hoe je daarmee moet om gaan in het digitale tijdperk.
Dit heeft te maken met het verschil in de aard van de drager.
De film in het analoge tijdperk bestond deze uit een laag gevoelige korrels, ongelijk in grote en willekeurig aangebracht op een doorzichtige drager.
Deze korrels hadden een ronde vorm waardoor deze minder afhankelijk waren aan de invalshoek van het licht.
Een digitale drager bestaat uit een laag lichtgevoelige dioden die volledig op een synchroon patroon zijn opgesteld waarna deze zijn afgedekt met een gladde beschermlaag.
Nadeel hiervan is dat de reflectie een grote rol speelt mede doordat alle dioden dezelfde grote hebben gaat je veel minder variatie hebben in de lichtomvang waardoor je minder informatie ter beschikking hebt.
In beide gevallen kun je spreken over een drager met dezelfde lichtgevoeligheid maar wordt deze op een gans andere manier omgezet.
De vraag die je u daarbij moet stellen is hoe dat vertaald wordt in zones.
Volgens het systeem van Ansel Adams had je tien zones of stops waarvan zone een en zone tien geen doortekening meer hadden met andere woorden ze waren volledig wit of zwart.
Bij een digitale drager van de laatste generatie is er spraken van vijftien zones.
Dit geeft te kenen dat deze veel gevoeliger is als de analoge, waar je hooguit tien zones haalt.
Maar de vraag die je u daarbij moet stellen is wat deze zones in houden hoe verhoud een analoge zone zich tegenover een digitale zone.
Bij een digitale drager wordt dit bepaald door de spanning die de dioden afgeven als ze bloot gesteld worden aan het licht.
Om dit te bekomen heb je een processor nodig die deze signalen omzet in een beeld.
Hoe krachtiger deze processor, hoe minder spanning je nodig hebt om deze signalen om te zetten naar een beeld waardoor de censor gevoeliger wordt en daarom in staat is om meer zones te detecteren als een analoge film.
Het is vooral dit wat het verschil uitmaakt tussen het analoge en digitale.
Hoeveel gegevens bevat een zone.
Een vergelijking is moeilijk te maken omdat dit hoofdzakelijk gaat afhangen van de toegepaste ontwikkeling van een analoge film, bij een censor ligt dat vast.
Maar afgezien van de verschillen die optreden bij het ontwikkelen kun je ervan uitgaan dat een zone bij de analoge drager onder te verdelen zijn in honderdduizend verschillende licht gradaties.
Bij de digitale dragen is dat veel beperkter, hooguit dertig duizend.
Wanneer je dat terug brengt naar de zones ga je een merkelijk verschil vast stellen.
Alles is terug te brengen op de hoeveelheid informatie waarover je beschikt.
Analoog beschik je over tien zones van elk honderdduizend gradaties in totaal een miljoen.
Digitaal heb je er vijftien van elk dertigduizend wat neerkomt op vierhonderd vijftig duizend.
De waarde wat hier aangehaald worden komen in feite niet overeen met de werkelijkheid, maar de waardeverhouding wel.
Wat dit inhoud is dat de gevoeligheid van een digitale censor inderdaad vijftien zones bedraagt maar de informatie bevat die terug te brengen is tot vier en halve analoge zones.
Met andere woorden digitale sensors zijn gevoeliger maar veel minder verzadigd.
Wat nu een voorname rol speelt is de werking van de processor, met hoeveel bit de omzetting gebeurt.
Oudere digitale camera's werken op twaalf bit.
Hedendaagse kleinbeeld werk op veertien bit.
Middelformaat zoals Hasselblad werkt op zestien bit.
Dit houd in dat een middelformaat vier keer meer informatie ter beschikking heeft om dat om te zetten naar een beeld wat neer komt op een miljoen achthonderd duizend gradaties en daardoor in staat is om de analoge filmwaarde te overschrijden.
Het is vooral in dit bereik dat de waarde van een middelformaat terug te vinden is.
Onrechtstreeks wordt dat ook bepaald door het aantal pixels wat de censor bevat.
Hoe meer pixels, hoe meer informatie.
Wat onveranderd lijft is de lichtmeting.
Nog steeds moet je het opvallend licht meten en om zone vijf te bepalen en ben je verplicht om een contrastmeting uit te voeren zodat je in staat bent om belichting zo danig in te stellen dat de belichting binnen de zones vallen.
Ik begrijp niet goed wat je me probeert te duidelijk te maken. Kun je dit ook in korte bewoordingen vertellen?
Dat men de waarde verhouding van een digitale censor overschat als het op grijstinten aankomt.
Al beschik je over 15 stopt dan is het nog altijd onvoldoende om digitaal een beeld te creëren dat gelijkwaardig is aan dat van een filmemulsie
Ongetwijfeld heb je gelijk.
Het aantal grijstinten, of beter gezegd luminescentie waarden is afhankelijk van de bitdiepte. 8bit is 256 tinten, 16 bit 65 duizend (en een beetje). Dat vergelijken met film emulsie is appels met peren vergelijken. Daar gaat het in dit artikel niet over. Het gaat over het gebruik van de 10 zones die Adams ooit gebruikte, en of je dit kunt toepassen met digitaal. Of je nu 65 duizend (en een beetje) grijstinten hebt, of nog meer grijswaarden in film emulsie, komt het toch gewoon weer uit op het verdelen in die 10 belangrijkste tinten als je uitgaat van het zone systeem.
I am in analoge photography since years and also shoot digital.
Monitors or photographic paper allow for 9 to 10 f-stops of dynamic range, so if somebody talks about more, it is compressed, mostly automatically by digital cameras. In analog photography you would call it contrast adjustment.
To clearify:
Digital photography is analog photography till after the sensor. On from there it starts with digital conversion.
With film the original zone system is based on zone I to be always constant. ISO therefore doesn't shift (just for minor adaptions), only development time is used to adjust for contrast. (Expose for the shadows and develop for the highlights).
All modern film data (exposure, development) is based on zone V constant. To achieve this you change ISO when adjusting contrast (dev. time). (Expose for zone V or mid tones, develop for highlights AND shadows, namely push/pull)
The analog film approach that fits best with your digital "expose for the highlights and develop for the shadows / RAW development" fits best for film when using William T. Mortensen's approach, giving you a more or less pictorialism look. Here digital and analoge give you a nice linear separation of upper mid tones and below zone IV shadows start fading away, depending on the dynamic range of your digital camera or the amount of underexposure with film. The shadow area in digital photography has less bytes in the lower zones and with film there are other mechanisms (e.g. reciprocity failure at lower light levels that can be compensated by pre-exposure)
Here is a link that covers this (in German, Google may translate).
http://experimentelle-fotografie.blogspot.com/2019/07/william-t-mortens…
I always encourage my students to start learning about exposure according to the zone system with a digital camera. The monitor of the camera (jpg-mode) is close to film at box speed in terms of contrast range you are able to tame..
Got piece of work, Nado.
I can confirm.
It gives a nice pictorialism look.
I even went a step further.
1. Digital shots exposed for highlights converted into BW (pic. 1)
2. Digital files exposed on T-max 100 film (pic 2)
3. Straight prints in my darkroom (pic. 3)
I wonder why suddenly after his death, the zone system of Adams suddenly no longer counts 10 zones (from 0 to IX) but everyone talks about 11 zones (0 to X), also in this article; can someone tell me more about this, where does the 11th zone come from, why is it needed and who started it?
the zone system is not outdated at all, but is needed in this digital world right now. I have the leica monochrome and this sensor really works like you are working on film, with all the other digital cameras I know you indeed have to expose for the highlights and then, like we used to develop the film, develop the file in the raw converter . There is a rule if it looks good on your screen on the back of the camera, you have underexposed one stop.
I have based my information on the research I did. I agree, things can get a life of their own. No matter how it is called, the basics keep te same.
I like the rule you mentioned. No, wait. I love it :)
No, Ansel used 0 to X. It's right there on page 52 of "The Negative." However, he describes "useful density" as lying between I - IX. But 0 to IX? No, that's not used by Ansel to describe any range. Whoever told you that was mistaken.
I have been exposing to the right as a matter of habit for some time. The exception is when I want to create a silhouette. I read several AA books years ago. Sadly I sold them which I now regret.