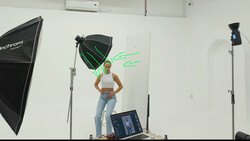
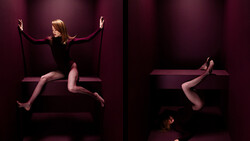
The beauty of a studio space is the ability to carefully craft light exactly as you'd like it to be, giving you the opportunity to get as nuanced as you would like. In this video, you'll move beyond some of the more common three-light setups and see a very precise design and the portraits that were shot with it.
Coming to you from Adorama TV and Miguel Quiles, this goes behind the scenes of a portrait shoot with a three-light setup in which Quiles does some careful work to ensure his desired result. It's a great lesson in controlling and shaping light, as you'll see him work with a beauty dish with a grid to control the spill of light, barn doors to direct light and give a precise highlight for the backlight, and a large, diffused light in a softbox (also shot through a scrim) as fill. The result is the shaping power of a beauty dish with a bit of fill to soften the deeper shadows and a one-sided backlight that provides some separation. It's definitely a fun and interesting setup, and you can see the results Quiles gets in the video above.

Join the Fstoppers community for free
-
Post comments and join in the discussions
-
Browse the site ad-free
-
Share your work and get featured in the community
-
Compete in the photo contests for fun and prizes
9 Comments
Good tutorial, but I find it odd that he is standing in front of that fill light. Strange to see his silhouette in the catch light in her eyes, which means he would be blocking some of it.
there really is no other way to do it if you want a large diffused fill light, if you look at some of Michael Thompsons old W magazine covers he shoots with 2 4x6 soft boxes directly behind him as the main light and you will see the same silhouette but beautiful light.
http://www.djuna.kr/christy/97/97-05-01.jpg
He's blocking some light from the Softbox, and then he's adding light back in through the Beauty Dish.
I use a 3 light setup, i.e. beauty dish and 2 6 foot strip boxes, all gridded. The wrap is enough where i rarely have to use a front reflector. You'll really get more pop out of your shots if you add a kicker light behind her facing the backdrop to create a gradation, either circular or linear, to separate the model from the background.
He's shooting awfully close to that background, which means it'll stay in focus along with the model. If you're shooting with a paper drop (which most of us do), you'll pick up the wrinkles in detail as well as hard light reflected of the paper from the strobes, which isn't too pretty.
He's shooting at f/11, also.
Yikes, why so high?
shooting at f/11, no lightmeter...
may have done that before the recording of the video, however, it may be his normal setup as I know from my normal setup I'll start at f/11 and make changes if needed.
I use a 3M x 3M scrim with 2 lights behind it and then a beauty dish with grid and a hair light with a medium grid, which covers both shoulders and hair. Have to say this video is one of the very few where the model actually worked. She was very good and very attractive.