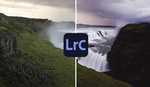
Most of us edit in Lightroom using the numerous sliders, and while those are perfectly fine the vast majority of the time, a tool that contains the power of many sliders all in one is hiding in plain sight: the tone curve. If you have not used it before, check out this fantastic video tutorial that will show you how to use it for everything from adding contrast to color grading.
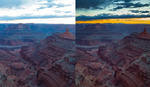
Coming to you from Anthony Morganti, this great video tutorial will show you how to use the tone curve in Lightroom. The tone curve is one of the most powerful and versatile tools in the application. At its core, it is a graphical representation of input and output luminance values. The horizontal axis represents all the luminance values already in your image (from 0 to 255), while the vertical axis represents the values to which you would like to map corresponding horizontal axis values. By manipulating the graph, you can quickly and effectively edit the exposure, contrast, highlights, and shadows of an image. Furthermore, by switching to the individual color channel curves, you can easily color grade your image. Check out the video above for the full rundown from Morganti.


Nice review, Thank you.
Anthony, you are an outstanding instructor who uses excellent verbal and visual illustrations to make your class so understandable. My only suggestion is that you remove the phrase 'kind of' from your vocabulary. It is just a filler that is really distracting to the listener, while adding nothing to the information shared in the presentation. Thank you.