Every year, I run dozens of workshops for photographers, and there are always the same areas that even established photographers have not grasped. Learning the metering and exposure ropes opens a gamut of creative possibilities.
Metering
Almost without exception, modern interchangeable lens cameras have through-the-lens (TTL) metering. This is a simplified explanation, but using the basic default setting, TTL measures the amount of light coming through the lens. The metering tells the camera what the exposure settings should be.
Entire Frame Metering
From most users’ points of view, the default metering is an average of the entire frame. It is more complex than that, though. Cameras’ processors are programmed to make assumptions about photographs. Consequently, they may change the meter reading depending upon where different amounts of light are distributed within the photo. But thinking of it as an average taken across the whole frame is a simple and usable way of working with metering.
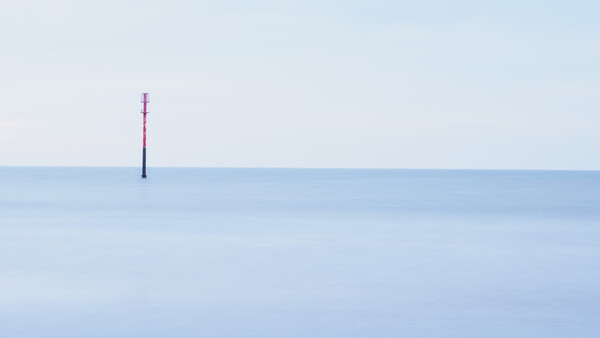
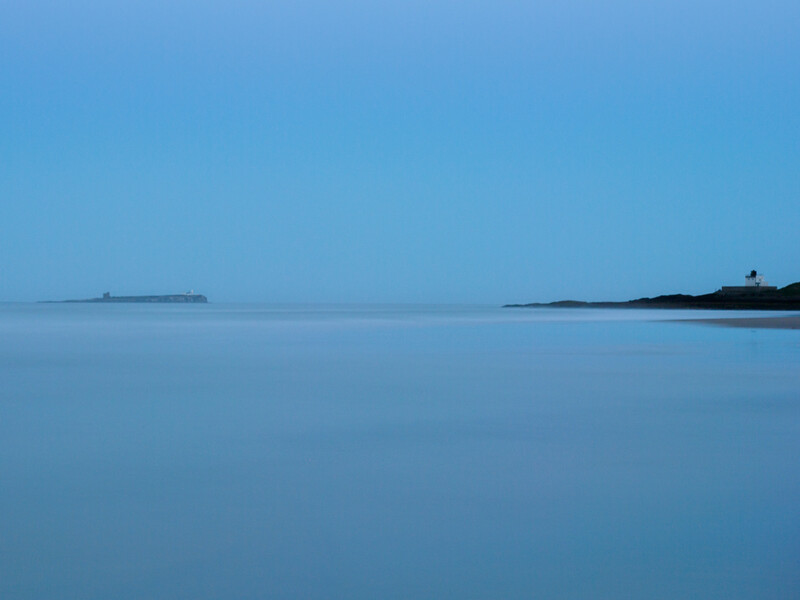
This metering mode has a variety of different names depending upon the brand of the camera, and, unhelpfully, the icons change from system to system too. On your camera, it may be named evaluative, matrix, multi, ESP, multi-zone, multi-segment, or multi-field. Whatever it’s called, this mode is particularly well suited for scenes where there is an even distribution of light throughout the frame, such as a typical landscape.
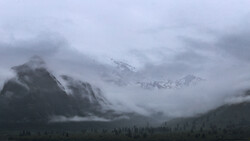
With this long exposure of the sea shot at dusk, whole frame metering worked well.
Spot and Center-Weighted Metering
There are two other common metering modes. Center-weighted metering emphasizes an area in the middle of the frame. This is great for portraits.
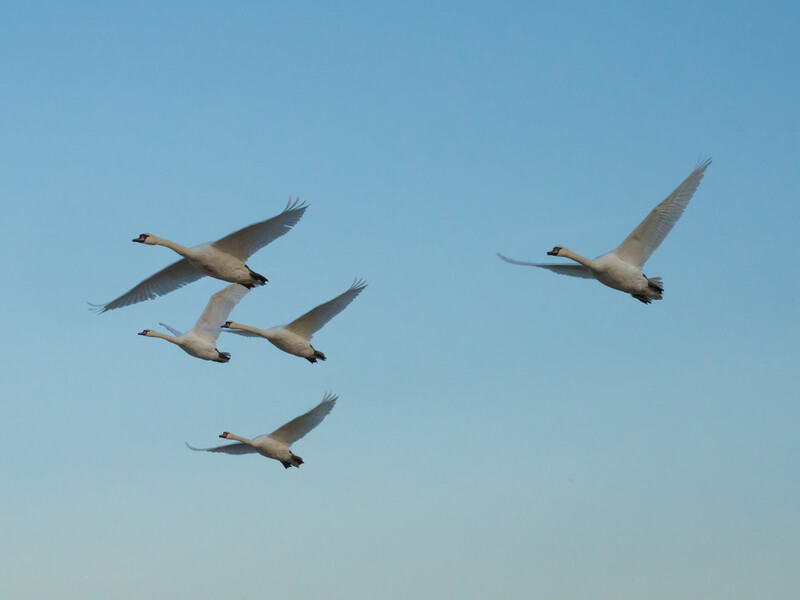
Meanwhile, spot metering, as its name suggests, concentrates on an individual spot in the picture. Basic cameras restrict this to the center of fame. However, far more useful is when that spot is tied to the focusing point. A typical use for this might be photographing flying birds against a bright background. As the focus point tracks around the framed bird, the metering spot moves with it.
Different brands have other metering modes for specific purposes, and there are too many to describe them here. If you are unsure, please feel free to ask about them in the comments; I’ll try my best to answer.
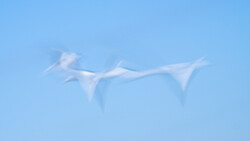
While setting up to shoot the previous image, I heard these mute swans approaching. Switching my mode dial to the custom slot set for wildlife, I could spot-meter on one of the swans as the continuous autofocus tracked it.
Exposure
A lot of photographers confuse metering with exposure. Although linked, they are two separate functions. While metering measures the light, exposure settings change the shutter, aperture, and ISO according to that metered light to create an image of a particular overall brightness.
Your Camera Can Be Fooled Into Suggesting the Wrong Exposure
In an automated or semi-automated (aperture or shutter priority) mode, the camera will adjust the exposure of the frame to cohere with the metered light. It will try to produce a Goldilocks image, neither too bright nor too dark but, on average, mid-toned.
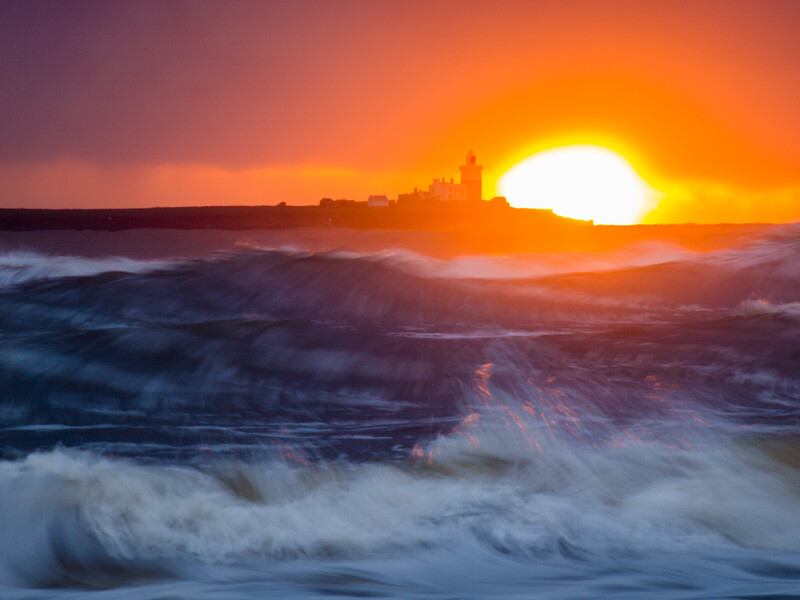
This is fine, but what if the scene we are shooting is exceptionally bright, like photographing contre-jour? I am often pointing my camera across the ocean towards a sunrise. Consequently, the camera will expose that dominant bright light to be mid-toned. Therefore, the water becomes a dull mid-tone in the picture.
Shooting towards a bright light source, like this sunrise, may mean adding exposure compensation to bring out details in the image that would otherwise be too dark.
Similarly, if we are photographing a primarily dark frame, the camera will try to brighten the image up, making blacks turn mid-gray. This might not be the result you are looking for.
Give it a go. Take a photo of a sheet of white paper, filling the frame with it (you may need to draw something in the middle of the paper for your camera to focus on) and look at the resulting image. The paper will appear gray, not white. Now, fill the frame with something black, like the back of your camera bag. Again, the resulting photo will be dominated by grays and not black.
If shooting in aperture or shutter priority, this is where exposure compensation becomes essential. It's counterintuitive, but dialing in positive exposure compensation for a bright scene and negative exposure for a dark one will give you a result where the photograph more accurately reflects what your eyes saw.
I estimate that in 80% or more of my photos, the exposure I chose is not the one that the camera’s metering recommended. This is partly because of the dominance of either bright or dark areas in my photos, but also because it is one of the most useful creative techniques available to us.
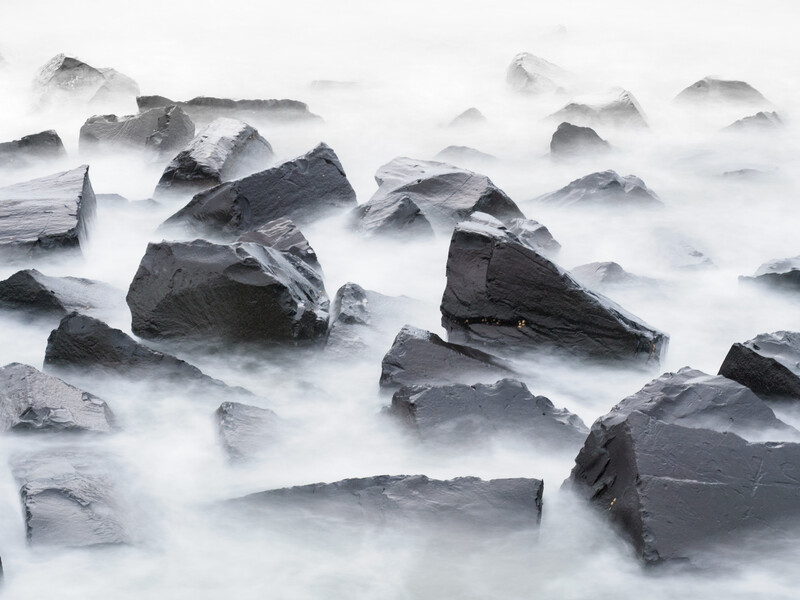
Adding exposure compensation allowed me to bring out the details in the rocks and increase the time the shutter was open, giving the water this ethereal, otherworldly look.
The Histogram and Exposure
The screens on the back of the cameras and in the viewfinders on mirrorless and bridge cameras are not calibrated. They are often adjusted to be brighter so you can see them in daylight. The histogram gives you a more accurate way of judging exposure than looking at the screen.
It may seem confusing at first. A histogram is like a bar chart, but with no gaps between the bars. Each bar does not represent a single value, but a range of values. If you want to learn more, I wrote a fuller explanation of the histogram back in July.
The histogram on a camera is a simple representation of the number of pixels at different luminosities (brightnesses) within the image. The left-hand side is black. Next to that, moving to the right, come the shadows, and then the midtones are in the middle of the chart. To the right of the midtones are the highlights, and finally, the whites.
A big peak in one section of the histogram will mean there is a large area with that luminosity in the image. If there are no pixels in another area of the histogram, that means that none of the pictures has that luminosity.
If most of the histogram is pushed to the left, the photograph will be mainly dark; a low-key image. Conversely, high-key images will have most of the pixels illuminated as highlights or whites, so the histogram will be pushed to the right.
Images with a U, M, and W-shaped histogram will have strong contrast with clearly defined areas of separate tones. Meanwhile, having all the pixels pushed together will represent a low-contrast image.
It’s a misconception that an underexposed image will have all the histograms on the left-hand side. Taking the sunrise seascape I mentioned before, without exposure compensation, the pixels for the brightest areas would be in the midtones (middle) area of the histogram, when they should be on the right-hand side.
Using Exposure Creatively
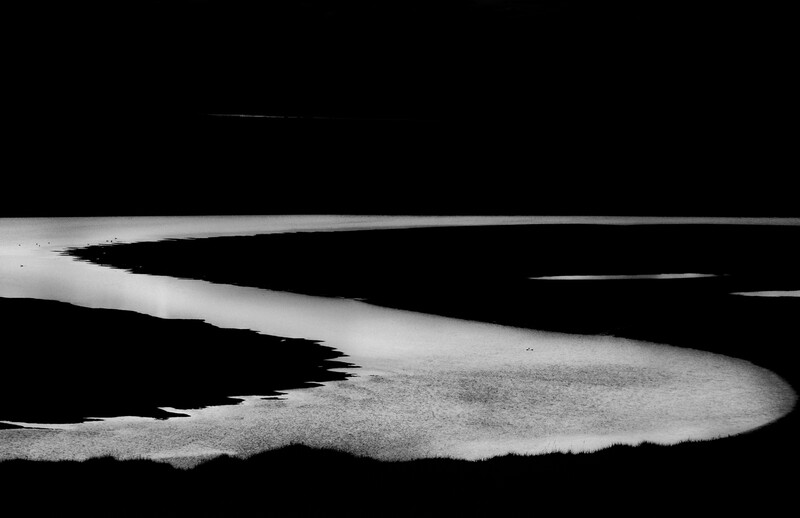
Well into dusk, negative exposure compensation made the land black, thus making the moonlit meandering river stand out. Additional adjustments to the contrast were added in Silver Efex Pro.
Once you know how exposure and metering works, you can apply them creatively.
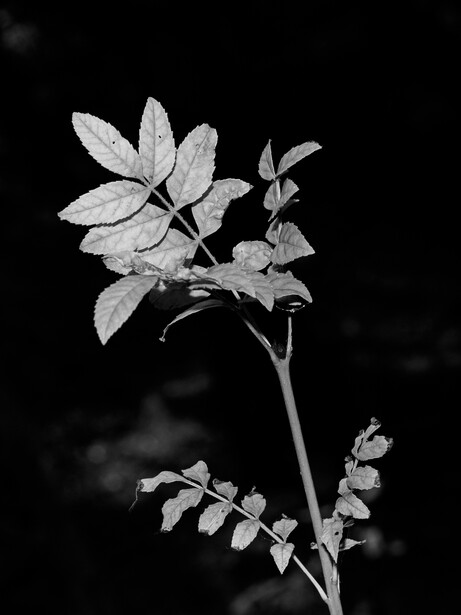
Imagine walking through a forest and a shaft of light beams through the trees and falls on a single leaf. Because most of the frame is dark and only the leaf is bright, in auto settings, the camera will bring the dark area up into the mid-tones, and parts of the bright leaf will become blown-out whites.
By applying for negative exposure compensation, the brightness of that leaf can be brought down to the middle of the histogram and the dark background pushed to the left so it becomes black.
Using a bright light source on the subject, in this example, a flash, will separate it from a dark background. Exposure was decreased to bring the brightly lit leaves into the middle of the histogram, making the background even darker.
You now have a picture of a leaf against a dark background.
It's possible to do the reverse of this too, making a high-key image by pushing the highlights into the whites and the blacks and shadows into the midtones.
Pushing the exposure to the right, adding positive exposure compensation, made this image of an arctic tern more effective.
Buying a New Camera? Here's What to Look For
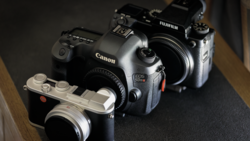
Because exposure control is one of the most important tools in photography, it is something that you want quick and easy access to. A lot of cameras have just one dial and therefore require pressing a [+/-] button before entering exposure compensation. It is much faster to have two dials instead. In manual mode, one is set to adjust the aperture and the other, the shutter speed. In aperture or shutter priority, the second dial adjusts exposure compensation.
If you use a semi-automated mode, such as aperture priority, then also look at the amount of exposure compensation that is possible. Three stops on either side of zero compensation are barely adequate, but I recommend looking for a camera that has at least plus and minus five stops of available compensation.
Let's Hear Your Thoughts and Experiences
There is a lot more to this than I can include in this short article. If you have any thoughts about this topic that other readers might find helpful, or if you have a question, please leave a comment. It would be great to see your images where you have used exposure creatively too.
Overall you are right, but esp. with Fuji X-cameras there are a few caveats. Like with every mirrorless system it's good to know that an EVF can be set to certain brightness and color corrections that can lead to a different exposure impression than actually recorded. Secondly, you can incl. or excl. WB, exposure and some settings like contrast and film simulation in your EVF. These also affect the exposure metering of the camera (as well as the histogram with Fuji cameras). Thirdly, Fuji calibrates their light meters with an 18% grey card (like in the days of film) opposite to most other brands that use a 30% grey card for calibration (for digital sensors). As a result, most Fuji raw files seem a bit underexposed. The nice effect is that highlights are better protected, which is great esp. for an APS-C sensor, but it also limits the DR a bit. When I used Fuji professionally (until about a year ago), I often overexposed the camera metering by 1/3 or 2/3 of a stop to get the best result that allows for the most latitude in post processing. Or, use an external light meter...
Thanks both, that's an interesting discussion. I know little about Fujifilm cameras, apart from them being great bits of kit. I've learned something today! :) It's nice to have educated readers.
Jacob, when you say the raw files look under-exposed, are you saying that on a "normal distribution" histogram (i.e. a symmetrical curve with a peak in the middle) the image appears dark? If so, does this include when viewing on camera, on the computer when using the proprietary software, and when using third-party raw developers such as Lr, C1, On1, etc.?
I haven't tested it with a 'normal distribution', but I did do some practice tests a while ago when I was trying out different cameras to move to a new FF ML system. We had a static studio setup and I took my X-H1 and GFX50S and compared the exposure with several other brands. I noticed that when selecting the average metering mode on all cameras, the Fuji's would select shorter shutter speeds and the histogram in C1 was a bit more shifted to the left. I also compared it to my regular external light meter in reflective light mode and the difference was similar. My camera supplier told me this was the underlying reason and it was confirmed by a Fuji rep here in Switzerland.
I do the opposite when im shooting, usually the exposure comp dial is 2/3 of a stop down. But im often shooting landscape at sunset so preserving highlights.
Because I live on the East Coast, I am usually shooting contre jour at sunrise and increasing the exposure because the bright light causes the camera's metering to reduce exposure. I do watch the histogram to ensure the highlights are not blown though. This one was shot on a workshop I was running this morning. It had +0.7 EV compensation, and I could have probably chosen +1 EV.
Thats a beauty that shot Ivor... ive just been to the Durham Lumiere testing tonight to get some shots before the crowds turn up. I must admit I don't often have my exposure comp dial on plus numbers with the Fuji I use.
Hello Ivor. You teach it very well. I am still struggling with the concept of including ISO in exposure. I can understand why it is included. But here's why I personally don't use it when thinking about exposure in the first part: the sensor has a base ISO at which it gives the optimal image. Most of the time it is between 64 and 200 ISO. (Some newer sensors have two base ISO values, but we'll leave that out here). And most modern sensors have an exposure invariance of 4 to 6 stops, which means you can increase it later in post-processing. This means that you can either underexpose the image and boost it later, or you can set the ISO of the camera higher and expose the image correctly for the given gain of the base value.
When you think about it this way, it's almost like using analogue film: Expose it to its (optimal) ISO value. Gather as much light as possible without overexposing critical parts of the image. The difference with digital photography is that you can change the (analogue) ISO setting after the actual exposure of the sensor (incorrectly, because it is a signal boost). And yes, a higher ISO setting than the sensor's base ISO is actually almost the same as post-processing (within a certain range). The sensor is only exposed with two parameters: Aperture and shutter speed, which control the light. ISO 6400 with 1/125s and f/8 always leads to an undersaturation of the sensor. That's why we use slow shutter speeds whenever possible in dark scenes.
But of course you can skip all these considerations and use the "exposure triangle". It leads to the right results.
I've always absolutely agreed with what you've just said, and thought the same way. When I teach metering and exposure to beginners, I start by describing metering as a seesaw and not a triangle for that reason.
However, several years ago, with a long-since replaced camera, I went out and did some nighttime shooting, pointing my camera into the dark, and towards the bright but distant harbor lights.
I tried different ways of shooting that same night scene. Firstly, I chose the base ISO and the recommended exposure settings, it was about 60 seconds. Then I increased the ISO by 2 stops, so achieved around a 15-second exposure. Then, thirdly, at the base ISO, I over-exposed by two stops. Finally, I under-exposed by two stops. The exposures of the last two I corrected in Lightroom.
The best quality image was, as expected. The base ISO recommended exposure was the cleanest.
What followed surprised me. Next best was the higher ISO image, just a little more noisy than the base ISO image.
The corrected over-exposed (longer exposure) base-ISO image had a similar noise level to the high ISO one. However, there were irrecoverable blown highlights around the harbor lights.
The corrected under-exposed image was the noisiest by far. With the best noise reduction software available at the time, it ended up a soft and mushy.
I must repeat this experiment with my newer camera, which I can push further than that now 11-year old model. Also, use the new NR software, such as On1 NoNoise and Topaz DeNoise, which do an amazing job compared with the horrible results of Lightroom's noise reduction.
When I get a chance to go out to repeat the experiment, I'll be sure to share the results.
11 years? That's quite a while. My D800E is from 2012 and is a Nikon. At that time, the Canons were not ISO-invariant. Everything I said only applies if the camera is ISO-invariant. Overexposure means a loss of data. That's why we want a wide dynamic range sensor: to store as much as possible in the shadows without blowing out the highlights.
I am looking forward to your results. Thank you very much for the answer. Cheers!
"However, far more useful is when that spot is tied to the focusing point"
I've been in the Canon fold for years and I've often wondered why they never implemented a feature as useful as this. It's not even available in the R5. Often, what I'm focusing on is not at the center of the frame. True, I could just take a reading off the center and recompose. But, that's just an extra step. Maybe they'll see the light in the R5s, R3 or R1.
Since I know I'll be postprocessing my images, I always keep an eye on the histogram to avoid clipping at either end. With this in mind I make sure I'm using a nice vanilla profile rather than "Portrait", "Landscape", etc. to make sure histogram readout isn't unduly influenced.
You are not the first person that's mentioned that to me, Robert. They make good cameras, but there seem to be a few areas where Canon plays catch up, not least with the move to mirrorless.
Regarding the profile, are you shooting raw? I didn't think the profile would make any difference to the actual raw file, just the embedded JPEG preview. It doesn't with my system. If it's different with Canon, I've learned another new thing today. If you shoot JPEG, then the profile does make a difference.
A typical example would be a subject against a light background (or very dark background). Your camera exposes with the default value of 18% grey. So your subject would either be too dark or too light. This is where exposure correction comes into play in order to expose the subject correctly.
Some cameras have settings that, with JPEGs, change the brightness of the shadows, bringing out the details in those areas. This is done by processing of the data coming from the sensor. There is no change to the exposure settings, just the way the picture is processed by the camera.
For JPEGs, that has an advantage over exposure compensation if there are particularly bright areas in the photo that would be blown out if you increased the overall exposure. If you increase the exposure, you are affecting the entire image. More advanced cameras also allow you to reduce the brightness of the highlights at the same time.
If you shoot raw then, (on my camera, and I assume others too) this setting has no effect. That shadow detail is still there, even if you cannot see it initially, and you can recover it in your raw developing software (Lightoom, On1, Affinity, etc.), typically by moving the shadows slider to the right. This is doing the same thing as the fill light setting, but you have greater control over it.
Learning how to use the camera's histogram will enable you to adjust the exposure compensation accurately and retain the details in both the shadows and highlights.
I hope that helps explain what you wanted to know.
Good article! Of course understanding exposure is an absolute requirement if one is to claim one is a photographer!!
"Back in the day" of film weddings the only reading we took was incident..who would trust a reflective meter with a white dress/black suit?
Grey cards (18% reflective) are still a useful tool even with digital and could have been used in the wedding situation! You could actually meter off your hand which came close to the 18% grey card reading for Caucasians!
I accept a lot of the time for fixed subjects bracketing (and RAW) will get you there and it's true that modern predictive matrix meters will generally get you in the ball park, but understanding the concepts will enable you to make adjustments on the fly!
We had simple "formulae" back in the days of film. Snow scene..open up 2 stops from the meter reading..predominantly dark scene, close down 1-2 stops.
For negative films the definition of "exposure" was the minimum exposure you would give to preserve detail in deepest shadows. For transparency and digital (positive) the maximum exposure you could give to preserve highlight detail.
Contrast is another matter! For negative film you could adjust it in the process..with digital you have to rely on the DR capability which is why I only shoot RAW. 13 stops range should be enough but a chip has a sensitivity "curve" which approximates a linear gradient...at least with film you had a knee and a toe to the sensitivity curve which thankfully compressed shadow and highlight detail...contributing no doubt to the "look" of film?


23 Comments
Overall you are right, but esp. with Fuji X-cameras there are a few caveats. Like with every mirrorless system it's good to know that an EVF can be set to certain brightness and color corrections that can lead to a different exposure impression than actually recorded. Secondly, you can incl. or excl. WB, exposure and some settings like contrast and film simulation in your EVF. These also affect the exposure metering of the camera (as well as the histogram with Fuji cameras). Thirdly, Fuji calibrates their light meters with an 18% grey card (like in the days of film) opposite to most other brands that use a 30% grey card for calibration (for digital sensors). As a result, most Fuji raw files seem a bit underexposed. The nice effect is that highlights are better protected, which is great esp. for an APS-C sensor, but it also limits the DR a bit. When I used Fuji professionally (until about a year ago), I often overexposed the camera metering by 1/3 or 2/3 of a stop to get the best result that allows for the most latitude in post processing. Or, use an external light meter...
Thanks both, that's an interesting discussion. I know little about Fujifilm cameras, apart from them being great bits of kit. I've learned something today! :) It's nice to have educated readers.
Jacob, when you say the raw files look under-exposed, are you saying that on a "normal distribution" histogram (i.e. a symmetrical curve with a peak in the middle) the image appears dark? If so, does this include when viewing on camera, on the computer when using the proprietary software, and when using third-party raw developers such as Lr, C1, On1, etc.?
I haven't tested it with a 'normal distribution', but I did do some practice tests a while ago when I was trying out different cameras to move to a new FF ML system. We had a static studio setup and I took my X-H1 and GFX50S and compared the exposure with several other brands. I noticed that when selecting the average metering mode on all cameras, the Fuji's would select shorter shutter speeds and the histogram in C1 was a bit more shifted to the left. I also compared it to my regular external light meter in reflective light mode and the difference was similar. My camera supplier told me this was the underlying reason and it was confirmed by a Fuji rep here in Switzerland.
That's really interesting, thank you.
I do the opposite when im shooting, usually the exposure comp dial is 2/3 of a stop down. But im often shooting landscape at sunset so preserving highlights.
Because I live on the East Coast, I am usually shooting contre jour at sunrise and increasing the exposure because the bright light causes the camera's metering to reduce exposure. I do watch the histogram to ensure the highlights are not blown though. This one was shot on a workshop I was running this morning. It had +0.7 EV compensation, and I could have probably chosen +1 EV.
Thats a beauty that shot Ivor... ive just been to the Durham Lumiere testing tonight to get some shots before the crowds turn up. I must admit I don't often have my exposure comp dial on plus numbers with the Fuji I use.
Thanks Stuart. I have a friend who shoots with a Fuji - a fine camera it is too - and I must do some side-by-side comparisons.
Hello Ivor. You teach it very well. I am still struggling with the concept of including ISO in exposure. I can understand why it is included. But here's why I personally don't use it when thinking about exposure in the first part: the sensor has a base ISO at which it gives the optimal image. Most of the time it is between 64 and 200 ISO. (Some newer sensors have two base ISO values, but we'll leave that out here). And most modern sensors have an exposure invariance of 4 to 6 stops, which means you can increase it later in post-processing. This means that you can either underexpose the image and boost it later, or you can set the ISO of the camera higher and expose the image correctly for the given gain of the base value.
When you think about it this way, it's almost like using analogue film: Expose it to its (optimal) ISO value. Gather as much light as possible without overexposing critical parts of the image. The difference with digital photography is that you can change the (analogue) ISO setting after the actual exposure of the sensor (incorrectly, because it is a signal boost). And yes, a higher ISO setting than the sensor's base ISO is actually almost the same as post-processing (within a certain range). The sensor is only exposed with two parameters: Aperture and shutter speed, which control the light. ISO 6400 with 1/125s and f/8 always leads to an undersaturation of the sensor. That's why we use slow shutter speeds whenever possible in dark scenes.
But of course you can skip all these considerations and use the "exposure triangle". It leads to the right results.
Hi Jan.
I've always absolutely agreed with what you've just said, and thought the same way. When I teach metering and exposure to beginners, I start by describing metering as a seesaw and not a triangle for that reason.
However, several years ago, with a long-since replaced camera, I went out and did some nighttime shooting, pointing my camera into the dark, and towards the bright but distant harbor lights.
I tried different ways of shooting that same night scene. Firstly, I chose the base ISO and the recommended exposure settings, it was about 60 seconds. Then I increased the ISO by 2 stops, so achieved around a 15-second exposure. Then, thirdly, at the base ISO, I over-exposed by two stops. Finally, I under-exposed by two stops. The exposures of the last two I corrected in Lightroom.
The best quality image was, as expected. The base ISO recommended exposure was the cleanest.
What followed surprised me. Next best was the higher ISO image, just a little more noisy than the base ISO image.
The corrected over-exposed (longer exposure) base-ISO image had a similar noise level to the high ISO one. However, there were irrecoverable blown highlights around the harbor lights.
The corrected under-exposed image was the noisiest by far. With the best noise reduction software available at the time, it ended up a soft and mushy.
I must repeat this experiment with my newer camera, which I can push further than that now 11-year old model. Also, use the new NR software, such as On1 NoNoise and Topaz DeNoise, which do an amazing job compared with the horrible results of Lightroom's noise reduction.
When I get a chance to go out to repeat the experiment, I'll be sure to share the results.
Thanks for replying. It's always appreciated.
11 years? That's quite a while. My D800E is from 2012 and is a Nikon. At that time, the Canons were not ISO-invariant. Everything I said only applies if the camera is ISO-invariant. Overexposure means a loss of data. That's why we want a wide dynamic range sensor: to store as much as possible in the shadows without blowing out the highlights.
I am looking forward to your results. Thank you very much for the answer. Cheers!
My newest cameras are ISO invariant, but not sure about that old DSLR. I'll write the results in a new article.
"However, far more useful is when that spot is tied to the focusing point"
I've been in the Canon fold for years and I've often wondered why they never implemented a feature as useful as this. It's not even available in the R5. Often, what I'm focusing on is not at the center of the frame. True, I could just take a reading off the center and recompose. But, that's just an extra step. Maybe they'll see the light in the R5s, R3 or R1.
Since I know I'll be postprocessing my images, I always keep an eye on the histogram to avoid clipping at either end. With this in mind I make sure I'm using a nice vanilla profile rather than "Portrait", "Landscape", etc. to make sure histogram readout isn't unduly influenced.
You are not the first person that's mentioned that to me, Robert. They make good cameras, but there seem to be a few areas where Canon plays catch up, not least with the move to mirrorless.
Regarding the profile, are you shooting raw? I didn't think the profile would make any difference to the actual raw file, just the embedded JPEG preview. It doesn't with my system. If it's different with Canon, I've learned another new thing today. If you shoot JPEG, then the profile does make a difference.
Thanks for replying.
I do shoot in raw. But, from what I'm told, your profile can affect the histogram as well as the JPEG. They can even affect your live view.
When should I exposure compensation or fill light settings?
A typical example would be a subject against a light background (or very dark background). Your camera exposes with the default value of 18% grey. So your subject would either be too dark or too light. This is where exposure correction comes into play in order to expose the subject correctly.
We were typing at the same time!
Hi Jasper.
Thanks for the great question.
Some cameras have settings that, with JPEGs, change the brightness of the shadows, bringing out the details in those areas. This is done by processing of the data coming from the sensor. There is no change to the exposure settings, just the way the picture is processed by the camera.
For JPEGs, that has an advantage over exposure compensation if there are particularly bright areas in the photo that would be blown out if you increased the overall exposure. If you increase the exposure, you are affecting the entire image. More advanced cameras also allow you to reduce the brightness of the highlights at the same time.
If you shoot raw then, (on my camera, and I assume others too) this setting has no effect. That shadow detail is still there, even if you cannot see it initially, and you can recover it in your raw developing software (Lightoom, On1, Affinity, etc.), typically by moving the shadows slider to the right. This is doing the same thing as the fill light setting, but you have greater control over it.
Learning how to use the camera's histogram will enable you to adjust the exposure compensation accurately and retain the details in both the shadows and highlights.
I hope that helps explain what you wanted to know.
Good article! Of course understanding exposure is an absolute requirement if one is to claim one is a photographer!!
"Back in the day" of film weddings the only reading we took was incident..who would trust a reflective meter with a white dress/black suit?
Grey cards (18% reflective) are still a useful tool even with digital and could have been used in the wedding situation! You could actually meter off your hand which came close to the 18% grey card reading for Caucasians!
I accept a lot of the time for fixed subjects bracketing (and RAW) will get you there and it's true that modern predictive matrix meters will generally get you in the ball park, but understanding the concepts will enable you to make adjustments on the fly!
We had simple "formulae" back in the days of film. Snow scene..open up 2 stops from the meter reading..predominantly dark scene, close down 1-2 stops.
For negative films the definition of "exposure" was the minimum exposure you would give to preserve detail in deepest shadows. For transparency and digital (positive) the maximum exposure you could give to preserve highlight detail.
Contrast is another matter! For negative film you could adjust it in the process..with digital you have to rely on the DR capability which is why I only shoot RAW. 13 stops range should be enough but a chip has a sensitivity "curve" which approximates a linear gradient...at least with film you had a knee and a toe to the sensitivity curve which thankfully compressed shadow and highlight detail...contributing no doubt to the "look" of film?
Thank you, David. That's fascinating.