
Most of the adjustment sliders in Adobe Lightroom or Adobe Camera Raw are self-explanatory, for example, highlights and shadows. But do you truly understand what is happening when you move that slider?
I'm a firm believer that the more you understand how something works or at least what it does, the more you'll be able to apply it in your practice. This understanding applies to many things in life, but in this article, we're going to explore some basic image-editing controls and how they manipulate an image.
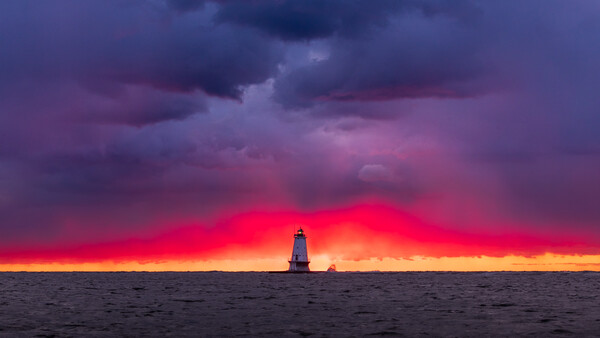
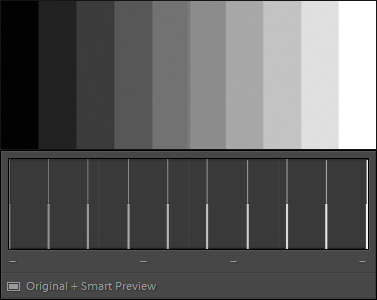
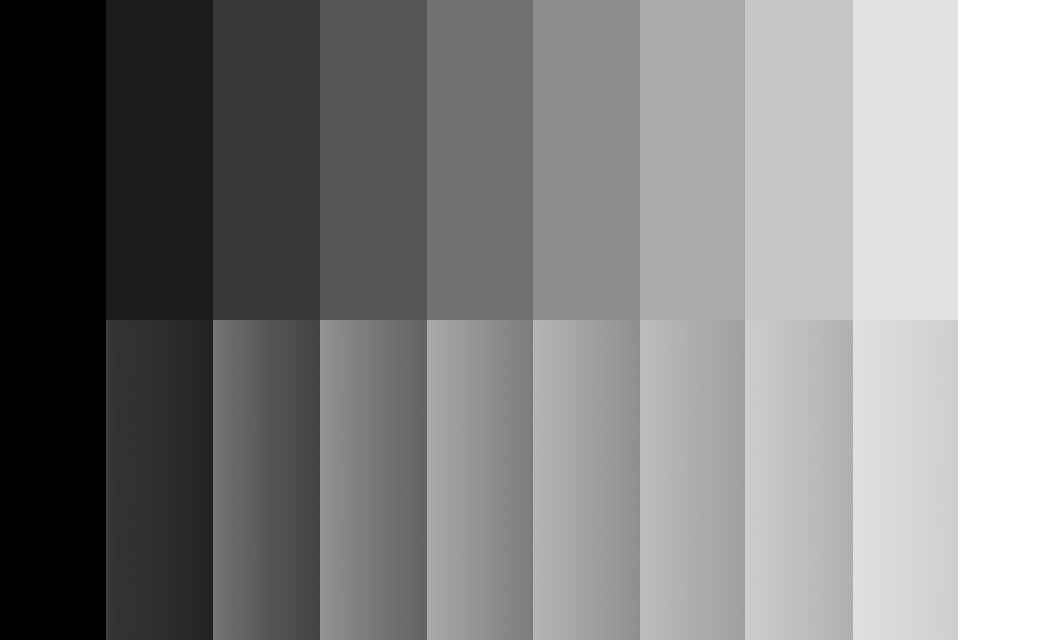
This is an exercise that you can participate in. I've created an image with a range of ten tones, from black to white. Download our sample image, import it into Lightroom, and follow along with the control changes. Because each tone appears as a single spike in the histogram, as you move the sliders, you'll be able to see which parts of the image are most affected by that change by observing the movements of these spikes in the histogram.
Download the following image; we'll be using it in our examples.

Sure, you could slide the adjustments back and forth and observe what they do to your photograph, but with a photograph, it's often difficult to see precisely the histogram range that's being affected.
What Is a Histogram?
A histogram is simply a chart that shows a range of values and the frequency of those values. For a photo/image histogram, the horizontal axis is a range of luminance from black on the far left to white on the far right. The vertical axis is the frequency. The more often a value appears in the image, the higher this value goes on the chart.
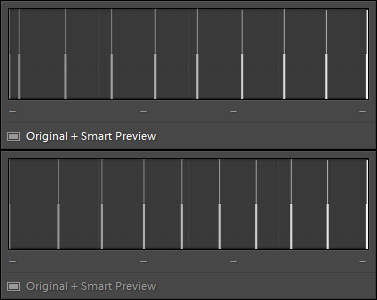
Start with all of the controls at their default setting of zero. Next, observe that the tones of the image are equally distributed across the histogram appearing as evenly spaced vertical spikes.
The Basic Tone Controls
We are going to cover some of the controls in the Basic panel. The effects of these controls are easy to see on the histogram. After seeing these effects, you may wish to experiment with some of the other sliders in Lightroom and see what they do.
Exposure
When moving the Exposure slider in the negative direction, it's interesting that white stayed pure white until the value reached -1.0, while the other values moved towards black. This tells me that if I have a clipped highlight, such as a light, I may be able to reduce the exposure by one stop before it starts to turn gray.
On the other hand, when increasing the exposure, the black stayed black regardless of how high the exposure was raised.
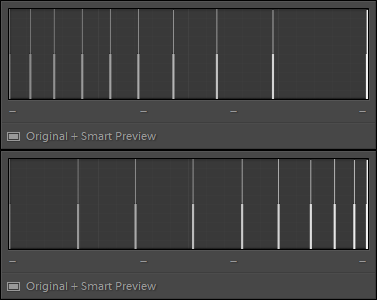
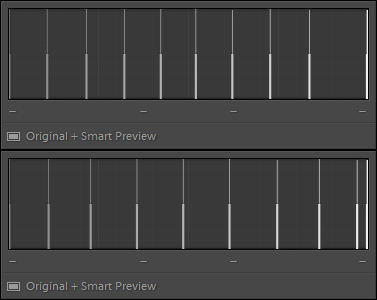
Contrast
Contrast is the brightness difference between tones or colors. Increasing contrast works by making the darks darker and the lights lighter. Decreasing contrast makes the darks lighter and the lights darker.
When changing the contrast slider, we can see the tones on the left and right either growing farther apart or drawing closer together.
Highlights
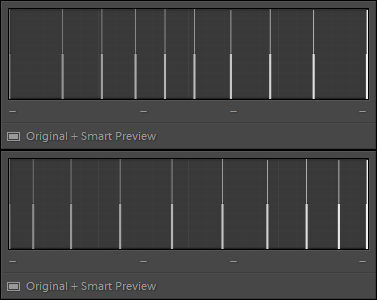
Highlights affect mostly the right third of the histogram, while the left two thirds of the image remain virtually unchanged. It's interesting to note that even though each tone is a solid color, this color becomes varied (spread out), thus reducing its height in the histogram. Unlike exposure, reducing the highlights has an immediate effect on the pure white.
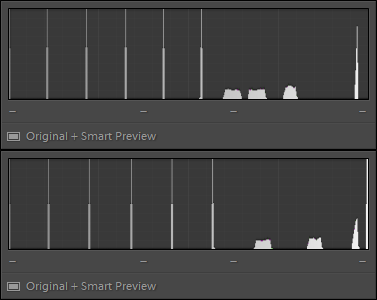
Shadows
Shadows are the opposite of highlights, but surprisingly, they tend to affect much more of the image than highlights do at just over one half of the left side of the histogram.

Whites and Blacks
The Whites and Blacks sliders are used to adjust the white and black points in an image. Some photographers prefer to have the darkest point in their photo to be pure black and the lightest point in the photo to be pure white. This works for some images, but in practice, I've found that this technique only works if there's something that is truly black and white in the photo.
Tip: With a regular photo, shift+double-click on the word "Whites" or "Blacks" to have Lightroom automatically set the white and black points. This works most of the time; however, sometimes, it's a little off, and you'll have to adjust to taste.
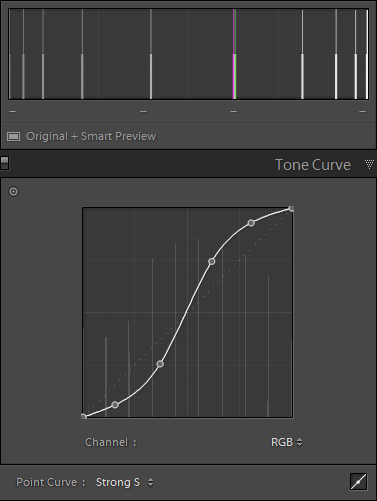
The Tone Curve
The tone curve represents all of the tonal values in the image and provides for more precise control over adjusting darks, lights, shadows, midtones, and highlights. The tone curve can be used in conjunction with the other sliders or used instead of those sliders.
We're not going to go into all of the ways you can use the tone curve to modify your image. The point I want to make here is the observation of the ten tones and how they are displayed on the tone curve.
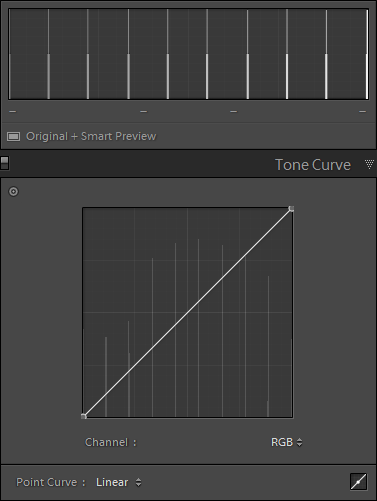
Notice that when an S-curve is applied to the tone curve, the lights are made lighter and the darks are made darker. This is similar to adding contrast except that the midtones are preserved more.
Bonus Tip: Clarity
One of my favorite uses for our example image is to explain how the clarity slider works.
In simple terms, clarity works by finding the edges of light and dark areas and then darkening the dark area as it approaches the light area and lightening the light area as it approaches the dark area.
The result increases the contrast between the two edges, giving an appearance of more clarity between the two.
Note how clarity does not affect pure black or pure white.
Conclusion
Observing how a particular adjustment slider affects the various tone ranges in an image can help you determine not only which one you might want to use, but also how other possible tones might be changed as well.


Join the Fstoppers community for free
-
Post comments and join in the discussions
-
Browse the site ad-free
-
Share your work and get featured in the community
-
Compete in the photo contests for fun and prizes
2 Comments
Interesting and quite helpful!
Thank you again - also for this. I do have a a Magazine Book on Teach Yourself Lightroom with a disc. perhaps a good idea to get into that as well. :-)