
When shooting digitally, more information is almost always better. Here’s an exposure technique that maximizes the available information your camera can gather in a photograph.
"Why is there so much cheese on my pasta?"
Imagine I gave you three ingredients to make spaghetti. I gave you the pasta, the marinara sauce, and cheese to top it with. The only catch was that you could only use each ingredient in certain amounts. What if I said you could have either 0, 500 grams, or 1,000 grams of each, but nothing in-between? Well, certainly, you’ll need pasta if you’re going to eat spaghetti, so let’s say you chose 500 grams. Unless you’re a marinara fanatic, twice as much sauce as pasta is going to be way too much. Even 500 grams to match the spaghetti is excessive, but then again, the only other option is no sauce at all. And what about the cheese? That’s going to be a lot of cheese.
The problem, of course, is that it’s not just how much of each ingredient is present that matters, but how much is present relative to the others. What if I gave you finer gradations, say steps of 100 grams each? You could probably make a pretty good approximation of your preferred meal, say 500 grams of pasta, 200 grams of sauce, and 100 grams of cheese. If I gave you 50 gram gradations, you could get even closer. For the record, the ideal meal is 473 grams of pasta, 167 grams of marinara sauce, and 56 grams of cheese.
It's All Relative
This is essentially the idea behind digital camera sensors. A typical sensor measures the amount of red, green, and blue light at each photo site and combines the three to give a value that can be interpreted as the hue, saturation, and lightness of that pixel. A lot of red is well, a lot of red, but a lot of red and green is yellow. Just like with our pasta, it’s not just the amount of each individual color present, but the relative amounts as well. Having 240 units of red (out of the usual 256 values we think of in digital photography) and 240 units of green make a relatively bright yellow, but 240 units of red and 120 units of green make an earthy orange. You want the ability to make finer gradations of color, right? Finer gradations mean more subtlety and smoother tonal transitions in an image.
The 5D Mark III records 14-bit images. This means it can assign one of 2^14=16,384 different tonal values to each pixel. It has an approximately 12-stop dynamic range. Remember that each stop represents a doubling of light; this means that instead of the tonal range being spread evenly across the stops, that is, the first stop of 12 containing 1/12th of the tonal values and so on, it actually contains one-half of all the available tonal values. What does this mean? It means the more you can expose the image without blowing the highlights, the more tonal information you’ll get.
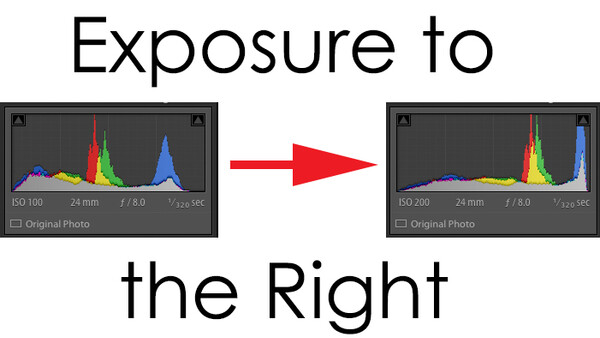
Exposure to the Right
Enter Exposure to the Right (ETTR). The idea here is to push your camera’s histogram as far to the right as possible without clipping any highlights to maximize the available information. Check out these two histograms to see the difference.
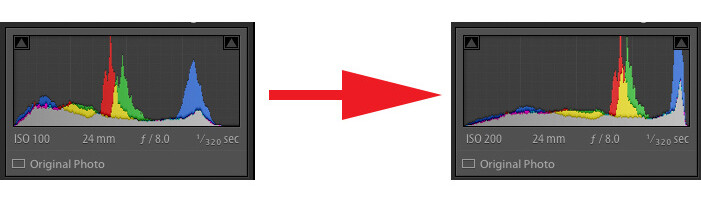
Notice how the histogram on the right contains most of the values in the right third or so; that is, most of the image is highlights. Of course, that’s not how we want the final image to look in most cases. Getting most of the image in the highlights is important because of one thing: the shadows.
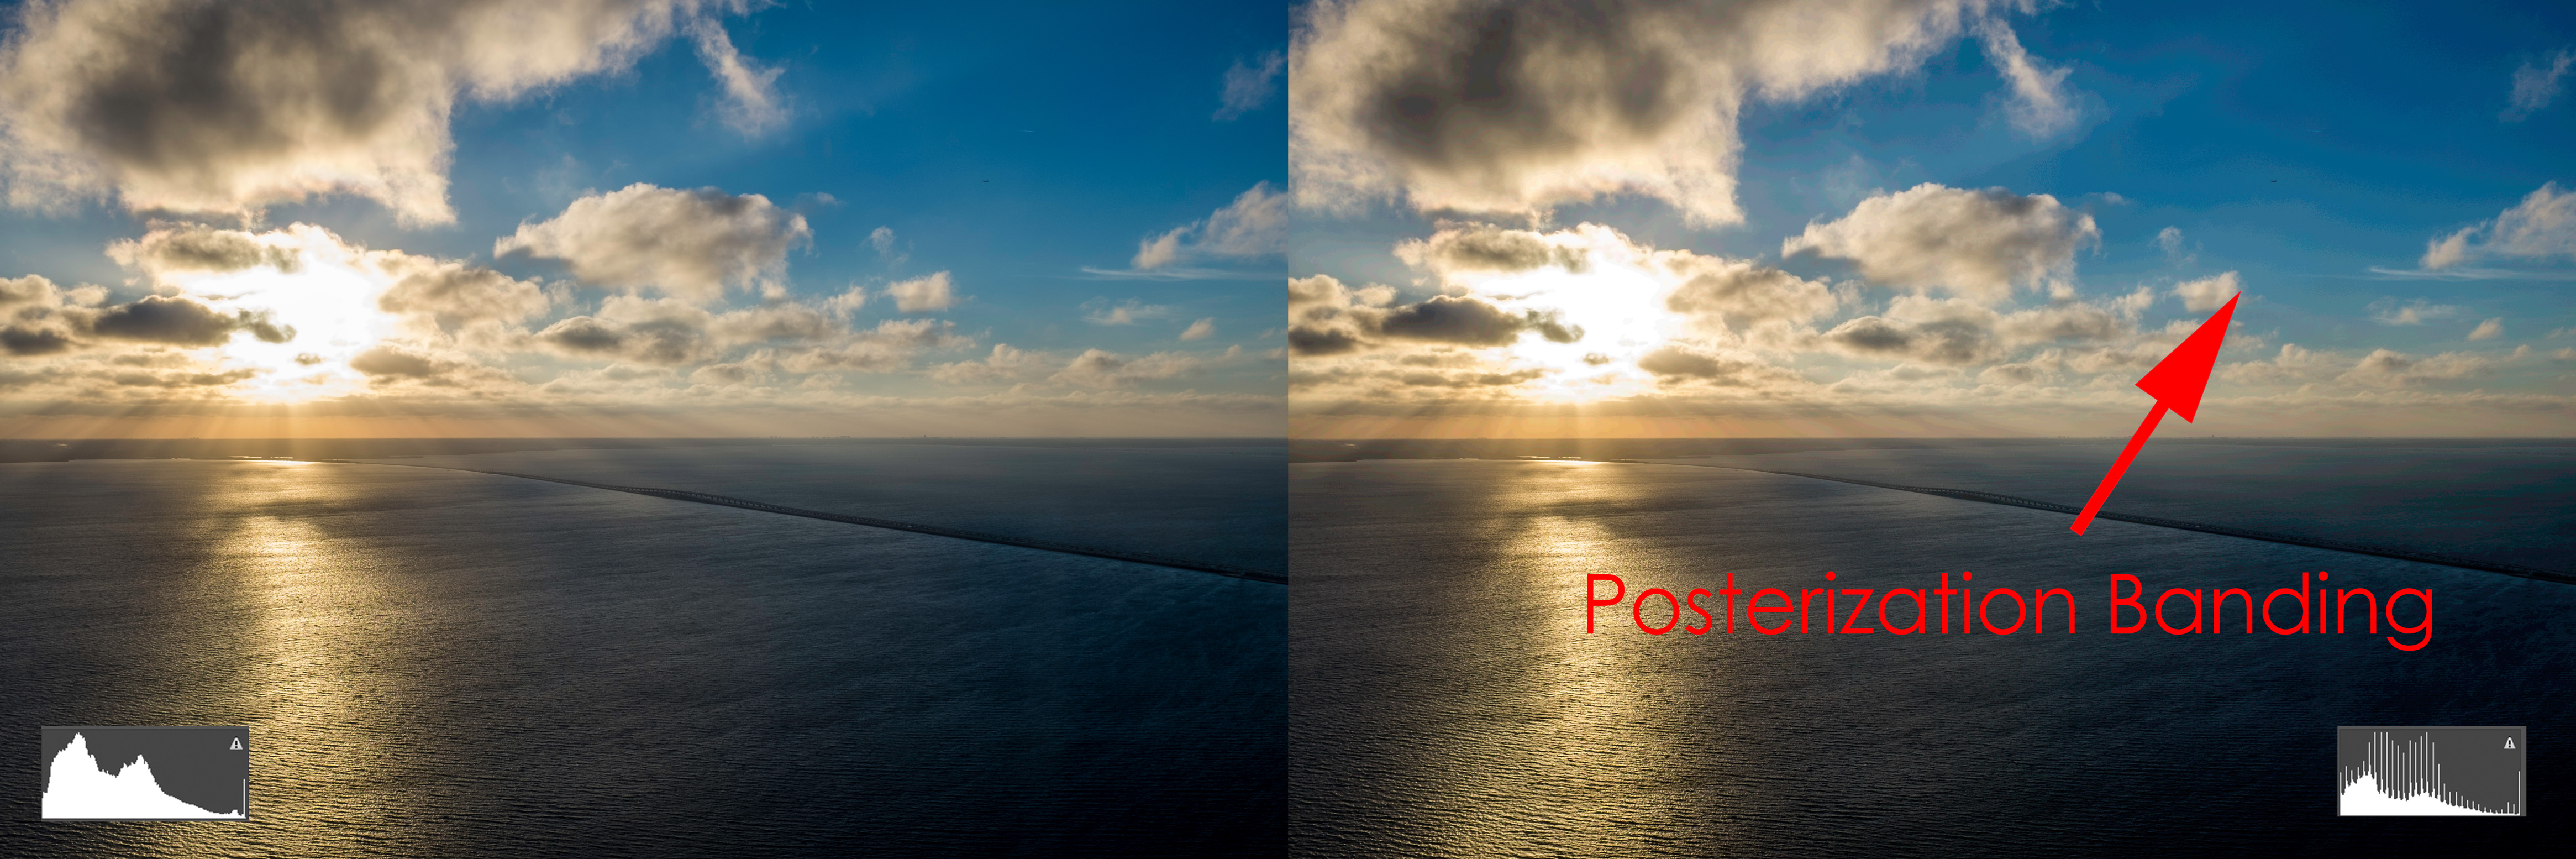
By the time we get down to the bottom 3 stops of the 5D III’s range, we’re down to 16, 8, and 4 gradations of tonal data, a far cry from the 16,384 across the entire range. When we lighten the shadows, as we often do, this does not mean that we increase the number of available gradations, it means we only increase the magnitude of the those that are already there. We have more spaghetti, but our ability to fine-tune the combination of ingredients hasn’t changed. In other words, the transitions remain coarse, which translates to blocky shadows and posterization. Remember that digital images are made of pixels with discrete color and luminosity values. For example, if I choose 4 pixels in the shadows of an image with red channel values of 2, 5, 8, and 13, you might not notice the jumps because they’re relatively small. Maintaining these small gaps is what we rely on to make the tonal transition of a sky during sunset look smooth, for instance. So long as they are below the threshold of human perceptibility, we don’t notice the fact that they’re not actually continuous. The idea is to make a staircase with so many small steps that to our eyes, it looks like a ramp.
But now, take those same 4 values and brighten the shadows by 2 stops. 2, 5, 8, and 13 become 8, 20, 32, and 52. The relative gaps are the same, but the absolute gaps are much bigger. Our staircase grew larger, but the gaps between the steps did too. Check out the example below. Also, note the spikes in the example histogram. This is posterization (the gaps being made larger).
On the other hand, had we initially overexposed by one stop, we would have doubled the available values and given ourselves the ability to resolve finer gaps, meaning when we raised the shadows now only by one stop, transitions don’t become as coarse. This is the idea of ETTR; it can create smoother gradients that result in more realistic tonal transitions and give you more latitude in post-processing.
When to Use ETTR
Though it theoretically maximizes available information and therefore, image quality, it’s not always appropriate to use ETTR. The pitfall of pushing your histogram as far to the right as possible is pushing it too far, i.e., blowing the highlights. Once a highlight is blown, there is little to be done. Thus, ETTR is best used in situations where lighting is relatively controlled or unchanging and there is a margin for error if you don’t get it right the first time. Many landscape and architecture shots, some portraiture, and most studio work can benefit from it. On the other hand, genres like wedding photography are likely taking a bit of a risk by using it.
Bodies with poor shadow recovery will particularly benefit from this. Nikon bodies generally have good shadow recovery. As much I like my Canon system, no system is perfect and in particular, Canons often suffer from poor shadow recovery. Most older bodies are more limited in this respect as well.
If you have a more modern body that can tolerate changes to the shadows well, you might not see a tangible difference. In fact, it might be more effort to use ETTR when it comes to post work. A great example of ETTL (Exposure to the Left) is Dani Diamond’s work. By underexposing, Dani reduces his workload in that he only needs to selectively brighten a small fraction of the image as opposed to darkening a large portion of it. This is a great example of knowing the capabilities of your equipment and using it to your advantage.
If you do use ETTR, be sure to turn on highlight alerts. Your camera will alert you to any blown highlights by flashing in those areas when showing the preview image. This can be more effective than reading the histogram, as it can be difficult to see if any highlights were blown when viewing a histogram on a small screen.
Exposure to the right gives your camera the maximum information about a scene and thus, gives you the maximum latitude in post-processing. Because of the greater risk of blowing highlights, it’s not always appropriate to use; in particular, avoid it when you only have one chance to get a shot. When appropriate, though, it can your images just a bit more smoothness and subtlety than without.


Join the Fstoppers community for free
-
Post comments and join in the discussions
-
Browse the site ad-free
-
Share your work and get featured in the community
-
Compete in the photo contests for fun and prizes
23 Comments
Is ETTR the same as push processing with film?
Not quite the same as push pull processing
It doesnt effect image contrast or dynamic range it merely gives the sensor more information especially in the shadows where the digital sensor lacks
When using the +/- compensation is it better to go under or over? How much .3, .7, or 1.0? Then bracket expose from that setting? Or is that defeating the purpose?
You would want to exposure compensate over but it depends on each scene, there is no right answer
is ETTR basically just over exposing your images then fixing them in post? if so how much?
Yes, that is what you are doing. As long as you don't clip the highlights you are okay. In a general situation. If you underexpose and try to "save" it. You'll have to increase your exposure slider and or shadow. Which actually increase your noise (even at iso 100 you can get noisy results if you have to raise the shadows). Hence why he said image quality. You are better to darken those blacks than to raise the blacks. This way of shooting is smart for APS-C shooters. When shooting wildlife I'll shoot 90% to the right. There are always exception to the rule. So don't get to hung up on shooting to the right. Just know when to and not too. You'll be okay. You see those little triangle in the top left and top right. If those are highlighted (white) then you are clipping the highlights. In canon cameras you can set a feature that will flash the highlights that are being clipped. If clipped you lost all data (detail) in that portion of the photo.
Well said
great article! the whole thing is about, that what is your workflow. so if ETTR is better for your style, do so, if ETTL, than use that one! how much? it depends on, but i think, 0.7-1.3 EV is ideal. for portraits better to underexpose (like Dani Diamond), because if you blow out the skin, mostly the forehead, you cannot save it...
ETTL is for flash only. Doesn't apply here.
I do not agree. ;-)
I Agree!
could also mean exposure to the left, i think that was what they were suggesting here
ETTL IDTIMWYTIM
ETTR for portraits
-With Nikon use the RGB histogram and monitor the red channel for clipping
-With Canon wish you had a Nikon
Clipped reds = Clipped skin
Dont clip reds. Simple.
There is no formula to set ETTR for optimal results otherwise cameras would already be setup for that.
Many photographers today shoot on an auto mode and thus may suppose that dialing in a touch of + exposure comp would do the trick. The problem begins in the exposure determined by the meter in the camera not knowing what its looking at.
A typical landscape or portrait with a range of middle value tones will expose correctly. High contrast, high key or low key scenes will not.
My solution is to shoot manual exposure and look at the histogram. If one is outdoors shooting landscape the light is usually fairly constant and one does not need to constantly fiddle with the exposure. In rapidly changing situations such as a wedding auto can be of great help in getting the shot.In that case the niceties of ETTR are irrelevant.
Today's EVFs (for those cameras that have them) are boon to photographers not only in pre-visualizing exposure but to set the highlight clipping alerts that allow you to bring exposures into a safer range.
With my mirrorless cameras I never have to shoot in auto mode as the manual mode shows me the small corrections needed plus whether I am pushing up against a clipping warning.
Or just use a Nikon and be able to push the shadows a stop or two with no problems.
I am little bit old school. I tend to think of it a little bit in the zone system. I shoot and expose for the highlights, because I have about 1/2 - 1 1/2 f/stop of latitude and process for the shadows because I have about 2 - 3 f/stops of latitude.
If you blow out your highlights there is little you can do to recover.
This is odd to me because I've always read to *underexpose* to preserve color information (again, without clipping the shadows/blacks), and that too-bright areas have more lost color data than too-dark areas.
Am I wrong or is this just a matter of opinion?
Edit: What I've really heard is to try to get a histogram that's nice and centered in the middle and not skewed either light or dark, and that's what gives the most options when post-processing.
Hi Caleb,
Getting a centered histogram is basically the way to "play it safe" and avoid clipping highlights or shadows. The idea of ETTR is to carefully (in situations where you have the time to work this way) get more information without clipping highlights. This gives the shadows more information to work with, which is crucial as that's where the smallest amount of data is, but preserves the highlights. As long as you don't clip highlights, more exposure will always mean more information.
I've tried this, but I've also noticed as you near the clipping-point (before blowing out) of your highlights, the integrity of the signal falls off significantly. Situations where an almost-neutral highlight is *just* before blowing out will often take on an orangey-yellowish 'burnt' look, instead of proceeding neutrally to white — at least on a number of my Nikon bodies. I found it easier just to expose as normal, or in the case of very high-contrast scenes, to actually under-expose, and then recover the shadows, and account for their magenta shift with the curves tool.
reading these comments and the comments on the facebook post, I'm baffled that this is news to everyone :)
It's digital capture 101. Don't belive it? try it. simple as that.
hah. I remember a little while back a pro photographer made a "how to edit landscape photo" video. I was puzzled why he underexposed it with, uhm, several stops. A static evening scene.
He then in Lightroom had to lift the shadows to get the detail. yes it works, but...
So I asked him why he didn't exposed it brighter, to retain more of the details. especially the shadow detail.
He shrugged me off. told me, each to his own.
I mean, why wouldn't you get the best foundation to work with? :)
Oh well. I've stopped caring about people who don't want to learn and improve.
Hi Alex. Great article. Just set my Highlight Alert to enable on my Canon. Looking forward to seeing how this technique will improve the quality of my photos. Will let you know.
if you have nikon @ low iso you can forget all this. if you have canon follow this. or switch.