Historical and alternative printing has experienced a popular resurgence in recent years. Let me show you how to make a cheap and easy lightbox for printing cyanotypes, salt prints, and other alternative printing processes.
More and more photographers are learning that historical and alternative printmaking can be one of the most accessible and rewarding of all printing processes. The materials are more accessible than ever, and it takes very little to produce quality prints right in your own home.
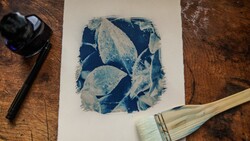
Most of these printing processes (such as cyanotype and salt prints) make use of ultraviolet light to expose the final image, and a UV printing box can drastically improve the quality of your prints.
Fortunately, it doesn't take much to make your own lightbox for printing historical and alternative photographs. You likely have the materials to make a basic UV printing box on hand as we speak.
Allow me to show you just how easy it is to construct your own basic UV lightbox in this step-by-step tutorial. I'll show you the mistakes I made so you can avoid them, and you'll see how simple it can be to have your own printing box in less than an hour.
Have you tried any historical and alternative printing? Let us know about your own printing workflow down in the comments.


Join the Fstoppers community for free
-
Post comments and join in the discussions
-
Browse the site ad-free
-
Share your work and get featured in the community
-
Compete in the photo contests for fun and prizes
3 Comments
Watched your box making and lining u-tube. You can simplify the interior lining since every box is engineered so that a box making machine can erect it, glue it and label it. Just reverse the process, unglue it and, voilá, you do not need to fabricate panels. Now lining the inside is easy. Once done, refolded and glue it and you have your perfect, wrinkleless lining.
Cheers, Joachim
Good idea. I've encountered a few other folks mentioning the "start flat" approach as well. I just made use of an already assembled box I had on hand. For a more dedicated project perhaps a new shipping box would be a better option.
Adam, you don't need a new, flat shipping box. Just undo the glue of the box you have or just got from Amazone.