
There's something absolutely wonderful about holding a piece of film fresh out of processing. The feeling of accomplishment, that indescribable rush of holding something you created in your fingers makes the difficulty of dealing with the medium worthwhile. However, once you're done processing the film, the next phase begins. Scanning can be, to put it lightly, a royal pain. From dust-spotting to tweaking color and levels, there are challenges that must be addressed. This is how I do it!
Firstly, I want to be clear that this is not intended to be the end all and be all how-to for scanning C-41 film. This is simply a method that works for me. I've been asked by commenters in multiple posts to show how I do my scanning, so here it is! Your mileage may vary, but at the very least, I hope to show that there's not too much to be afraid of. Definitely check out the accompanying video to see me scan and work on a 4x5 portrait in near real time. Skip to about three minutes in if you just want to see the scanning portion.
Two Common Misconceptions About Shooting Color Film
When I started shooting color film, like most of us do, I did a lot of image searching. I checked out a bunch of really awesome photos on Flickr, 500px, and other image collection sites, and my mind was blown. I just loved the colors that these folks were getting! There was something very rich and organic about them that I really wanted to add to my work. But stop right there! There are few things you should know about when it comes to getting those colors and tones.
There's No Magic Bullet
I thought that once I laid my film on the scanner, I could tell my software what the film type was, throw everything on auto, and voila, I'd have picture-perfect scans. Um, no. The reason that most of the work you see online has that wonderful color rendition is because it's being sent to professional labs where professional scanning personnel who are trained to color-correct bring out the best in those scans. They have gotten it down to a science! When we scan at home, there's usually not a magic button press to get it right. You are going to need to tweak your images. Even awesome scanning software like Silverfast or Vuescan will usually require some tweaking to get the image where you want it.
My $800 Flatbed Scanner Can Produce Super Sharp Images
Ok, yes and no. I use an Epson V700 (replaced now by the V800), and while it is a wonderful scanner, no flatbed scanner is going to fully realize the sharpness of film. Period. I don't care if you're using fancy holders or shooting with 35mm or 4x5; it just isn't going to happen. You need to sharpen your images. I typically use high pass sharpening, but I know a lot of people still use unsharp mask or smart sharpening in Photoshop. I'll leave that up to you as it is personal preference, and in the end, it really isn't that important as long as you're not going overboard.
The Quick and Dirty
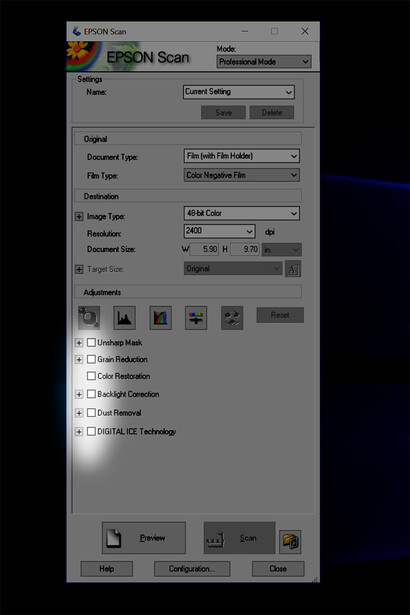
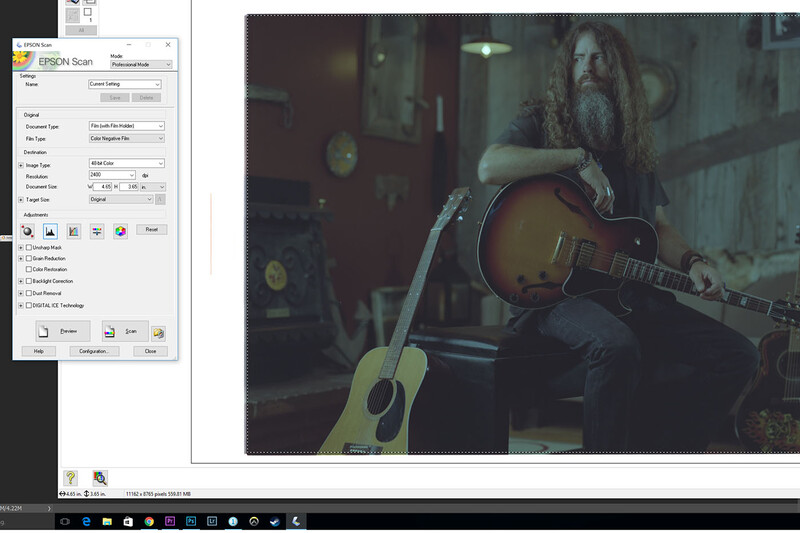
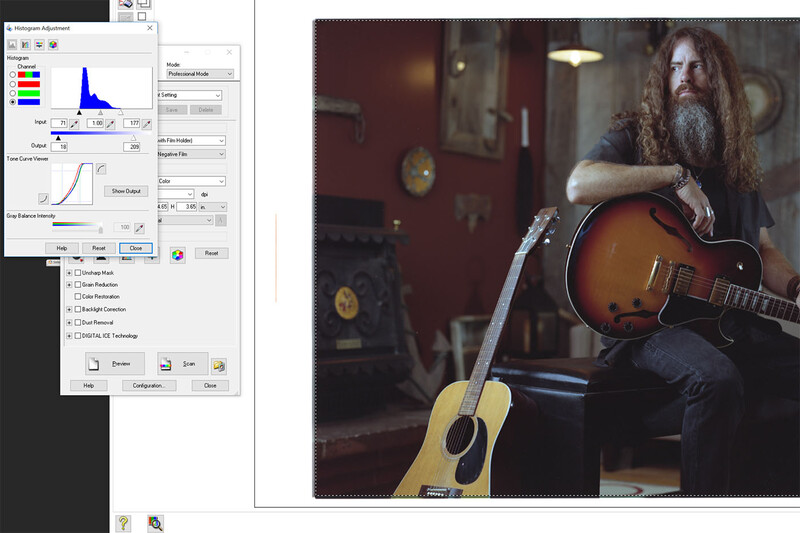
I'm going to use Epson Scan to do my color work as it comes with Epson scanners for free. Essentially, there are three steps in Epson Scan to get your image most of the way to where it needs to be. First off, make sure you're in Professional Mode, 48-Bit Color, and the highest native resolution your scanner is capable of. For most decently spec'd flatbed scanners, that's between 2,400 and 3,200 DPI. The film I edited was a sheet of 4x5 Kodak Portra 400.
1. Turn off All the Auto Settings
Seriously. Turn them off. No sharpening, no color correction, turn down auto exposure under configuration. Don't let your scanner software make decisions for you. For the most part, it will get them wrong.
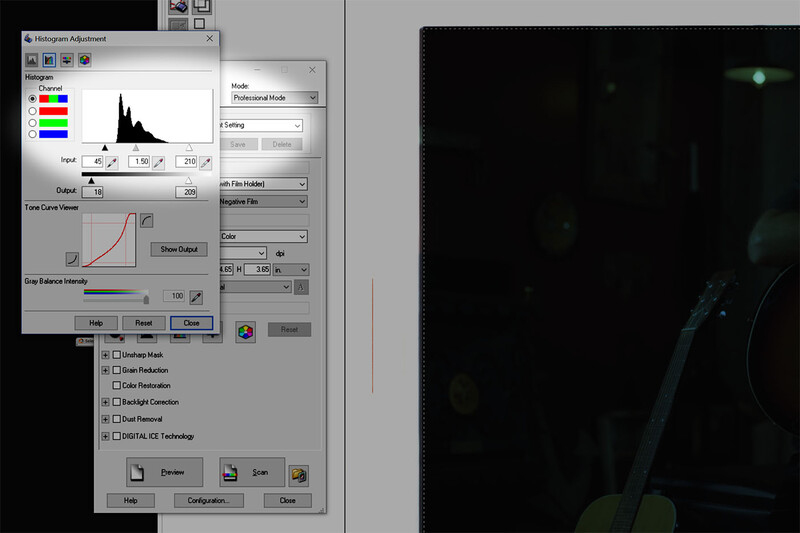
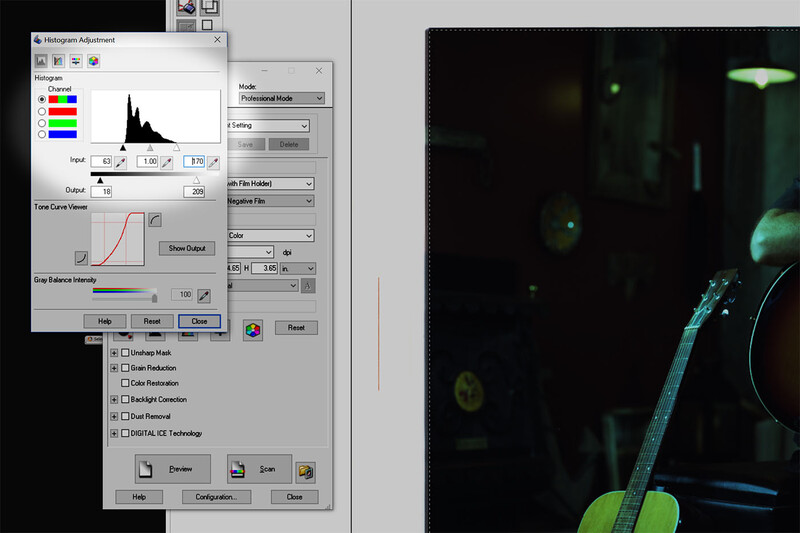
2. Tweak the Levels Globally, Then in the Color Channels
Under the histogram button, there will be sliders to adjust your levels in RGB and then the color channels individually. First, adjust the sliders' endpoints for shadows and highlights to reflect where there is actual data in the histogram. Like so:

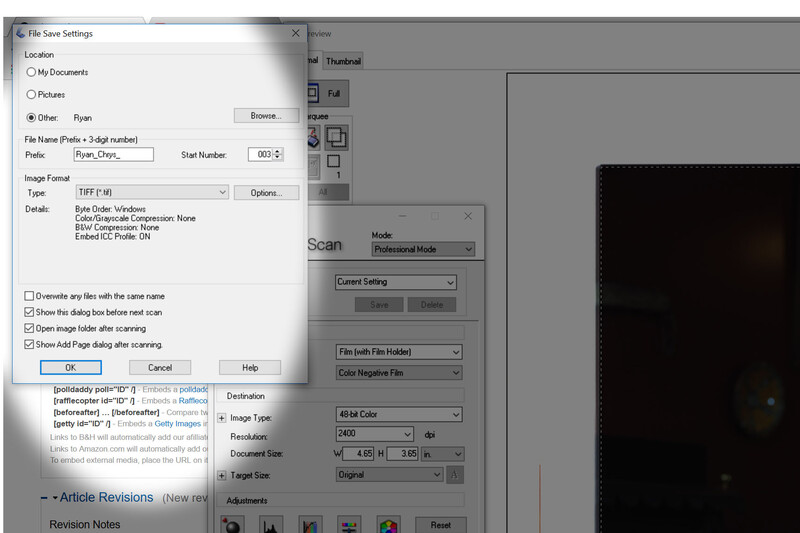
3. Output the File, Move to Lightroom!
After you adjust all of the levels, the image should look a lot better, but probably still not quite to where you want it. I find that the tools in Epson Scan are not quite flexible enough for my needs, so from here, I scan the film and move into our old pal, Lightroom (Or Camera Raw if you're one of those people.) Output to TIFF so that you preserve data and Lightroom can read the file.
Lightroom Play Time!
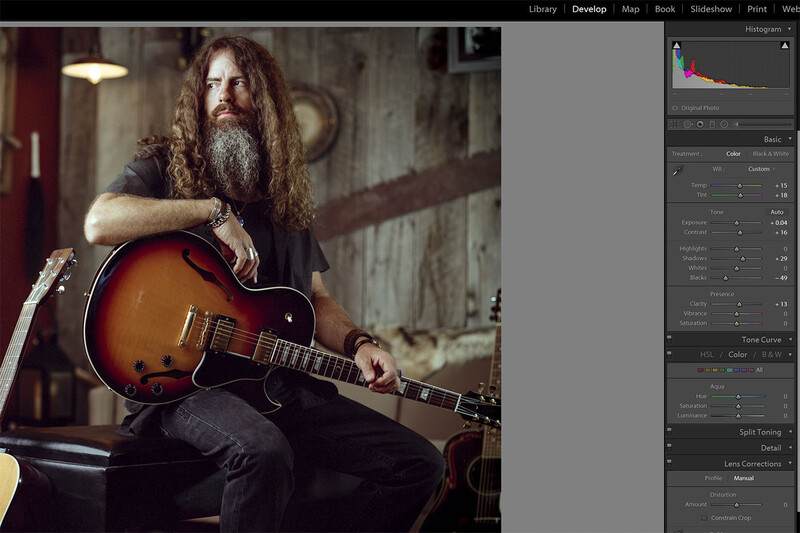
Once you're in Lightroom, the steps you take are going to vary greatly depending on where the image is in your eyes. It's a lot like dealing with a digital raw file at this point. How much contrast do you want? Is the image too blue? Adjust it! Add some vignette. Boost your shadows. Boost your blacks. Clarity is always fun (in moderation). Only you can decide what to do here. In the video, I show the steps I took on my image, but they will certainly be different for yours. After you're done tweaking, just output to Photoshop for your preferred sharpening method and dust-spotting. Then you're done!
When you get it down, you can color-correct a scan in just a few minutes. Do any of you have a preferred method? What about those without Epson scanners? Let the community know!
Special thanks to Ryan Chrys for stepping in as a model for this shoot!


Join the Fstoppers community for free
-
Post comments and join in the discussions
-
Browse the site ad-free
-
Share your work and get featured in the community
-
Compete in the photo contests for fun and prizes
14 Comments
Thanks for this Hans. One auto setting I have chosen to leave on when I scan on an Epson flatbed is the Digital ICE. I've found that when I'm scanning a big batch of negs, it''s a pretty decent time saver. I'm with you on all the other settings though--all good insight.
Digital ICE is nice, but it will not work for all film.
Digital ICE is nice, although occasionally it does some weird stuff to the image. It also adds a lot of processing time, and like Robert said, it wont work for true black and white film. A rocket blower is my best friend these days! Dust is the worst
One other tip I would offer (though I have MUCH to learn when it comes to scanning film via flatbed) is that if possible you should wet scan your negatives. Higher end scanners usually give you the option to buy accessories that allow wet mounting your film to a tray to be scanned. This produces far sharper images than are possible with dry scanning. While there is additional cost associated with this since you have to buy the wet tray, scanning fluid (water will not work), etc, it may not be useful for scanning in old snapshots, but is very helpful when trying to get the best out of your more important images.
I've yet to try wet scanning, although I hear good things. I'm a bit lazy, though.
I've never scanned film and probably won't, but I just have to say, damn that is a gorgeous photo! Well done.
Thanks, sir! I'm digging the 4x5 format!
This looks great. But this approach seems to be for one image at a time. What about if you're scanning 24 frames at a time? One might scan all 24, look at them with lightroom and then re-scan selected images using this method.
Also, why just C-41? Would this approach apply to B&W and E6?
BTW: for 120, I use the A Better Scan film holder with their anti-Newton ring class. You can adjust the level of the holder to improve focus and the film is absolutely flat - a big issue with 120.
Finally, I've looked vuscan and it appears to be trying to do with the scan what is much easier to do in LR/PS. It is also incomprehensible. Minimal scanning via Epson Scan seems like the most sensible approach.
I dont scan much 35mm, but I imagine you could batch out the images, then create a preset in LR to adjust all the images at once.
I concentrated on negative color film because it seems to be where most have trouble getting their colors where they want them. For black and white I try to get as much good data as possible and adjust for contrast on Lightroom. I havent scanned slide film in a long time, but I imagine it would be much easier to hit the target since you know what its supposed to look like.
I have a better scanning holder for 120, but havent had as much need for it when I moved to the V700. Maybe I should break it out again! 4x5 doesnt need much flattening at all. The Epson holders seem to be just fine. I like using Silverfast and it seems pretty intuitive. Vuescan I gave up on in 5 minutes, although I hear if you can push past the learning curve it is very effective.
Sorry, didn't register 4x5. Makes much more sense. Only one spot! You've very tidy.
Ha! A rocket blower is my best friend. And a nice thing about large format is that a spec of dust is much less significant.
1. Thanks for doing this!
2. The advice on individual color channels was super-helpful; hadn't though of that, but makes sense. Will try it next time I scan film (ie, tonight)
3. Now for the controversial part: Doing everything except scanning....
If you keep your films and workplace super clean, eliminating the Digital ICE step makes sense; it does cost some sharpness.
Same with doing your sharpening in another program - woldn't be at all surprised to find out PS or LR can do it better.
But ... how are you dealing with film grain? Confession: I've never turned the grain reduction in Epson Scan completely off. Maybe it doesn't do much of anything. Any magic to share with us on that topic? (I've found the Color Noise reduction in LR helps, a bit)
Honestly, I think film grain is going to have more to do with the type of film you use and your development process. For color, I'm using Portra 400 which is fairly fine grained. Couple that with it being large format and it's a non-issue. For black and white, I typically like finer grained films as well (TMAX, Acros, etc.) and I use XTOL which minimizes grain as well. If you like grain, there are tons of great films that will produce it. So as for minimizing grain, I'd do as much as possible before even getting to the scanner. Now, for 35mm...embrace the grain! haha
Ah, 4x5 - got it. And based on my most recent 6x9 stuff, shot with Portra 400 or Fujicolor 400H, it's not a huge issue there, either. In 6x4.5, it is. I've shot a bit of 35mm recently, but flatbed scanning won't cut it.
What's surprised me is just how much better today's pro films are than their 90s counterparts: Portra 400 blows away the old Pro-100, Vericolor 160? May God have mercy on your soul.
That said, in Lightroom, color noise reduction seems to do the lion's share of smoothing (not eliminating, but making unobtrusive) grain, and a smidge of luminence reduction helps. If someone has a better method, please share.