
Last week I showed you how you can use just a DSLR and a few accessories to digitize your negatives. However, that article wouldn’t have been complete without explaining how to convert the scanned analog picture to a positive image. The process is quite easy and only a few steps are required to achieve a great result. Let’s dive in!
Why Use Capture One?
As the title indicates, we are going to use Capture One to make our positive image come to life. The reasons why I prefer Phase One's raw converter software for this process are the following:
- Unlike Photoshop, Capture One works on the raw file created using the technique shown in my previous article, and thus leaving a bit more room for adjustments without losing quality.
- Unlike Lightroom, Capture One has both curves and levels tools, avoiding to mix the color correction and the negative to positive conversion process.
- Capture One has a powerful tethering tool that can apply a style to convert the negatives on the fly while digitizing them, thus saving a lot of time.
With that being said, the method shown in this article, and video above, can be used in any app that offers either a curves or levels tool. Be sure to try both Capture One and your current photo editing software of choice, and see for yourself what’s best for you.
Turning a Negative Into a Positive Using Levels
In Capture One, open your Levels tool (Window > Create Floating Tool > Levels). In a negative picture, the black point is actually white and the white point is black.
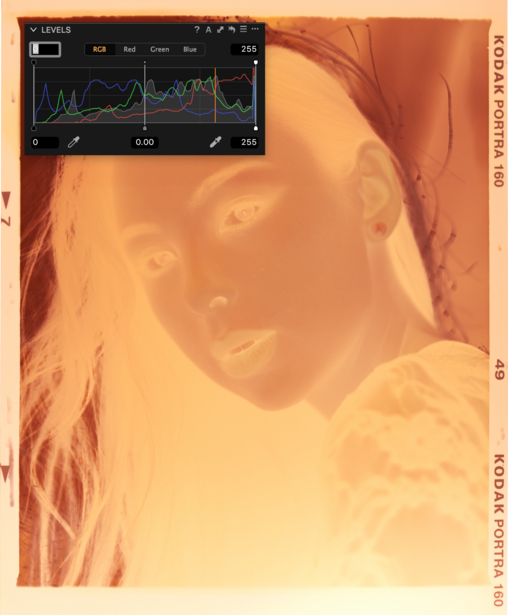
To make it a positive, we want to invert that and indicate to Capture One that the black point has a value of 255 (white) and the white is 0 (black).

If you are working with a software that doesn’t have levels, you can do exactly the same by inverting the RGB curve like so:
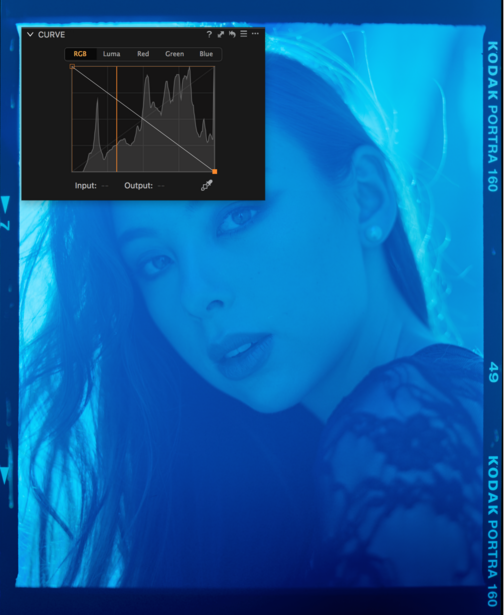
As you can see, curves and levels can achieve the same result. In both cases, my negative ends up with a noticeably strong blue color cast. Depending on the film, the chemical process, and the scanning gear you are using, you might have a different color shift than blue or perhaps none at all. But if you do have a color cast like I do, don’t worry, there is an easy fix, and it will work no matter what your current positive looks like.
Color Correction
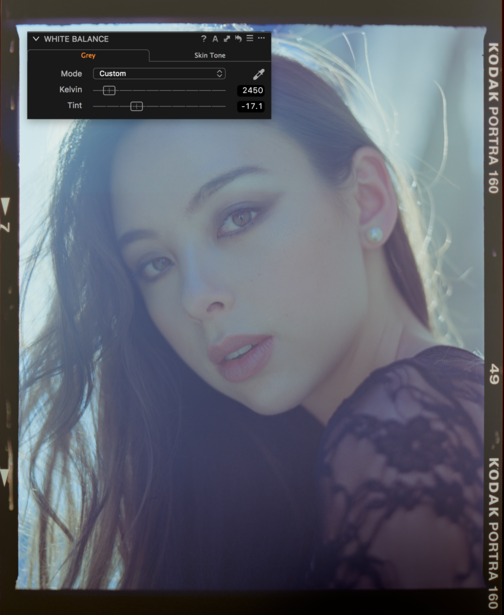
Let’s bring our white balance tool and select the white balance picker (press "w" on your keyboard to access it quickly). Including the border of my film in my scans finds its reason here: it gives me a neutral area to sample my white point from. So by simply picking from the border of the film with my white balance color picker, the blueish cast should mostly be corrected as you can see here:
Obviously, it still doesn’t look quite perfect. But now we have a positive image that we can edit just like we would on any other picture — or almost. Don’t forget your raw file is a negative, so some sliders will work the other way around than what you are used too. For example, pushing the exposure will give you a darker positive image, while pulling it will yield a brighter picture. Before yelling at your computer because it doesn’t do what you ask for, be sure to try to push or pull the slider to the other side and see if that achieves what you are looking for.
Getting Lab Quality Color Correction
As we shot the negative in raw, the correction can almost be pushed as far you’d like to. You could decide to go for something rather neutral:

But because we shot a color film, doesn’t mean we have to use it as a color picture:
Now, if you want to get perfect color correction, something very similar to what you would benefit from a lab scan, I would recommend you to send one picture to a lab from each film stock you are using. Once you get your digital file from the lab, digitize your file with your setup, and try to color match you picture to what the lab sent you.
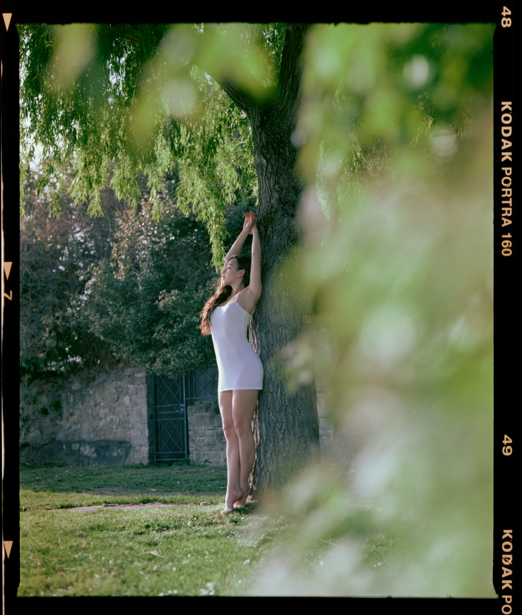
The first time I digitized a negative, I created the following positive image out of it:

Then, when I received my scan from the lab, I worked on it again and it looked something like this:

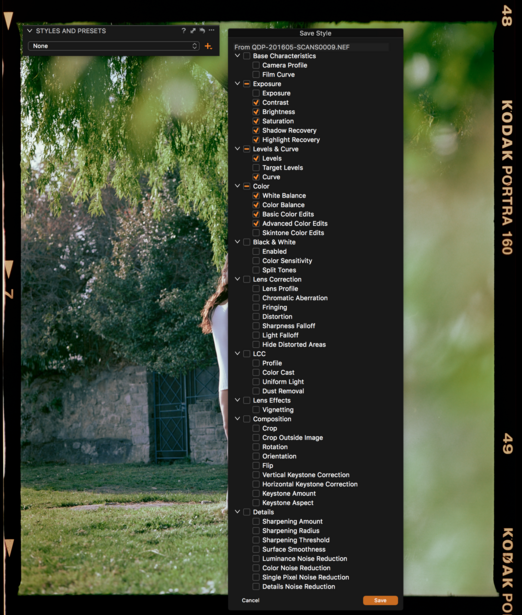
The Power of Presets
From there, I created a preset that I could apply to future captures of Kodak Portra 160 negatives. To create a new preset, go to the Adjustments tab and under Styles and Presets, or access it from Window > Create Floating Tool > Styles and Presets. Click the "+" button next to the drop-down list and check every setting you want to include in your preset (avoid including exposure, crop, local adjustments, and other settings that can vary from image to image), then click save, give it a name, save again and your presets is now created.
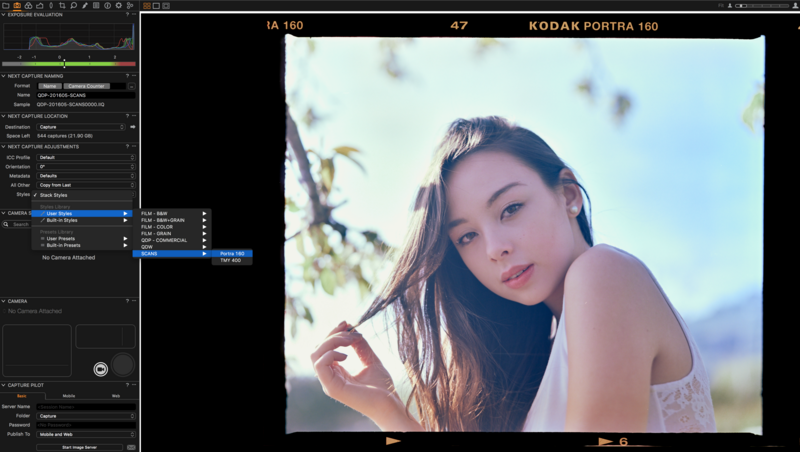
From now on, if I shoot with my camera tethered to my computer with Capture One open, I can apply this style on the fly, and watch the positive image appear on my screen without having to do anything. All I have to set is the Styles setting in the Next Capture Adjustments tool that can be found in the Capture tool tab.
As you can see, the process isn’t very complicated. All you have to remember really is to invert the RGB levels or curve and then color correct the image with the tools you like best. Shooting raw, I would suggest starting with the white balance tool like shown in this article, and then use either the color balance tool or the curves to further refine it. If, for some reason, you are stuck with JPEG or TIFF negatives, you may want to skip the white balance tool altogether and give the curves a try.
If you have the possibility of shooting tethered, don’t overlook it. It will allow you to zoom in on the files and be sure everything is in focus, that you don’t have any Newton rings showing, or too much dust on your negatives. Also, it’s a great way to check you exposed your digital capture correctly to get the best out of your precious analog picture.

Join the Fstoppers community for free
-
Post comments and join in the discussions
-
Browse the site ad-free
-
Share your work and get featured in the community
-
Compete in the photo contests for fun and prizes
3 Comments
good article
I know this is an old article but I'm hoping you are still monitoring the comments! :)
I am thinking of doing my own 35mm scanning, and keep being referred to a Lightroom plug-in called Negative Lab Pro. It looks good enough, and I do have a LR subscription so I suppose I COULD use it, but I'd love to find a capture one based solution. I did come across this article while researching the topic, and it was really helpful.
The thing I was not sure about after reading this is what ICC profile and curve to use, to be sure that I am preserving the integrity of the film, and not applying a different 'look' based on the profile. It seems that the NLP plug-in for LR has special profiles that ensure you are not influencing the finished product. That's my biggest concern about a C1 workflow. I want to be sure that the files I produce have the 'look and feel' of the film that I used. Any thoughts on this?
Hi Rivki,
Coincidently I discovered NLPro too but am wondering about a Capture One alternative. Did you make any progress in your quest since your post here?
Thanks!