
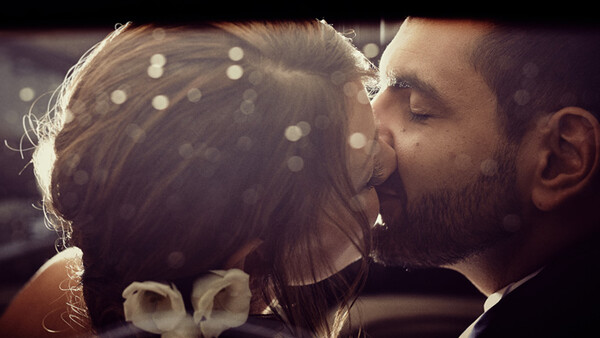
Wedding photographers often tell me how annoying it can be to get a consistent white balance across the images of the day. Shooting weddings almost every weekend during the summer myself, I used to have that problem as well. With a white dress for the bride and a white shirt for the groom, it should be easy though. The problem is I like my images to make my couple look good. Meaning I like having the same skin color and tone on every picture. During the day, their skin might change color a bit because of the sun, the emotions, and the alcohol. Switching to Capture One this year I found the perfect solution to avoid this issue: setting my white balance based on skin tones and not on a gray card anymore.
Camera Raw or Lightroom are excellent tools. I used to work only with Adobe products until I decided to give Capture One a try for its tethering functionality which works much better than that of Lightroom. I then really liked the rendering of my processed images using Capture One. Finally, I found a couple of tools that changed my workflow and made my work much easier and my processing quite faster. One of them is the possibility of setting the white balance of images according to the skin tone of my subject. How does this make my workflow faster and better? Let's see that with an example.
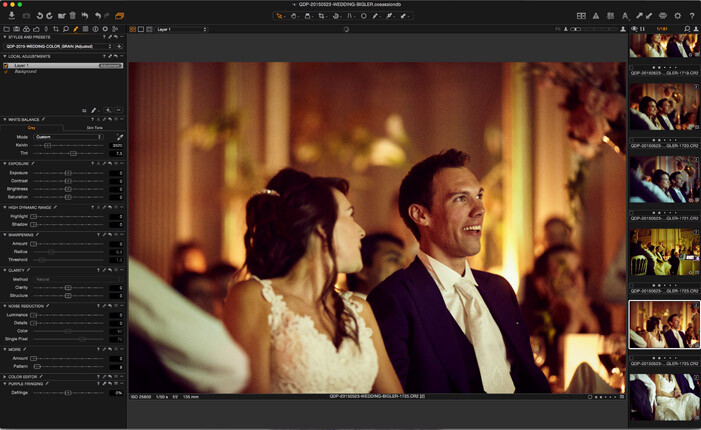
Set the White Balance According to Skin Tones
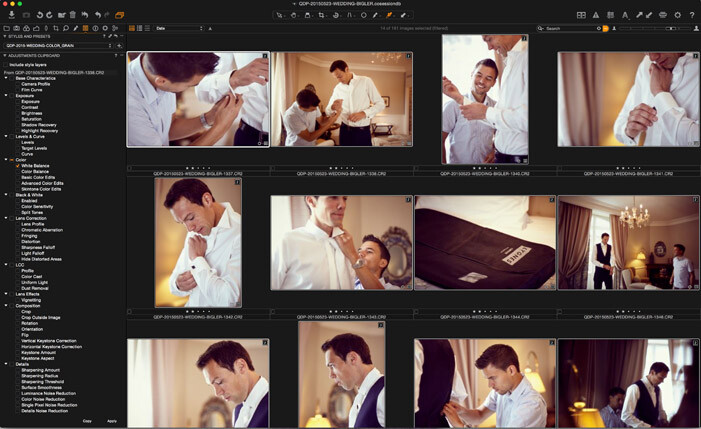
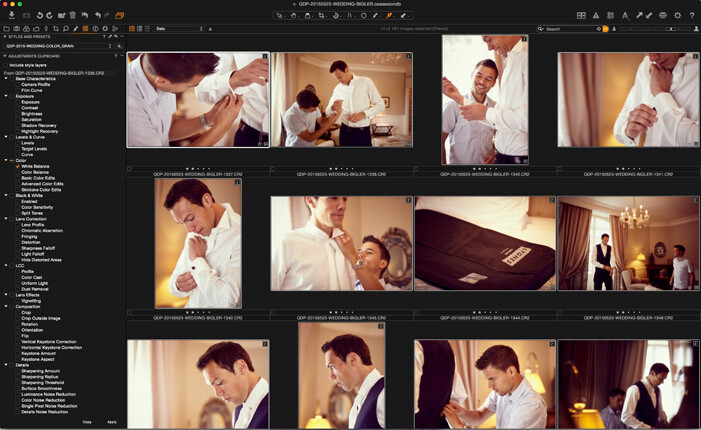
When shooting, I try to get a pretty accurate white balance for each location I am photographing at. It makes my post-processing usually faster and easier, but mainly my pictures looking better straight out of camera. When my images are culled, I import the selected ones into Capture One, apply my preset on all images, and generate the preview for each of them (select all images, right click and select Regenerate Previews). I then end up with only minor adjustments to do and images should load quite fast as the preview is generated with my preset already applied.
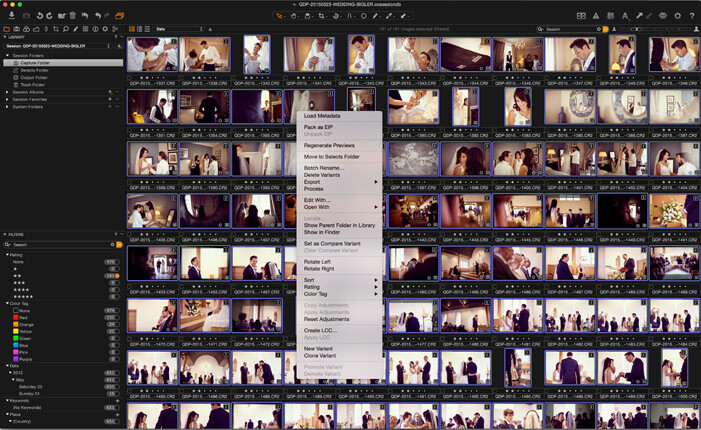
Once that is done, I will go back to the getting ready part of the day, when makeup has just been done. That way I have fresh looking skin with perfect tones. I choose one image that I particularly like and set its white balance to make the skin look the way I want. For this reference image, I generally use the Grey tab of the White Balance panel and set it manually until I am happy with the way the image looks.
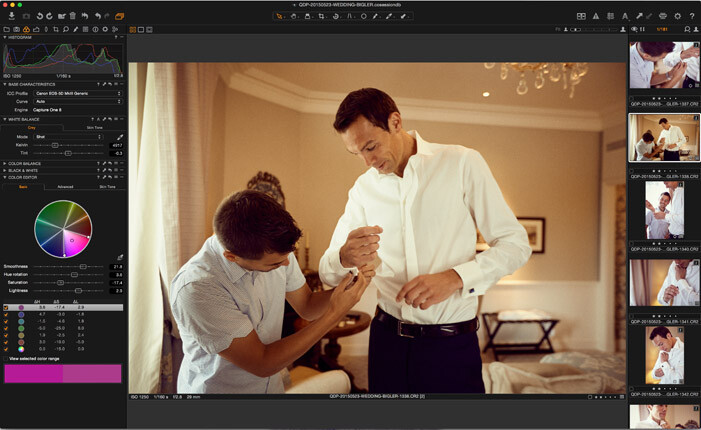

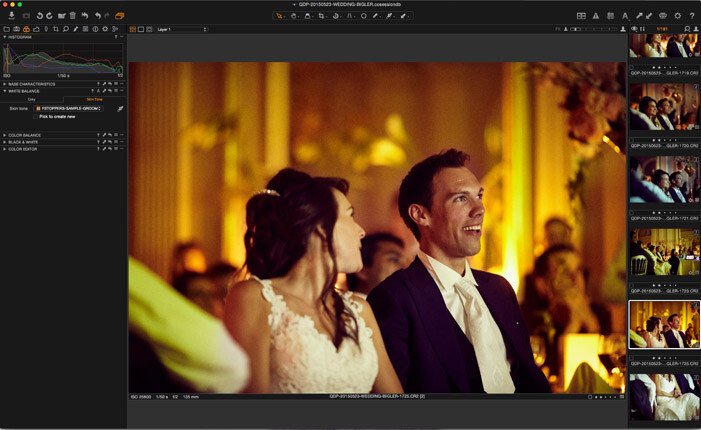
I then create a white balance preset in the Skin Tone tab. To do so, simply enable Pick to create new, then activate the Skin tone picker (keyboard shortcut is s) and click on the skin of the groom or the bride.
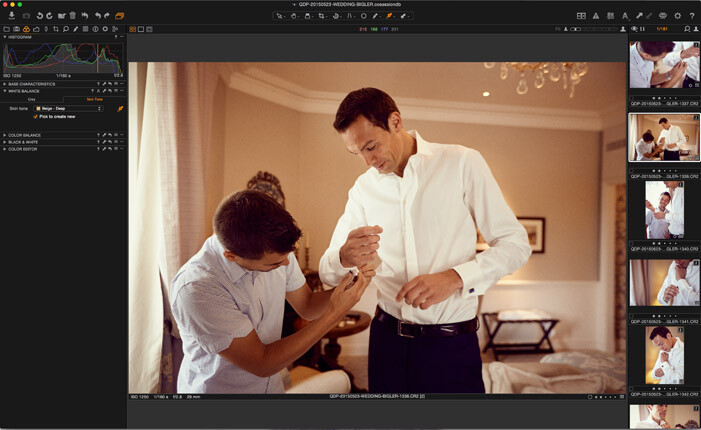
It will then ask you to give it a name.
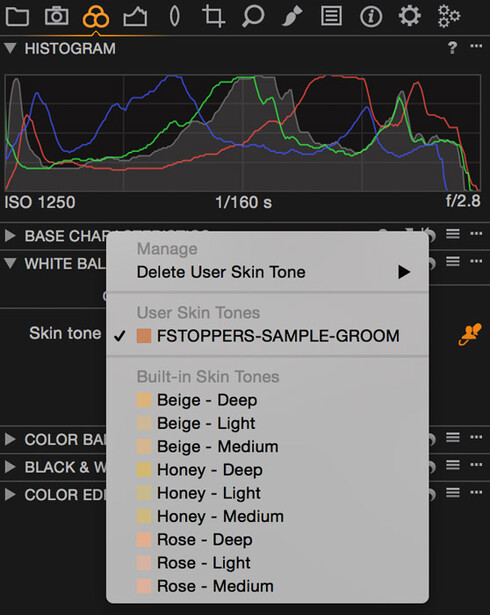
Once I have created one for the groom, I will do the same for the bride. From there, I will find an image for each location with either the bride or the groom on it and apply the skin tone white balance preset created. It works very much like the traditional white balance picker, only you select the skin tone of matching the active preset instead of picking a neutral area.
When each location has one image that is correctly balanced, I will use the Adjustments tab to replicate the white balance across the images of the same location.
Consistency for More Refined Looking Images
Some of you might be wondering what the interest of setting up the white balance according to the skin tone is. Why not just set it according to the clothing instead? It is a great question and I actually would not use the tool for everything I photograph. I find it perfect for weddings or portraits but not for fashion or beauty.
The traditional way of setting the white balance with a neutral gray or white area works perfectly to set a technically correct white balance — which I tend to do for my studio work. However, when shooting weddings, I do not always want a technically correct white balance. What I rather have is my bride and groom to look fresh all day long in my pictures. If they have sunburn on their faces because the cocktail was outdoor under bright summer sunlight, and the lighting of their reception is a trendy purple,I am quite sure that if I set my white balance according to their clothes they will still look red. Even if the purple might be corrected, the sunburn probably will not. Using this white balance skin tone tool will allow you to set the white balance of the image to make their skin look great. Think of it as "skin balance" rather than "white balance," it might make it easier to understand.
Sure, the environment might not seem the proper color, but what is the subject of your image? Also, there is always the brush tool to correct the white balance on the rest of the picture or just locally if needed.
Capture One for Weddings an Overkill?
Capture One is known amongst photographers for being a great tool to process raw files and get amazing skin tones. The white balance tool is part of the reason for this reputation. Another reason is the possibility of having uniform skin tones very quickly and easily. I actually wrote a previous article on that precise topic.
The thing is that people seem to think Capture One is slow — very slow — and thus only worthy for studio work where you do not need to work on as many images as for weddings. The truth is, Capture One is not all that much slower than Lightroom. I would actually say it is almost faster as you can customize the interface however you like to fit your needs. Also, a couple of tools such as the one presented in this article can make it really worth it for wedding photographers.
If you have not tried it for weddings yet, you definitely should. With the season being almost over for most of us (unless you live in South Africa or Australia), it might be just the perfect time to give it a try. I made the change right before the beginning of this wedding season, and I do not see myself going back to Lightroom unless Adobe brings something mind-blowing in the next version.


Join the Fstoppers community for free
-
Post comments and join in the discussions
-
Browse the site ad-free
-
Share your work and get featured in the community
-
Compete in the photo contests for fun and prizes
19 Comments
Does C1 integrate with Photoshop?
Yes, obviously not as smoothly as LR, bc LR and PS are made by the same company, but they play very well together.
It all depends on the kind of "integration" you are looking for. The XMP generated by CaptureOne with all the adjustments will not be applied fully by CameraRAW/Photoshop. The same way, CaptureOne will not recognize PSD files.
The best way to work with Photoshop and CaptureOne is to use TIFF files. Both softwares are able to read and edit them ;)
I like things about C1 but like the options in LR for highlights and shadows being the -/+ slider. If I capture in C1 and save out as a TIFF file and import into LR will color change in LR? That is my main concern.
It should not change. However, keep in mind a TIFF file is not raw anymore. It doesn't keep all the data a raw file contains and thus you won't be able to push it Lightroom the same way you'd push a raw file.
Good article as always about the underdog Camera One and it's advantages to learn and use it... sometimes.
I would only disagree with using it for beauty shots. Prominent C1 advocate and retouching pro Michael Woloszynowic uses it specifically because of the superior skin tone adjustments and rendering over LR.
I can attest to that fact after giving C1 serious consideration after seeing MW's YT video many months ago, first reported here on FS. Oddly enough, I'm also using C1 for animal portraits, bread products, and packaging photos where the warm beige, yellow, orange, and tan tones are crucial to the emotional power of the photo.
In addition to the above, there's something about the overall color adjustment controls, noise reduction and micro-sharpening that adds up to a very capable, highly professionalized "look" and tool in any photographer's arsenal. Caveat: but with a rather large learning curve to be used effectively. Just got to stick with it. IMHO.
I actually do use C1 for beauty. I just don't use the skin tone WB tool for beauty shot as I shoot tethered when in studio. When shooting tethered with C1 only the first shot need to be adjusted, then the settings are replicated to every following shot taken.
C1 is not just better with skin tones, but with colors in general in my opinion. It's color editor tool make it vastly superior to LR or ACR. It is very intuitive and powerful.
As you say, it takes time to learn about everything C1 has to offer but it is worth.
Very interesting article! Consistent WB is often an issue for me as I mainly shoot weddings and the idea of setting it to match skin tones makes me seriously wondering about giving C1 a try, the negative thing is I feel now pretty comfy with my LR workflow and habits and the idea of starting from (almost) 0 a new software is overwhealming...
When I made the switch, I first only used C1 for personal studio work. It allowed me to get accustomed to the global interface and the options the software offers. Then I used it for small shoots such as portraits or engagement sessions. Then once I felt pretty comfortable I made the switch for bigger projects and for weddings. Going step by step – if your work load allows it – might be a solution ;)
you're right i'll try this way! merci Quentin
Thank you, this is good info
I made the switch to C1 in the off season last year and you're right their is no turning back!
Thanks Quentin, would you or anyone you know ever adjust batch settings in capture one, and then export to LR ? I am more familiar with LR, but I am in the postition to decide which product to purchase for professional use.... I will be mainy shooting tethered for portrait work, with some weddings and events also?
For shooting tethered, I'd go with Capture One without even thinking about it.
You can batch edit in C1 and then export your files as TIFF or JPEG or any other format that is not raw anymore and import it back into LR. This way you keep your adjustments. However, TIFF and JPEG are not raw formats. So you development it LR would be restricted. Also, I don't really see a reason for importing files into LR after having them in C1… Both are meant to process raw files.
This is great! Saving this for next season.
I recently made the switch to doing my weddings in C1...it was the last of my workflow to make the jump...and I haven't looked back. I was certainly hesitant to put a job with so many photos into C1 (for me it definitely is a good bit slower than Lr and it gets a little bumpy at times), but the bottom line is that when everything is done I am able to get a much better product out of C1.
I've found that by quitting/closing and reopening C1 regularly when working on bigger jobs (such as weddings), it helps to keep it faster. Because when leaving it open for too long, the previews just will not load or will take longer than usual.
"The thing is that people seem to think Capture One is slow — very slow — and thus only worthy for studio work where you do not need to work on as many images as for weddings. The truth is, Capture One is not all that much slower than Lightroom. "
This doesn't seem true at all any more. Lightroom takes forever to do anything, even as simple as switching photos, or changing the color temperature, on a high end system. I specifically started looking for RAW editors again because of Lightroom's 10 years of ever-increasing bloat in the program. Capture One is 1000x faster.
I've been using Capture One for a very long time, and don't see the controls you referenced in this article. My White Balance panel doesn't have a Gray and Skin Tone tab. What version of Capture One are you using? What is the panel name? Thanks.