A champagne toast at midnight. There is no more iconic way to make the transition from one year to the next. To celebrate the beginning of 2014, I decided to shoot a glass of champagne. Let me show you how I created this shot with items I had laying around my garage.
Here is the final shot. For this image, I was trying to have a darker background with lights that mimicked the bubbles found in champagne. I wanted the focus to be on the glass, so I left the bottle darker and covered in shadow.

This was shot using a 500 watt worklight, a collapsible diffuser, a string of white Christmas lights, some black foam board and black cinefoil. These are all very inexpensive items that you probably have lying around your house. Here is a look at the lighting set-up.

I wrapped the string of lights around a piece of black foam board and secured them in place with a small clamp. Using the lights with dark green cord is better than the lights with the white cord. The darker color of the green cord will help the lights blend into the background. The wide spread of the worklight, creates a problem of light spilling onto and lighting the background. To prevent this, I used black foam board and black cinefoil to block and control where the light fell. Placing the collapsible diffuser in front of the worklight created a long white highlight on the side of the glass.
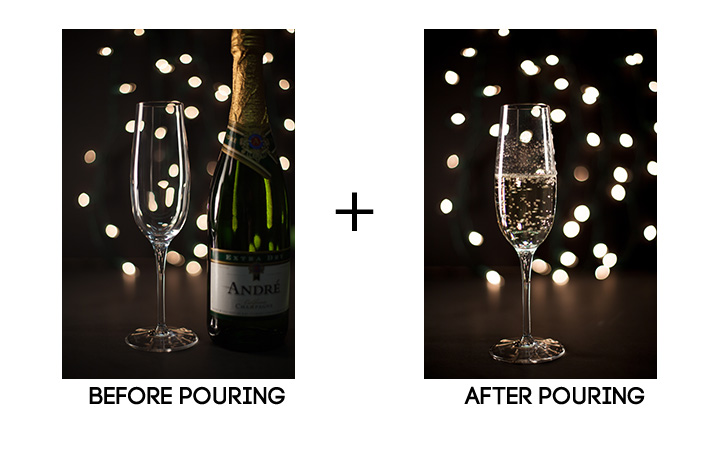
The final shot is a composite of two images. One was shot before pouring and one after pouring. Below are the two images that were merged together to create the final image.

I realize that a worklight is not something that is practical to bring with you to a shoot with clients. You could easily create this shot with a flash or other continuous lighting gear. The point of using this inexpensive lighting solution is to emphasize that it isn't the gear that makes a great image. Sure there are situations where high powered flashes or super fast lenses will help, but what is more important is understanding why they help. I encourage you to try new things and push your photography skills in 2014. If you normally shoot people, try shooting objects. If you are a wedding photographer, try your hand at landscapes. If you don't have the expensive gear that you think you need to create the shot, try it with what you already have. You may find that you don't need the more expensive gear, or you will learn what that more powerful flash or tilt shift lens is necessary. I plan on pushing myself in new ways photographically in 2014, and look forward to sharing them with you.
If you want to add food photography to your portfolio in 2014, check out the PDF series photographing FOOD. The 8 issues will help you improve your food photography in 2014!


Great Tutorial. Any tips on how to avoid your reflection (or the cameras) in the bottle like above?
Cheers! (tehe)
Ah! I can't spot the reflection. You can try using lens like 70-200 and shoot from a distance.
Yeah, it's on the bottle and looks like there is a person behind the camera. I know its hard to avoid. Thats an idea! Shooting through a black foam core board with a hole cut out for the lens? .
Yes, that would be perfect as well.
Black or white depending on what you are doing is the best you can do. You will still see the lens depending on the angle you are shooting but there isn't much else. A tilt shift lens is the way you handle it if you have some money sitting around but otherwise, just minimize it and retouch it out.
I don't actually see the reflection in the shot above. The lack of proper depth of field might be distracting me though.
Just above the "r" in the "extra" there is a "bokeh ball" and right above that is the vertically stretched reflection.
Using a longer lens will never change the size of the cameras reflection. You could shoot with a 1200mm from across the street and as long as the subject is the same size in the frame then the cameras reflection will be the same.
I think what he was suggesting was that the farther away you are from your subject your reflection will get smaller. I think he's correct. Especially if the rooms main light source is only near the subject. Another suggestion would be a polarizing filter...
I understand what he means, and that you think it will work, however it will not work. You are welcome to try it or look it up but the fact remains, a long lens will not reduce the reflection of the camera as long as the subject remains the same size in the composition.
Really? Huh. I'll have to give it a go. What I was trying to say with the lighting is if you are further away from the light source you yourself will get darker and therefore less visible (smaller or not). Just a thought. Thanks for your input.
If you were to step away from the camera your reflection would get smaller but the size of the lens/camera reflection won't ever change. Putting the camera in the dark does hide it in some cases, just depends on the situation. Probably could have been done here with the way the composition is.
When shooting something reflective, we are not lighting the subject itself, but lighting what it reflects - light yourself and your camera, see yourself and your camera in the reflection. To remove yourself - don't light yourself.
Polarizer may help too!
Andre - when a $5 bottle of Cook's is just too expensive.
Thanx for the inspiration :)
http://goo.gl/gE4dGv