Exploring prime lenses in can significantly refine your skills and vision. It's a path worth considering for those looking to focus on composition, visual weight, and other photographic elements without the distraction of multiple focal lengths.
Coming to you from Ben Harvey Photography, this insightful video features Harvey taking on a unique challenge throughout 2024. He’s swapping out a bag full of zoom lenses for one prime lens, hoping to channel his attention to more critical elements of photography. This approach aims to simplify decision-making regarding equipment, pushing him to be more creative with his shots. This method can indeed remove the paralysis of choice, but it might also mean missed opportunities where a zoom lens would be advantageous.
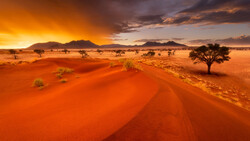
It's important to understand the implications of opting for only a prime lens. Harvey starts his morning at Brighton seafront with just a 16mm lens. His choice is strategic, taking advantage of low tide to capture fascinating foreground details revealed by the receding water. A wide angle lens is beneficial in this scenario, providing a vast perspective that can effectively include interesting foreground, mid-ground, and background elements. Harvey highlights the advantages and challenges of using such a lens, noting how critical it is to get close to your subject and maintain compositional integrity to avoid keystoning.
Beyond its practical application, Harvey's experiment encourages you to push beyond usual comfort zones. He advocates heading out in varied, even turbulent weather conditions to capture more dramatic imagery. His intention is clear – overcoming the tendency towards safe, pretty images in favor of raw, powerful shots borne out of challenging environments. Of course, be safe if you head out in such conditions.
Harvey's deep dive into the specifics of wide angle lens usage also reveals a learning curve. Wide angle lenses require thoughtful use due to their propensity to distort verticals if the camera isn’t level. This makes careful composition and camera handling paramount. Such a challenge might lead you to discover new compositional techniques and problem-solving strategies in your photography practices. Check out the video above for the full rundown from Harvey.


Join the Fstoppers community for free
-
Post comments and join in the discussions
-
Browse the site ad-free
-
Share your work and get featured in the community
-
Compete in the photo contests for fun and prizes
1 Comment
Yes you are very new with wide and super wide lenses! But the real reason is to get an image that is wide without doing a panorama where if clouds are moving you get a blur of movement. A prime lens like the 16mm is used most inside and outside for architecture image. I past years there was the fisheye lenses needing a lens profile to get rid of the fisheye effect. Like doing Astro Milky Ways the human eye wide was and is 50-55mm but all you get is pegasus and the galactic center. The wide was like 24mm, except that in the film days Canon does have 14mm f/2.8 on up and the reason for the f/2.8 and faster/lower value was for handheld shooting, today for bokeh!
To really go wide is to go 10mm!!! normally 5.6 but now we have the 2.8 yes more light gets in but behold most all photographers use the center f/ of a lens for sharpness is best both far and near with little need for focusing or even need AF.
Things to remember, you stated keep level for sides will lean in or out. Next is a up close subject with a far off story that can be seen, Yes like a sunset/rise in the background and the subject like a very tall tree that will fill the frame like 3/4 of it and being just 10 or 20 yards way. Another is not to use a polarizer for the center of the sky will be darker vs the sides just like a panorama no use of polarizer for same reason. Also doing milky ways using the super/ultra wide is the trail in the sky stretches from right to left straight horizontally, yes no many the widest. The best way to use is in portrait view, the wider the higher you can do a pano for those late season miky ways for the arch effect, late season MW's are as high as directly overhead and a little further back, hard to do a one shot horizontal for you need to do several rolls but the super/ultra wide allows for a single roll and only 1 1/2 minutes to do even with camera NR on moving to next point during NR with a degree stepper at base of pano rig. To process now going from Lr to PS panorama, PS does even the hardest night pano now no need to do hours of points in PTGui. Just info, the early Sony Mod 1 and 2 have a built in panorama on the dail and even using the 10 to 12 or 16mm's you get great foreground and far ground sharpness/clarity with the far ground not looking sooo! far away.
For those who do not like the heavy Sony 12-24mm f/4 or f/2.8 there is a very less known lens the E 10-18mm (15-27 mm in 35mm) f/4 OSS APS-C BUT can be used in full frame mode without any vignetting at 12-18mm (18mm if lightshield is removed, a very small pocket sized lens.
A recommendation is to do bracketed shots with the wide lenses say 5 at +/- 2EV for sunrise/sets you will get smaller suns and more clouds.
As you noted you get smaller moons using wide lenses, If you do bracketing 5 at +/- 3EV with SS/ISO 125 and f/ 8-11 for sharpness you will get a infocus moon no matter the lens but using HDR program you get foreground bright as well a sharp moon but easy and faster is to just paste a full moon over just glow of a out of focus moon, been done since film days in the darkroom.
1. 10mm single capture in 3:2 format whereas and pano would be wide and narrow and many rows, scary at the edge of a cliff in the wind!!!
2. using the A7RM2 pano dial using a 12mm Grand Canyon
3. using the E 10-18mm f/4 OSS in FF mode at 12mm
4. Bracketing 5 at +/- 2EV with a driftwood tree about 5 yards away at is over my head with a small sun 12mm