
Ah, the allure of the sea! The crashing waves, the salty air, and the breathtaking beauty of the coastline. If you're a beginner photographer looking to embark on a seascape photography journey, you're in for a treat.
Seascapes offer a wealth of stunning photographic opportunities, but getting started can seem a bit daunting. Fear not! In this article, we'll explore the five essentials for beginners to kickstart their seascape photography adventure and capture mesmerizing images that will transport viewers to the shores.
Research and Scout Locations
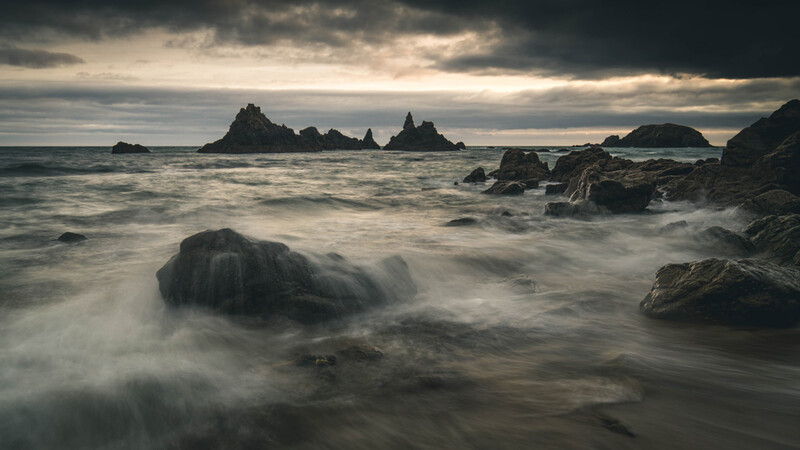
The first essential step is to research and scout potential seascape locations. From dramatic cliffs to serene beaches, coastlines offer a myriad of possibilities. Look for spots that have interesting geological features, rock formations, piers, lighthouses, or any other elements that can add character to your images. Study tide charts to plan your shoots during low or high tide, as they can drastically change the look and feel of the scene. Take note of the sunrise and sunset directions to position yourself for optimal lighting conditions. The more you know about your chosen locations, the better prepared you'll be to capture stunning seascapes. It may take a number of attempts to get the right conditions for the scene, so don't be put off if the conditions aren't right when you are there. If they are, then it may turn your scouting trip into an actual banger shot.

Gear Up for the Challenge
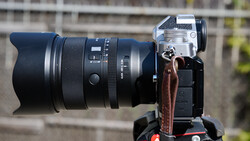
Seascape photography comes with its own unique challenges, and having the right gear is essential. Invest in a sturdy tripod to keep your camera stable in windy conditions and ensure sharp images. A wide-angle lens, such as a 16-35mm or 24-70mm, will allow you to capture the expansive beauty of the seascape. Consider using a polarizing filter to reduce glare and enhance colors, especially when photographing water or capturing reflections. Lastly, don't forget lens cloths and protective gear to shield your equipment from the sea spray. Besides camera gear, having the right clothing will allow you more chances to capture that banger. Wellington boots (gum boots) are an essential tool to have here, or if the water is of a pleasant temperature, then bare feet can work too; just be careful not to slip. Clothing will also be a factor to consider as you will be standing around for a long time, so if it is cold, wear warm and waterproof clothing, as there is nothing worse than being beaten away from a location just as the light and conditions get better because you are cold, wet, and uncomfortable.
Master Long Exposures
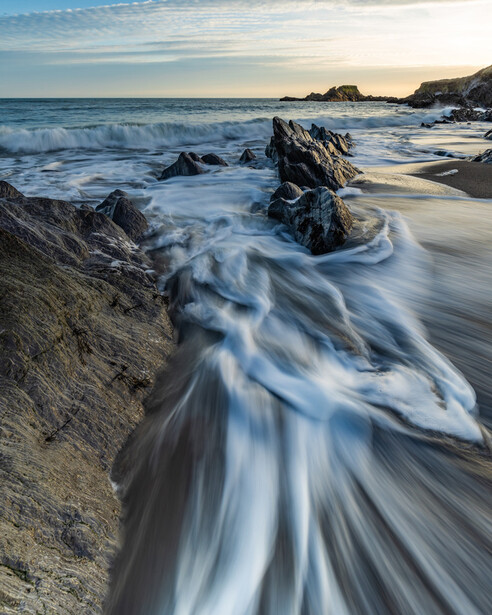
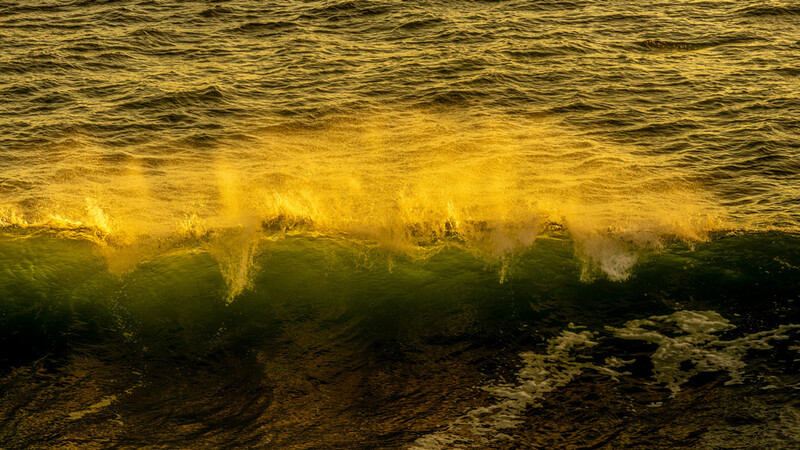
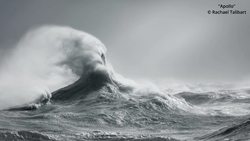
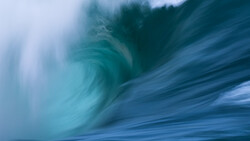
Long-exposure photography is a fantastic technique for creating captivating seascapes. By using longer shutter speeds, you can capture the movement of water, creating a dreamy and ethereal effect. To achieve long exposures, set your camera to manual mode and use a small aperture (higher f-stop number) to limit the amount of light entering the camera, or attach a neutral density (ND) filter to reduce the amount of light further, allowing for longer exposures without overexposing the image. Experiment with different shutter speeds, from a few seconds to several minutes, and observe how the water transforms into a silky and serene surface. Ideal shutter speed times I've found to work more than not are from 1/8 of a second up to 1.2 seconds, depending on the flow of the water and the ambient light. The key here is to experiment. There is no fixed rule that will work for every scene, and as you use different shutter speeds, you will find different results on the back of the camera. The ambient light above will also reflect off the water below, and in the case of waves, this will cause a vast amount of white, so take care to not blow those highlights in the water as well as the sky.
Embrace Dynamic Lighting
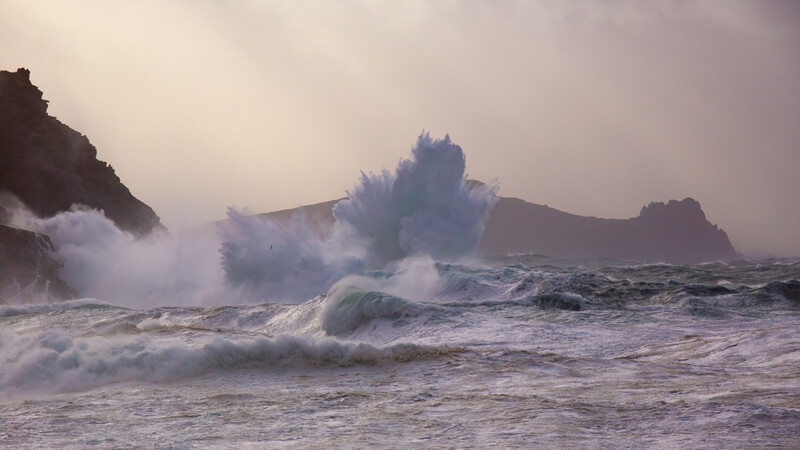
Lighting is a crucial element in seascape photography. The interplay of light and shadow can add drama, depth, and dimension to your images. Be prepared to adapt to the ever-changing lighting conditions by visiting your chosen location at different times of the day. The soft, golden light during sunrise and sunset can infuse your seascapes with warmth and create stunning silhouettes. Stormy and dramatic skies during cloudy or rainy weather can add a sense of mood and intensity to your images. Don't shy away from challenging lighting situations; instead, embrace them as opportunities to capture unique and compelling seascapes. However, a key point to remember here is that you need to be fluid and fast. Fluid is in regards to your composition; don't camp on the same one if light is kicking off in another direction. Take the opportunity to move and recompose. You can always return to your original composition once that light show in the other direction has finished. Being fast is also a key skill, as you need to be ready to snap that shot. Light waits for nobody, and it can come and go in the blink of an eye.
Capture the Essence of Motion
Seascapes are inherently dynamic, with crashing waves, swirling tides, and the constant ebb and flow of the water. To truly capture the essence of motion in your images, experiment with different techniques. Use a faster shutter speed to freeze the action and capture the power and energy of breaking waves. Conversely, a slower shutter speed will allow you to convey the fluidity and movement of the water. Incorporate long exposure techniques mentioned earlier to create a sense of calm and tranquility in your seascapes. Play with different perspectives, angles, and compositions to capture the ever-changing nature of the sea. When viewing your images on the back of the camera, ensure that the look you wanted to achieve has happened; otherwise, you will get back to base and realize that you didn't quite get it right and the moment is gone. If you want to freeze the water action, then ensure that your shutter speed is very fast. 1/500 or a second or faster I find works well to freeze the water droplets, and as mentioned abovem 1/8,1/4m or 1/2 a second keeps some texture in the water plus adds the sense of motion in the image. When composing your shots, a great trick is to use the water as part of your composition. So, frame up a shot and wait for the water to either advance or retreat into the scene and grab the shot. This way, the water and motion have added to your image and made it stronger overall.
In conclusion, starting your seascape photography journey is an exciting opportunity to immerse yourself in the beauty of the coastlines and capture mesmerizing images. By researching and scouting locations, equipping yourself with the right gear, mastering long exposures, embracing dynamic lighting, and capturing the essence of motion, you'll be well on your way to creating stunning seascapes.
Remember, practice makes perfect. The more you venture out to the shores, the more you'll learn about the ever-changing nature of the sea and its photographic potential. Don't be afraid to experiment, try different techniques, and develop your own unique style. Every seascape has its own story to tell, and it's up to you to capture its essence through your lens.
Lastly, don't forget to enjoy the process. Seascapes offer a sense of serenity and tranquility that can be incredibly therapeutic. Take the time to appreciate the beauty around you, listen to the soothing sound of the waves, and let yourself be inspired by the vastness of the ocean. Your passion for seascapes will shine through your images, inviting others to experience the captivating world you've captured.
So, gather your gear, research your locations, and set off on your seascape photography journey. Let the waves guide you, the light inspire you, and the beauty of the coastlines fill your frames. With the five essentials for beginners in mind, you're well equipped to embark on an adventure that will not only expand your photographic skills but also deepen your connection with the captivating allure of the sea. Happy shooting, and may your seascapes transport viewers to the serene and enchanting world of the coastlines.
What are your thoughts on this topic? Let’s continue the conversation below.

Join the Fstoppers community for free
-
Post comments and join in the discussions
-
Browse the site ad-free
-
Share your work and get featured in the community
-
Compete in the photo contests for fun and prizes
6 Comments
Pssstt...a cloth to wipe your lens is your best friend
And not just one of them either :)
Damn. Wish i lived near a sea. I'm smack dab in the middle of the mid west unfortunately.
I sometimes think what that would be like myself 😳
You have captured some awesome images and with only one group of rocks. If I may add, the tripod should be Carbon Fiber but still use grease on the legs clamping points mainly the tightening bolts and nuts and a good oil down. If using two different lenses use mounted on two different cameras, Bravo for using two but even more also working the video camera. Also tether the camera to you!
Filters are needed some but there are filters that fit on the back of the lens like Haida for all camera lens makes, what they help with if a sunny day and using say a lens less than 20mm you may get a center dark area with a front filter if you are not using the rule of sun placement using a polarizer exp. for a filter behind the lens you will not get that dark spot in the sky mainly in the center. One thing very few photographers know is the Sony A7,R,S mods 1 and 2 have on camera apps and two apps "Digital Filter" and "SKY HDR" that in camera lets you capture the Sky separate from the Ground using any and all camera settings including WB. The problem you have till Sept 30, to buy and until '24 to download to the camera. The A7RM2, 42MP 13 years old and still $1.5K (says something) is a very sharp and cropable sensor as well as the others. I used the "Digital Filter" to capture the Milky Way over lit city and Runway also some falls and streams. I mention so that you can get still clouds over a buttery ocean without using Photoshop and merging two images.
Another way is to do bracketing 5 @ +/- 2EV for day and +/- 3EV for night, you get five images to play with but selecting a different image to be the base you can also get a blur water but a still sky.
There are also raincoats for camera and len as well as one for the cold where you can see the screen but put your hands in the sleeves.
Lastly take some at night with a starry night and rough water, Believe me with just a 5s image and a low ISO 6400 the image will be as bright as day with baby blue sky with stars.
Least I forget the Planit Pro app has a section for tides in your area getting info a selected point if not that if the moon is above the horizon going up tide is going out coming in as the moon comes down the tide comes in. The charts are a little hard to figure the morning of side of the chart for the day before maybe. Only fishermen know. 1. high tide with moon still below horizon, that's venus in the MW 2. tide going out as moon rises above horizon 3. using the Digital Filter app getting a RAW two shot image processed in camera 4. using the Haida Clear Night filter in back of lens for a baby blue sky on a 12mm lens getting no dark hump also white clouds will be white and no blue or grey tint as well a true colors during daytime.
After the brain work just enjoy the quiet surf and clean air.
Thank you very much ! Nice additions and images ! Thanks for your comment