Exposure bracketing is a technique that can significantly improve your landscape photography by helping you deal with difficult lighting situations. If you've ever struggled with blown-out skies or muddy, noisy shadows, bracketing might be the solution you're looking for.
Coming to you from Gavin Hardcastle of fototripper, this practical video dives into the ins and outs of exposure bracketing, focusing on why and how to do it efficiently. Hardcastle starts by addressing the common reliance on Auto Exposure Bracketing (AEB). While AEB might seem like a convenient tool, Hardcastle prefers manual bracketing for its control and precision. He explains that many photographers automatically reach for AEB, thinking it's the best way to capture a scene with a wide dynamic range. However, Hardcastle argues that you can often achieve the desired result with just two manually bracketed shots, rather than the three or more that AEB typically produces. This approach not only reduces the number of images you need to manage but also makes the editing process more straightforward.
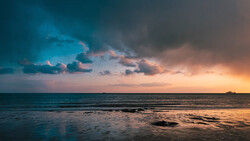
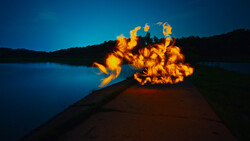
One of the key reasons to bracket your exposures is to handle scenes with extreme contrast—where the highlights are too bright, and the shadows are too dark to capture in a single exposure. Hardcastle demonstrates this with a challenging subject, a sea arch in Newfoundland, where the bright sky contrasts sharply with the darker cave interior. By manually bracketing his exposures, he ensures that he captures both the detail in the bright highlights and the depth in the shadows. Hardcastle also shares a tip for dealing with lens flare when taking an overexposed shot: simply use your hand to block out the sun or other bright light sources. This small adjustment can prevent unwanted flare and make the blending process easier in post-production.
The video also covers the importance of reducing the number of frames you shoot, especially when working with panoramas or focus stacks. Hardcastle points out that using AEB can quickly fill up your memory card with unnecessary images, particularly if you're trying to capture a high dynamic range scene. He gives an example from a recent shoot where he manually bracketed a panorama. On one side of the frame, he needed only two exposures to capture the full range of light, while the other side, which included the sun, required three exposures. By bracketing manually, Hardcastle was able to tailor his shots precisely to the needs of the composition, avoiding the clutter that comes with automatic bracketing. Check out the video above for the full rundown from Hardcastle.
And if you really want to dive into landscape photography, check out our latest tutorial, "Photographing the World: Japan With Elia Locardi!"
Join the Fstoppers community for free
-
Post comments and join in the discussions
-
Browse the site ad-free
-
Share your work and get featured in the community
-
Compete in the photo contests for fun and prizes
2 Comments
This is a great show of Exposure Bracketing. I was doing with my Canon T2i back in 2010 using the Promote Control learning more about. But in 2014 bought the A7SM1 just because it did 5 at +/- 3EV an extreme and hard to find a program at the time to blend all. You can use the 5 at +/- 3EV to get a full moon sharp and in focus over a lit foreground but never the size your eye sees the moon.
The happy place is 5 at +/- 2EV and for sunrises/sets but for hand holding 3 at +/- 2EV with IBIS and OSS/IS lenses.
As far as sunrise/sets the 5 at +/- 2EV if sun is above the horizon it will be very small and not blown out filling the whole sky. For sunrise/set with sun below or a blue hour if you have say trees or an object the dark side will be bright and in focus vs being a silhouette.
I always use AWB and auto ISO meaning each capture will be basically a perfect image but if you use a fixed WB and ISO you will get images a lot different as far as brightness of each.
I keep the 5 at 2EV set handy for fast selection. Also you can use a high f/# getting great detail in each. Also if you can select AWB white to remove or capture images with out the bluish shade on white like boats.
The 3rd image is when i was at Antilope Canyon and forgot my plate for my camera to tripod, others all had sticks and I was using my new A7RM2 with IBIS and just tried 3 at +/- 2EV hand held each image looked great and i was using the new Sony FE 12-24mm at 12mm, the only one for any camera in 2017 so wider captures than anyone else. Also back in 2015 using the A7SM1 I did some Milky Way shots with the E 10-18mm f/4 OSS (15-27mm in 35mm) but 12-18mm in full frame making the widest possible at the time 12mm but without knowledge or info on captures I did bracketing 3 at +/- 1EV the lesson learned is camera noise reduction is turned off if an image in the set is turned off if longer than 1 sec. then you get hot and dead pixels in all images but not get upset when merged together the HDR software gets rid of the hot and dead pixels.
Also if in a cave like image 3 a tour guide was using a 6500 temp light so as long as there is light a bracketed shot can be done hand held for all images will be above 1s like image 4, had to try and it worked.
Also for night captures if a building like an old house is lit inside and you have a full moon lighting the outside you can do 5 at +/- 3EV but blending you will need a deghosting of moon program like EFX HDR in the Nik collection in Dxo program or some of the old programs like Photomatix 6, all awesome when done.
Just remember on sticks turn off steady shot!!!
The 3rd image was done during day tour also of late no tripods are aloud in the Canyons due to erosion problems.
Finally what are 5 images as far as large SD cards today when you do 10 or 20 images a second doing birding!!!
Excellent HDR results. Thanks for sharing. I thoroughly enjoy the HDR process. I use photomatix to apply my images to a perfect result.