
Understanding the histogram is essential for any landscape photographer who wants to master exposure and achieve their creative vision. The histogram provides a visual representation of the tonal range in your image, allowing you to make informed decisions in-camera and during post-processing.
In this article, we'll delve into the aspects of using histograms, covering their types, reading techniques, and how to use them to enhance your landscape photography. Perhaps you already know this information, or perhaps it's new to you; whichever it is, I hope it helps you get the most out of your photography.
What Is a Histogram?
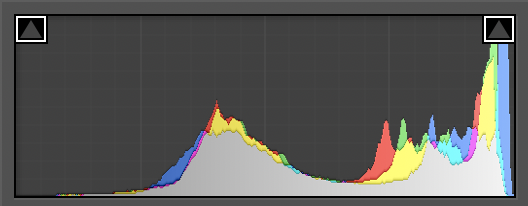
A histogram is a graphical representation of the distribution of tones in an image. The horizontal axis represents the tonal range, from pure black (left) to pure white (right), while the vertical axis indicates the number of pixels at each tonal value. Understanding this graph is crucial for making adjustments to exposure and contrast.
Types of Histograms
Your camera will have two potential options available. It's important to know which one to use and why.
-
Luminance Histogram: This displays the overall brightness levels in your image, showing the distribution of light and dark areas. It's purely there to help you with exposure based on light.
-
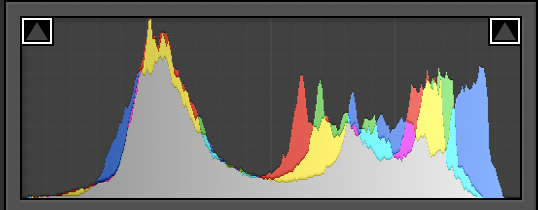
RGB Histogram: This breaks down the tonal distribution into red, green, and blue channels, allowing you to analyze color balance and saturation. This can be very helpful when you are shooting at sunrise or sunset, as the red light levels will be higher at these times. Additionally, during blue hour, you will notice that the blues will be higher when you use the histogram.
Reading the Histogram
Reading a histogram effectively can seem daunting at first, but with practice, it will soon become part of your flow.
-
Identify Clipping: Check for spikes on the left or right edges, which indicate loss of detail in shadows or highlights. You need to avoid these areas, as you will lose data in your raw file if the histogram touches either side.
-
Evaluate Midtones: A well-balanced histogram typically shows a smooth curve peaking in the midtones, indicating a good distribution of light.
-
Look for Gaps: Gaps on either side can indicate underexposure or overexposure.
 Using Histograms in the Field
When shooting, review your histogram after taking a shot. If the histogram is skewed too far left, your image may be underexposed; if it's skewed right, it may be overexposed. Aim for a balanced histogram that utilizes the full tonal range without clipping.
-
Exposure Compensation: Use your camera’s exposure compensation to adjust the exposure based on histogram feedback. If the histogram is bunched up on the left, increase exposure; if it's on the right, decrease it.
-
Bracketing: In high-contrast scenes, consider bracketing your shots. Capture multiple exposures and combine them in post-processing to achieve a balanced final image.
-
Post-Processing and the Histogram
Histograms are invaluable in post-processing. Think of them as another tool to use when you are editing your shots. If you have blown the highlights while taking the shot, you will see the same graph on your histogram in Lightroom or Photoshop, and as you make adjustments with sliders, you will see the results represented on the built-in histogram in your software.
-
Adjusting Levels: Use the histogram in editing software to adjust brightness and contrast. Ensure you pull the black and white points to the edges of the histogram to enhance tonal range.
-
Avoid Clipping: Monitor the histogram as you edit to prevent clipping. Use the histogram to maintain detail in both shadows and highlights while making adjustments.
 Common Mistakes
-
Ignoring the Histogram: Many photographers rely solely on the camera display. Always check the histogram for a more accurate representation of exposure. Your LCD screen isn't enough to see if your shot is exposed correctly. I have had numerous participants in my workshops who have it turned on but never use it. However, once they start, it becomes a game changer.
-
Misinterpreting the Histogram: A common misconception is that a centered histogram is always ideal. Depending on the scene, a balanced histogram may not always reflect your creative intent. If you have a bright scene, then the histogram is going to be on the bright side (whites to the right), so bear this in mind when shooting.
Final Thoughts
Mastering the histogram is a game changer for landscape photographers. By understanding its nuances and applying this knowledge in both shooting and editing, you can ensure better exposure, richer tones, and ultimately, more compelling images.
Your histogram is a tool; however, it's no good to you unless you use it. Enable it and ensure you are shooting with it visible on your camera's LCD. I have many times switched the view on my camera to see the scene better and forgot to go back to the view that shows it, only to then have an underexposed or overexposed image when I get back to base.
Built-in exposure metering on cameras is good; however, the histogram is far better, as it gives you a visual representation of what your sensor sees, rather than an evaluative view of the scene, which is what your camera normally shows you by default.
It's also important to note that at times your histogram can get confused, particularly when you are dealing with a scene that has a large contrast between darks and whites. It will tell you that, overall, your image is underexposed; however, when you review it, you will see that the brightest part of the scene is actually overexposed. So, bear this in mind when shooting. You can recover a slightly blown highlight or a slightly underexposed shadow with the advances in raw files, but it's best to avoid this as a default and only use it when you really need it. Get it right in-camera first, and you will get the most out of your image in post.
Take the time to familiarize yourself with histograms, and you'll elevate your landscape photography to new heights.
How has using the histogram influenced your own photography? Let's continue the conversation in the comments below.


Join the Fstoppers community for free
-
Post comments and join in the discussions
-
Browse the site ad-free
-
Share your work and get featured in the community
-
Compete in the photo contests for fun and prizes
6 Comments
I looked at the article and title and started watching the video, and my initial response was 'Why can't I just fix it in post, if I really missed the mark in my manual shooting settings?'. However, I began to think of some specific cases where a little camera digital assistance like this would have come in handy, to prevent some photos from becoming toss-aways, or at the very least to keep me from having to work so hard in post editing. But it is a bit of a learning curve, and I was just trying to figure out how to get the histogram to display on my model of camera in pre-shoot mode... I did so maybe this article could really help me out. I would think it could apply to more than just landscapes.
Thank for your comment Robert, glad you enjoyed the article and the video! The histogram is a great tool overall for sure
I'm no Guru, but I watch a lot of YouTube videos! For the Nikon system, the histogram is based on the jpeg Picture Control selection. It was suggested that you set it to neutral or NL so that the histogram would properly represent an accurate raw image histogram. If you get this right in the camera, then in post you will not have blown out highlights or hidden details in Dark Shadows. (Spell check must remember the old TV show... It capitalized Dark Shadows! 😂)
I like your syntax :-) I’m not sure about the histogram being related to the output JPEG on the camera tho? I’ve not heard that before, but then again I shoot Canon :-) thanks for your comment
I shoot meduim format
And ..the dynamic range ...I barely worry about the histogram
And with the denoise now you can certainty under expose ...or bracketing also and its not an issue
Good Stuff Nev, I would have thought you still need to be conscious of highlights regardless of shooting medium format ?