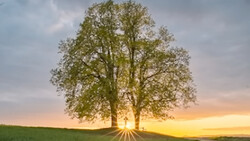
Continually exploring new techniques is essential for capturing your best images, especially in landscape photography. The practice of exposure bracketing, a technique of taking multiple photographs of the same scene at different exposure levels, is one of those valuable tools for photographers seeking to achieve perfect exposure in their images.
Coming to you from Park Cameras, this helpful video tutorial will show you how exposure bracketing is particularly beneficial in high-contrast scenarios, such as landscapes with bright highlights and dark shadows. By capturing multiple exposures, photographers can blend these images in post-processing software of their choice, ensuring that all areas of the photograph are correctly exposed. This is a crucial technique, as even the best modern sensors are outmatched by the dynamic range of some scenes. Exposure bracketing addresses this by allowing the photographer to take multiple shots - typically one underexposed, one at what is considered the correct exposure, and one overexposed, which are then mixed into one final shot. This technique reduces the need to push the shadows or highlights too far in post-processing, which can often lead to noise or loss of detail. It's an approach every landscape photographer should know. Check out the video above for the full rundown.
And if you really want to dive into landscape photography, check out our latest tutorial, "Photographing the World: Japan With Elia Locardi!"
Join the Fstoppers community for free
-
Post comments and join in the discussions
-
Browse the site ad-free
-
Share your work and get featured in the community
-
Compete in the photo contests for fun and prizes
3 Comments
I often use rhis "image sandwiching" technique on commercial shots of buildings as well. However, a tripod assures the accuracy of image matches.
John Clarke, MPhotog,Cr,Q
First some photographers are kinda to young to really know what Bracketing is and why it is used. Back in magazine days I spotted it. What hit first was it was a indoor photo of a western cabin but with a few windows and the outdoor image was as tack sharp and colorful as the indoors. After a little study I tried it around the house with my (at the time) Canon T2i with the 3 @ +/- 2EV. The hard part was finding a program to combine, Canon's SW did not do it. Found Photomatix Pro (Trey Ratcliff who's program got a photo into the Smithsonian) and Oloneo PhotoEngine along with the free (then) Nik Collection HDR Efex Pro once owned by Google and now Dxo (saved it), to kick in the past PS and Lr cost $800 + each full update the cost of my camera and two kit lenses, duh! Yes the cartoon photos. The reason for bracketing was the lack of Dynamic Range of cameras say shadows and highlights. All some 14 sort years ago.
Today programs are better and just two years ago Lr made it to the line. The programs today that let you pick one image to be zero or center the old but better are Nik Collection HDR Efex Pro and ON1 Photo Raw.
Something to think about, you capture images say at sunrise with the sun above the horizon you get a large blown out sun in the background but if you bracket 3 or 5 @ +/- 2 or 3 the sun will be small and less looked at so much. If the sun is below the horizon and a single image has silhouettes and a dull foreground a bracketed say 5 @ +/- 2ev the dark silhouettes will be colorful, sharp and texture with a colorful sky with textured clouds and ocean that is also colorful lastly ever do a capture in the blue hour where are the stars and foreground just a blob. Do the 5 at 2 and get everything yes. Next time you are in a hotel do the 5 or 3 and 2 and get both outside and inside sharp.
In 2014 I went to Sony A7S reason it had the 5 and 3EV the only camera with it out of the A7 or A7R and I used the Promote Control device with my T2i it could do any and all and more.
I used to do and still do take a full moon capture over a city try this 5 @ +/- 3 EV 125 ISO/SS f/ 8-11 adjust for sharpness use .5 as center. first shot 125 last 30s you get a moon sharp and in focus with a foreground also. But the moon is kinda small why no lens will capture the moon as we see it and get the foreground nice and wide. In film days they took a neg of the moon and added it today we clone one but remember the moon wobbles always looks normal on a full moon rise but will twist before setting. Very important to remember.
You should also bracket in low light Canyons.
Agree with the idea that there is more than one correct exposure, and it is better to capture the effect in camera than use the latitude of Raw, but the video was very long for one idea, and had very few example photos