In an era where digital cameras offer advanced metering systems, the relevance of a traditional light meter might seem diminished. However, for photographers seeking precision and consistency in lighting, especially in complex setups, a light meter remains an indispensable tool.
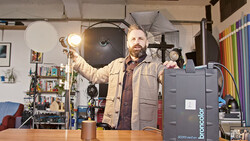
Coming to you from Ab Sesay with Adorama, this helpful video tutorial dives deep into the practicalities of using a light meter in various lighting scenarios. Sesay begins by explaining the concept of a stop of light and its visual impact on images. He demonstrates this with a three-light setup, showing how exposure changes with each stop. Understanding stops of light is essential for managing the intensity and quality of light in a scene.
Sesay then delves into the exposure triangle – the relationship between ISO, aperture, and shutter speed – and how these elements interact differently with flash and continuous light. He provides practical demonstrations of changes in exposure when altering these settings, both in flash-only and constant light conditions.
The video also covers mixing flash with continuous light, a scenario that poses unique challenges. Sesay's thorough explanation of how to meter a scene with multiple light sources, including a main light, fill light, and accent light, is a treasure trove of knowledge for photographers looking to enhance their lighting skills and become more versatile in the studio. He also discusses developing a lighting diagram, an essential tool for replicating and planning lighting setups. Check out the video above for the full rundown from Sesay.


Join the Fstoppers community for free
-
Post comments and join in the discussions
-
Browse the site ad-free
-
Share your work and get featured in the community
-
Compete in the photo contests for fun and prizes
4 Comments
But if you haven't calibrated your meter to each and every different lens you use, then you'll never be accurate.
Fortunately some meters have an offset feature where you can do just this - but you'll need to have a little chart to note which lens needs which offset.
Photography lenses are marked in F-Stops. This is a mathematical calculation of how a lens SHOULD perform, not how it actually does perform.
Cinema lenses are marked up in T-Stops which is where the manufacturer has measured how the lens perfors and so T2.8 on one lens give the same exposure as T2.8 on a completely different lens.
But on F-Stop marked lenses, this isn't the case and it can be surprising how much difference there can be. My lovely Sigma 105mm ART lens is 1/2 stop different to my Canon 70-200 L Mk2 or 24-70 L Mk2 lenses for example. My Canon 35mm prime is somewhere in between as is my Sigma 50mm ART.
It takes a while to accurately calibrate, using a Kodak Grey Card and importantly, following exactly the instructions of how to measure a grey card which Kodak include in the packaging. (It is amazing how few photographers understand the very precise way to measure exposure with a grey card, because it isn't intuitive).
I've measured every lens I have (usually ignoring any vignetting by checking at F5.6) and it is satisfying to get measurements accurate to within 1/10 stop.
I should add that this calibration should be done in the manner you work, (so I shoot Raw and I process with Capture One). Because every Raw processor will have its own interpretation of default contrast curves and lens adjustments that may effect exposure.
So my advice... spend some time calibrating, and get a meter that will allow you to do so. It is worth it. :)
Because of RAW file editing and EVF's giving you a preview of the exposure, people don't necessarily have to be so precise when exposing. They can eyeball it in the EVF or rear screen and RAW allows a fair bit of recovery. Software also helps to clean up photos that may contain too much noise. It doesn't take away from using a decent light meter though, especially studio portrait photographers springs to mind but with the technology we have, a light meter isn't necessarily a must have item anymore.
That's very true. But certainly for portraits / headshots, it does make things a lot faster. And there's always a sense of satisfaction when opening it up in Capture One and nothing needs to be changed. :)
It's not a must have, but it makes life so much easier and shortens the postprocessing time and work significantly.