There's a lot of different reasons why someone would need a new headshot, but producing one with a pure white background may not be the simplest task.
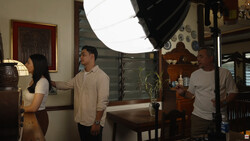
In this video, photographer Jeff Carpenter of Readylight Media shares one of his favorite setups to produce a pure white background headshot. Out of all the different ways to shoot a headshot with a pure white background, Carpenter says this is one of his easiest setups that's also great to take on location. This set up includes using three Paul C. Buff DigiBee units with a V-Flat World's V-Flat on the white side. Carpenter even offers more affordable solutions for the large background modifier he uses, not to mention the V-Flat can easily be substituted out with a white reflector or white foam board for a few dollars if even that. Carpenter also talks about the distance between the subject and lights, including the power needs to make sure to get a clean headshot without spill light affect your image.
What are your thoughts on this setup? What setup do you find yourself going back to when looking to shoot headshots with a pure white background? Leave some of your favorite setups in the comments below.


Join the Fstoppers community for free
-
Post comments and join in the discussions
-
Browse the site ad-free
-
Share your work and get featured in the community
-
Compete in the photo contests for fun and prizes
14 Comments
Notice that the pics are really low-contrast - if you try to shoot a 100% white background in the studio you'l almost always get this effect because of the heavy backlighting. Higher-end lenses, especially primes with lots of anti-reflective coatings, tend to be much better at handling this (check our comparison of the new vs old Canon 70-200 EF lenses to see an example of the difference it can make).
For years we shot with lower-end lenses (like a 24-105 f4) and corrected this by increasting the contrast (lowering the back point) in post. An approach we eventually developed that worked better was to reduce the backlighting, exposing it for maybe 75% grey, and then increasing the background brightness in post. Overall that produces similar results with greater contrast and sharpness.
And that's one big advantage of higher-end lenses: higher contrast, showing you closer-to-final-results in camera, and saving you having to do as much in your post-processing workflow.
Did we see the same pictures? The first picture with proper exposed background shows a great contrast. The second is the example for a heavily overblown background exposure. This shows a low (flaring) contrast. A correct back-lighting, as seen here is not called heavy. This is the result of the (good) idea using a big box with an adjustable flash as background. This can be achieved with almost any standard 50mm prime e.g. But anyway: who has such a big octobox, 3 studio flash heads with 2 softboxes remotely triggered and adjusted and not using a better than average lens?
"But anyway: who has such a big octobox, 3 studio flash heads with 2 softboxes remotely triggered and adjusted and not using a better than average lens?"
Me. I shoot my headshots these days with a Nikon 105mm f/2.5 Non-AI lens. Then again, I don't shoot with a light pointed at my lens in this manner so it works just fine. I imagine that if I tried this, I could easily run into some issues, though.
With this lens, I got the 105mm f/2.5 AI-s, there is a chance for flares. But the 85mm f/2 is o.k. and the newer 85mm as well. The 135mm AI-s works well too.
I did not watch the video but my gut reaction when looking at the cover photo was: Flair City! For many reasons you are much better off shooting on a larger white seamless. The most important being is that having a larger shooting area allows your subjects to move around a bit. People who are moving will be more relaxed and confident looking and portraits like these are all about confidence.
It depends. My team travels a lot and it's kind of hard to fly with big rolls of paper to other cities, states and countries.
Lighting like this (surrounding the subject with softboxes) gives the subject no definition, and you will always be fighting the fact you are shooting straight into a light, which reduces contrast and increases the risk of flare
How about lighting the subject with a reasoned and controlled mix of hard and soft light, dealing with the subject and background separatly
Etc. Etc.
You could still lower the background light to get a darker background. But this here is about shooting against a pure and even lit white background. You could have a white board instead but then have to deal with a good illumination of it.
All I can see is that both of the c-stand knuckles are set incorrectly...
I still don't get the horizontal headshot on a white background thing (I know, Peter Hurley). If you have the ability to crop and replace the background very easily (as show in the video), why not shoot vertical, fill the frame with your subject and then crop it however you want it in post.
If the end goal is a headshot, then shooting horizontal is the simplest way to get there.
For a true headshot (as opposed to a portrait), mid-chest is about as low as the final image will be. For the tiny size that most profile photos will be used at, going below the collar points on a shirt just makes their face smaller and smaller in an already tiny frame.
So shooting vertical is pointless for creating a headshot because you'll just have to throw away much of the image.
Also, shooting vertically would require a lot more physical distance to conduct the session.
People come in various shapes and sizes. To shoot horizontally at flattering focal lengths of 85mm and up requires a certain amount of distance. To shoot vertically at 85mm and up and have white space on the left and right of the frame will require more distance between the camera and the subject.
When working in normal sized rooms (home studios, office conference rooms, etc), it's often barely enough space to work shooting horizontally.
Using a wider focal length (like 50mm) to shoot vertically would just mean that there would be even more unusable stuff in the frame that would have to be thrown away. That's terribly inefficient for even one or two people. If you photograph ten or twenty or fifty people, all that extra work compounds quickly.
Regarding the color, white matches any and every website color palette. And when an organization adds staff in the future, it's easy to make all the staff photos match.
If you're going to extend the background in post anyway, a much simpler setup is to point a speedlight at a white wall or reflector or foam board.
You can A-clamp a reflector to a light stand and attach a speedlight beneath it using a magic arm and super clamp. This is a setup I've used.
You only need to power the speedlight enough to create a rim of pure white around the person. That will keep flare / wraparound light from being a problem in the smallest amount of space possible. It also keeps you from having to do detail work in post.
With that rim of pure white as a buffer, you can very quickly and easily turn everything from the buffer to the edges of the frame pure white in post.
For a couple years now, I've been doing this with a translucent scrim (the core of a 5-in-1 reflector disk set) and a speedlight. Great for location work in small spaces because it requires less space behind the subject than an opaque backdrop lit from the front.
Patrick Hall did an excellent video tutorial, "How To Create Beauty Photography on a Budget." And Peter Hurley is a master on the subject, IMO.