
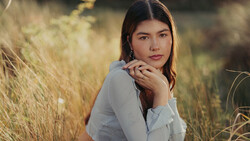
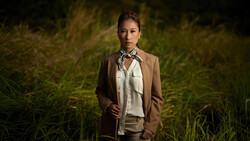
Mastering natural light can take a lifetime of practice, but there is one type of natural light that will produce amazing results in almost any situation: I call it "cave lighting."
Cave lighting is produced when your subject is in a dark "cave," looking out towards the bright entrance of the cave. This will produce soft light that is bright on the tip of the nose, cheeks, and forehead, while creating beautiful shadows along the sides of the face and body. Luckily, you don't need a literal cave to pull this off; you simply need to block the light from hitting your subject from above and from the sides.
The absolute easiest way to pull this lighting off is to put your subject in a dark exterior doorway. Make sure that it's dark inside your doorframe so that the only lighting hitting your subject is coming from outside, directly in front of them. Ideally, you don't want direct sunlight hitting your subject. You'll get the best results from the soft light of a bright or cloudy sky.

Once you become accustomed to this style of lighting, you'll start noticing opportunities to use it out on location or in nature. Simply find a location to place your subject where they are being lit from the front while the light is blocked above and on either side of them. I do this most often when I'm shooting with tree cover: I simply move my subject to the edge of the woods.

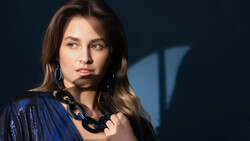
To pull this off in the studio, you can simply put a large softbox directly above your camera with some sort of fill below. If your studio space is small, you may need to add some sort of negative fill (black cards or fabric) to keep the light from bouncing around the room and hitting the sides of your subject.
In many cases, I prefer lighting men a little differently than women, but with this manner of lighting, I think it works well for all subjects. It's soft, classic lighting that will never go out of style.

Gear Used
If you like photography tutorials, check out our full-length tutorials in the Fstoppers Store.


Join the Fstoppers community for free
-
Post comments and join in the discussions
-
Browse the site ad-free
-
Share your work and get featured in the community
-
Compete in the photo contests for fun and prizes
29 Comments
I use this style of lighting for photographing horses; I just put them in a big barn door, and it lights them perfectly. It's especially useful since you can't really use strobes and light stands around them.
Edit: “works for men women and horses”
Worked for ghost the cat:
https://fstoppers.com/photo/429645
Off topic, but I didn't find the answer elsewhere; how do you embed a picture like this?
I just pasted the link in my comment - image showed up when posted.
As many commenters on YouTube have said, I dislike the skin tones on the photos. It looks to me that in the video they are more true to life.
I get it that brown skin is challenging and sometimes looks bad on camera. I live in Brazil so I have to work with much more mixed race people than you could ever find anywhere else and know that it is HARD to get right.
I have a friend that has a very beautiful tanned skin tone that is a mix of black, Brazilian native Indians, European and middle eastern races. I haven't found a camera that captures it well. I always need to tweak it post. She really likes when I take her pictures because she says no one else gets her skin right.
I might be wrong but I believe these photos are straight out of camera from the GFX100. I don't know that Lee edited the photos for this post but I do know that the soft lighting style wouldn't make the skin tones look worse or less true to color. I took the video clips with a completely different camera (GH5) with different white balance and color profile. You can def get the skin tones to look right if you edit a little in post.
I know you can. But was surprised to see what was presented. Cameras will usually not get those tones right straight out of camera. That was most of what I said, you need to tweak it to get it right.
Also I used a technique similar to that to take a self portrait on the door from the corridor to the kitchen, only used the 9W light bulb the too.
I'm not sure why you are complaining about then skin tone on Lee's photos when the skin tone on this image you posted is terrible. Your face is greenish and your nose is magenta/red. Probably has a lot to do with the 9W light bulb you used.
Probably the difference for a millions of dollars photographer with decades of experience and a barely starting semi-professional. But at least I appear alive, not washed out almost dead-white even if the girl is clearly very brown.
And I did not "use" the light bulb as much as it is already there. This is a corridor in my house at night, a quick self portrait because I thought it would be fun and my wife wanted to take advantage of the fact I was already on a suit.
I do not think this is a million dollar case photographer thing. What you are referring to as washed out is simply Lee for example at 54s part of video shows a overexposed image of model as you can see bellow since the black board has become grey completely. Since that camera has a very large DR he then pulls raw file in post to create a more contrasty look and brings that way blacks back. He did not reinvent the wheel, this techniques had been used by painters and photographers for hundreds years now, and when done right it can simply work very effective way and for the reference, the guy shot really needs more then front light, that images needs back light as someone noted already and also the front light is too flat it simply does not work for him ... so as you can see there is no golden bullet in here :) just play, try and learn and you can get it better then this in no time :) Happy shooting.
1. "Probably the difference for a millions of dollars photographer with decades of experience and a barely starting semi-professional". Then, maybe, don't talk like you know more when you clearly don't.
2. You need to get your monitor(s) calibrated (which includes adjusting the brightness). She's not washed out almost dead-white. The first image has a warm color. The second image has a light warm/magenta color.
3. You're the one that brought up, "only used the 9W light bulb the too" as if you were proud of it. Weak crappy light source will usually result in crappy colors tones.
Patrick, do you know what color space Lee had set the GFX100 to in camera, for these SOOC shots?
I just checked and it was shot in Pro Neg Hi with the white balance set to 5000k (daylight basically). For some reason the camera was set to jpeg for this so these image are literally straight out of camera. Probably should have had a warmer WB, not sure about the color profile though.
Check and see if he was using adobeRGB, sooc photos look flat on my gfx100. I had to switch it to sRGB.
Uummm have you heard of a little plot of land called Canada?
Yeah I usually do it at weddings for one on ones of bridal party with groom and bride
"cave lighting" --- I love that name :)
very well explained, and yes, darker backgrounds are usually less distracting as our eyes are drawn to the lighter /brighter colours in a photograph . A darkish lane /walkway leading into a forest is great for cave lighting however highlights need to noted so they can be removed easily PP . Now that's an inexpensive luxury I didn't have in film days so we had to be more observant before clicking .
Interesting comments about darker skin people --- something I have not done a lot of, but I would think those darker skins would be far easier to get right than ghostly white skin . Or even worst , ghostly white skin with darker makeup applied to the face only and the neck, shoulders, arms and often too much boob left natural . They would certain glow with cave lighting
Bit off topic: the impossible portrait -- a very dark skinned bride in a polyester white wedding dress :)
Yes, darker skin is easier, and more easy as it becomes more dark.
Thanks for the tip!
Damn, I always thought I had invented this "trick." :)
Seriously though… while I love the quality of the light, it really needs a hair light to create some separation.
Wow. I read this in an article of Modern Photography back in 1972. I've been doing it ever since.
"in the studio, you can simply put a large softbox directly above your camera with some sort of fill below."
Aka the clamshell lighting. This was highly popular in the 50s and 60s, particularly with women, for the reasons you already wrote. You'll see it used in many actresses (and some actors) official still portraits.
wow soft flat lighting for women, never hear of that before. But, I've been living in a cave for the last 50 years.
"This lighting works for men and women."
Curious is there a different way you think of lighting men and women (soft light, darker background, jaw lines, etc)?
Yes, I usually light men with darker and longer shadows.
Sue Bryce teaches something like this. Calls it tunnel light.
Sue Bryce teaches this method. She calls it the Tunnel.
Sorry didn’t mean to post this twice. I didn’t see my comment appear so I tried again, looks like it worked 👍🏼
The ultimate of this is garage lighting. The garage door gives you an enormous soft light source, and its width means you can shoot diagonally for less frontal lighting. Put a background at the back on the garage and you're golden.