Do you know what the Luminance slider in Lightroom does and why it's so important that you do? Sure, you can slide it left and right and watch your image change before your eyes, but do you actually know what's happening and why this slider is so powerful?
I subscribe to dozens upon dozens of post-production channels on YouTube. Most of them relate to Adobe's Photoshop and Lightroom, as they're the two platforms I use the most in my editing workflow. As such, I think I'm pretty good with both forms of software and can hold my own against most people. That said, there is always something new to learn, and it doesn't have to be anything revolutionary. Sometimes, it can be as simple as understanding a common tool more deeply.
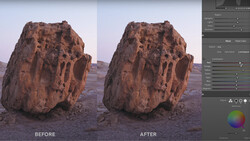
And that notion brings us to this great video by Mark Denney, in which he runs us through the Luminance slider in Lightroom. I think almost anyone who uses Lightroom knows about the Luminance slider in the Color Grade panel and has probably used it on occasion to spice up some colors in an image. But do you actually know what the slider is doing and which pixels it's specifically impacting? Here, Denney makes good use of the histogram to show us where and how the Luminance slider works its magic. Knowing this can make your editing much more intuitive. Once you see it in use, I think you'll be very pleasantly surprised at how easy it is to implement in your editing workflow, but more importantly, you'll know why you're using it and when to use it for most impact. Give the video a look, and let me know your thoughts below.
Join the Fstoppers community for free
-
Post comments and join in the discussions
-
Browse the site ad-free
-
Share your work and get featured in the community
-
Compete in the photo contests for fun and prizes
3 Comments
Mark Denney is great at sharing information on editing and composition! This little extra info on brightening sections and colors will help in colorful images for I had a few of mine up and running while I watched this a couple of times. This the season of colors of lights some being a little too bright and having to be less bright with lowering highlights and whites to get rid of those pesky redness of over expose but with the Luminance slider maybe bring back the brightness of some lights without increasing exposure.
I'm pretty good with LR, but this is one I hadn't fooled with. Gotta' try it out.
TLDR: The luminance slider is in the color grading tool. There is one for a mid-tones highlights and shadows.
It's a great little tidbit and I do appreciate it, although the video runs awfully long at 13mins(!). There is a few helpful notes are along the way. I would argue that this is more of a beginner's video because the adjustments he's making are just so basic, and then, .. heres the slider ;)
Otherwise this was an easy two or three minute this is where the slider is and this is where it does.
PS - these fstoppers "PRO" titles are just getting out of hand.
PS2 - not noted in that long 13 minutes, but being that this tool is in the color grading section, it's also good to note that the new color grading tool is not for the faint of heart. It is extremely difficult to use with the caveat being if you can manage to get a hold of it, then you will be in a better position to grade video. Generally speaking photogs editors are better off with sliders it's just easier.