Changing the mood of an image doesn’t always require elaborate setups or complex software. A few strategic adjustments in Lightroom can completely transform a photo, shifting colors, reshaping light, and creating a more dramatic effect. This kind of editing isn’t about correcting mistakes—it’s about making the image match your vision.
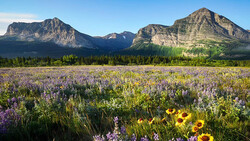
Coming to you from Christian Möhrle - The Phlog Photography, this detailed video walks through the process of reshaping light and enhancing colors to create a striking sunset scene. Möhrle starts by darkening the overall exposure, pulling up shadows and blacks to maintain detail while softening contrast for a more atmospheric look. The white balance gets a significant shift, warming the image to create the foundation for a rich, glowing sunset. He then introduces selective edits using Lightroom’s masking tools to control brightness in different parts of the frame. The left side of the sky, which should appear darker, is adjusted separately from the right side, where the light source sits. Multiple gradient masks help fine-tune this effect, deepening shadows and enhancing the natural transition from light to dark.
Color plays a major role in the transformation. Möhrle uses the color mixer to push yellow hues toward a more intense orange, making the sunlit areas of the mountain look warmer and more visually appealing. He then adjusts the saturation of individual tones, reducing unwanted color casts and bringing out the blue in the sky for a complementary contrast. The split toning panel adds another layer of color grading, emphasizing warm highlights and cooler shadows to create depth and separation.
These adjustments are more than just aesthetic choices—they reinforce the natural light direction and guide the eye through the composition. Möhrle also applies sharpening and sensor spot removal at the end, ensuring the final image is crisp and clean without unwanted distractions. Check out the video above for the full rundown from Möhrle.


Join the Fstoppers community for free
-
Post comments and join in the discussions
-
Browse the site ad-free
-
Share your work and get featured in the community
-
Compete in the photo contests for fun and prizes
No comments yet