Masking can make or break a landscape photo. It’s what lets you balance a bright sky against dark terrain or fix strange color casts without ruining the rest of the frame.
Coming to you from Christian Möhrle - The Phlog Photography, this detailed video shows how masking in Lightroom turns an ordinary raw file into a polished, natural-looking landscape. Möhrle begins with the basics with small global adjustments to exposure, black levels, and saturation before explaining why these sliders often fall short. When you pull down highlights to recover a sky, the shadows in the river flatten out. When you fix a blue color cast in the sky, the water turns muddy. Global edits don’t respect the differences between parts of an image, which is why selective masking matters.
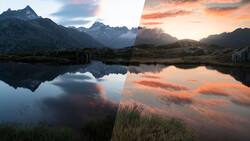
Once the groundwork is done, Möhrle dives into masks. He starts with a sky mask to gently warm tones and pull down overexposed highlights. Then he layers a color range mask to fine-tune blues and deepen contrast between clouds and sky. You see how combining masks, like a sky selection plus a linear gradient, makes precision easy. He moves on to the mountains, selecting both the landscape and sky together to remove the heavy blue cast and shift the light toward warmer yellows. Adjusting tint and saturation fixes purple artifacts while keeping the image believable. Even subtle changes, like lifting whites or shadows, help the distant peaks feel airy and atmospheric instead of flat.
The real power of masking appears when he starts shaping light. Möhrle uses object selections and brushes to brighten specific slopes, creating the illusion of sunlight hitting the terrain. Raising exposure and warmth makes those areas glow, and balancing them with cooler shadows builds depth. He repeats the process across the frame, painting light where it should naturally fall. This kind of digital dodging and burning turns a static capture into something dimensional and alive.
He applies the same logic to the foreground river. A water mask isolates texture and clarity, giving the current detail without making it harsh. A bump in saturation adds richness to the blues, while small temperature and tint tweaks correct color without draining vibrancy. A radial gradient on the small waterfall draws the eye, and a final mask enhances a single rock’s warmth and detail. Every adjustment serves to guide attention and emphasize form instead of simply making things brighter or sharper.
The final stage brings everything together with color grading and sharpening. Möhrle subtly shifts hues in the mixer to steer the river toward cyan and warm up greens and yellows. He controls luminance to balance brightness and prevent one area from overpowering the rest. Then, he fine-tunes global calibration and sharpens the image, carefully masking edges to avoid haloing. The result is balanced light, natural color, and texture that feels tactile rather than processed. Check out the video above for the full rundown from Möhrle.

Join the Fstoppers community for free
-
Post comments and join in the discussions
-
Browse the site ad-free
-
Share your work and get featured in the community
-
Compete in the photo contests for fun and prizes
No comments yet