
Whether you’ve shot raw or JPEG, the choice of what format to use when editing is very important. There are key differences in the capabilities inherent to PSD, PSB, DNG, TIFF, and more. Want to know which format to choose next time you open Photoshop?
In my previous article, I covered the decision-making behind what format to choose in camera, as well as what format to use for storage. The choices boiled down to raw versus JPEG, with DNG by Adobe representing a slight specialty twist on raw formats. When it comes to editing, there’s a lot more variety.
Editing
One of the points I wanted to emphasize throughout the capture and storage guide was the importance of retaining data. Discarding information, whether it be by choosing JPEG over raw, converting to a lossy format, or repeatedly saving a JPEG with changes, should be a deliberate choice. I approach my file format for editing in a similar way, with the goal of passing along as much information as possible from each step.
The main benefit of retaining this data is clear: higher quality in a finished product and an easier time making those adjustments. While these same principles apply to things like color space and bit depth, the easiest example comes from resolution. Take the difference between a file that is 1,000 pixels wide and 4,000 pixels wide: the 4,000 pixels provide more information when making a selection, allowing for finer detail when cutting out hair, for instance.
The same applies to adjusting the saturation of a sky: with a 16-bit image allowing for much finer gradation in the colors, an 8-bit image, while smaller in size, will show unsightly banding with a much smaller adjustment.
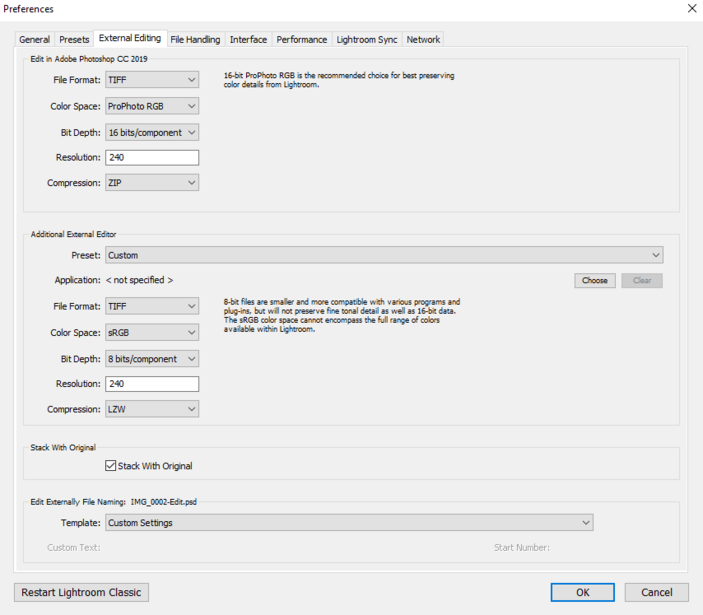
Shown above are Lightroom’s default export settings. Notice specifically the “Edit in Adobe Photoshop section,” which controls how the file is passed to Photoshop when using the “Edit In Adobe Photoshop” menu item (Control+E). These choices are a great default and best preserve data available in your raw files. Changing the color space or bit depth will leave behind potentially useful data, while disabling ZIP compression increases file size without much benefit. While you can switch to a PSD, metadata changes are more poorly supported compared to a TIFF, which I’ve found odd, considering it is an Adobe file format in an Adobe product.
Also worth noting is the lack of a LZW compression option. LZW compression can actually increase the file size of 16-bit files, and since Lightroom expects you to be using 16-bit files in this process, there is no reason to use LZW over no compression.
These same guidelines apply to use with other plugins and editors; however, there may be individual variances with smaller things like color space support. Those need to be addressed on a case-by-case basis, but most modern software should support these standards.
DNG Versus PSD Versus TIFF
Adobe is positioning DNG as an open alternative to proprietary raw formats, and I believe that is its best use. While you could pass a DNG between programs, I feel like it is best supported within an entirely Adobe workflow. A similar qualification applies to the PSD/PSB versus TIFF question, with TIFF being supported more broadly, but PSD retaining theoretically better support for specific features within Photoshop. In practice, I’ve used both and never experienced any issue, assuming the TIFF save options are set correctly.
Recently, I’ve started to make more use of PSB, as I’ve run into file size problems when saving large panoramas as PSD files. PSB is essentially just a PSD that supports these larger file dimensions and sizes, but will be less broadly supported as a newer, more niche format. Just be aware that PSB is not well supported in Lightroom. If someone on the Lightroom team is looking for a Christmas gift for me, add this feature!
Going back to TIFF, I mentioned setting the options correctly. Photoshop presents a number of TIFF-specific options when saving, but only a few of these are relevant for 99% of users. The most important of these are image compression and layer compression. With image compression, ZIP should be used, as it is lossless, and LZW can actually increase file size in 16-bit images. For layers, it’s a choice between compression and discarding them; if you’re saving out a final copy, you can discard layers to save space, but as I frequently return to make changes, I prefer to compress them.

Using these compression options when saving a TIFF will make for a much slower saving process, since your computer has to run algorithms to compress this data. These options are well worth the extra time, as it can result in a final file that is 50% of the size or smaller, all for a few extra seconds of CPU time.
A final consideration for panorama photographers or those lucky enough to be using Phase One 100 MP+ cameras is the file size limit. PSD is limited to 2GB, TIFF is 4GB, and PSB is effectively limitless (300K pixels by 300K pixels). With that in mind, I’ve just started defaulting to PSBs for my larger panoramas, as waiting through a 45-second save just to error out over the 4 GB limit was frustrating.

To conclude, for editing, I work primarily with TIFFs, which enjoy the broadest support across programs of the formats mentioned, while offering reasonable size constraints. Lightroom’s defaults are excellent, serving as a good guide to saving settings in other programs. For narrow use cases, like ultra-large panoramas, PSB’s larger supported sizes may come in handy, but at the cost of interoperability.
Delivering the Goods
You’ve shot raw files, processed them with care, and stored a carefully crafted TIFF file; now’s the time to throw that all away for 1080px, 100 kB JPEG for posting on Instagram. If that sounds familiar, know that I understand your pain. All isn’t lost, however, because that data will come in handy.
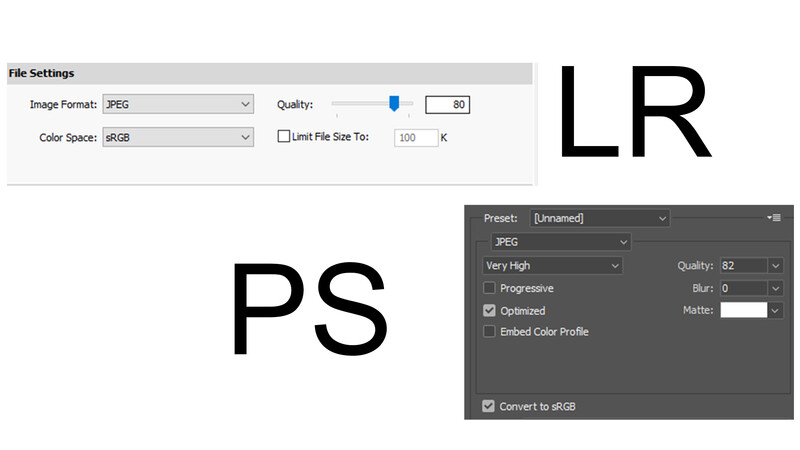
The web has essentially standardized on 8-bit sRGB JPEGs; you know your photos will display correctly on just about any device, given those settings. While Apple has been pushing for broader color spaces, just like USB-C, they’re a little early to the party. Fortunately, this pseudo-standard is easy to achieve. In Lightroom, the following settings are a great starting point for any web use or digital delivery of files to a client for social media (perhaps with reduced dimensions or compression, depending on the camera). From Photoshop, the Export - Save for Web (legacy) option provides an easy way to unify color space, image size, and JPEG compression settings.
Resizing is tricky, as the diversity of screen sizes and use cases has exploded. While some may be viewing your work on a 5K Retina iMac, others may be looking at it on a 1,080p TN laptop in direct sunlight. For this, knowing your expected user comes in handy. It isn’t scientific, but I’ve felt that 3,000 pixels along the long edge hits a happy medium between high-DPI displays and loading times on lower-end devices and connections.
If you’re uploading to social media, check one of the many available guides for the recommended sizes, as their algorithms will butcher your file if it is too big. For your own website, look into resizing images based on the user’s device (this allows you to store one “master copy” on your server, then create custom-sized images for each user). Saving on download time is both courteous and beneficial, since page-loading time is taken into account for search engine ranking.
For printing, check into your lab’s file expectations. The more consumer-focused they are, the more likely they’re set up for 8-bit sRGB JPEGs, while some will accept TIFFs and possibly Adobe RGB color gamuts. For example, here are Bay Photo's rules.
Conclusion
File types can seem complex, but for most photographers, only a few key steps need to be remembered. My workflow typically follows raw files, to TIFFs for editing, PSBs for the occasional panorama, and JPEGs for web use and client delivery. While there are a myriad of individual options along with each file, I hope this guide has helped build your understanding of the choices behind them.


Join the Fstoppers community for free
-
Post comments and join in the discussions
-
Browse the site ad-free
-
Share your work and get featured in the community
-
Compete in the photo contests for fun and prizes
6 Comments
Nothing about DCS format? Just kidding, who even uses single EPS for photography nowadays.
Ha - in research for the article, I came across Scitex CT, which Photoshop supports. The Wikipedia article is basically 2 lines, which boils down to 1) it exists, and 2) Adobe programs support it.
Photoshop 20 actually support the file. We used it as a 5 files document, meaning each plate (channel) CMY and K had their own file. The 5th file is the actual document but since it links to the plates, if you lose one plate you are out of luck.
Try it, convert a file to CMYK and save (flat) as DCS2.0. Select a multiple files DCS and save it in a folder. It will save it as an EPS but you can change the extension to DCS as you save. This would be critical to differentiate any single eps from multiple file eps if someone use this heavily. The reason is, if later you grab an eps to move it to another folder and don't move the associated plates, it will no longer be usable. So DCS will remind you on what to do. You can open the plates/files individually, but you can't open a DCS/multiple file eps if one plate is missing.
Very interesting. I've never made use of that feature, but I'll have to check it out if just for curiosity's sake.
I wonder when we'll see an increase in support for HEIF.
I'm waiting for that too. I'm honestly surprised Apple's adoption across the iPhones hasn't driven faster adoption, given how many files must be created in that format on a daily basis.
I'd like to see Chrome pick it up, since the important photo apps already support it, and the newest OSs do as well.