
With the holiday sales starting this week it's the perfect time to start calibrating your monitor or upgrade your old device to a new one. Datacolor is offering some great deals on Black Friday and Cyber Monday. So pick up a new device and read through my walkthrough on how to use your new toy.
What is the Spyder5Elite?
The Spyder5Elite is the latest flagship color calibration device made by Datacolor. It has a built-in Colorimeter that captures a screens brightness, color, and white point through a sequence of tests. It then uses the software to create a working “profile” based on this information that corrects these factors to give you a better representation of what's displayed. The corrected profile can now be automatically activated each time your computer boot ups.
Through December 22nd, you can get a decent discount on a bunch of Datacolor Spyder5 family products..
The difference between my studio monitor and home monitor before calibration
Why Calibration is Important
There are a lot of reasons why you should be calibrating your monitors. I recently wrote another article "Are You Calibrating?" that goes into more detail for various reasons. I often hear photographers say well if you aren't printing then why calibrate? This thinking comes out of knowing most consumer monitors are poorly calibrated and over the life of these monitors they display images wildly different. If you can't control how your images are displayed then why attempt to calibrate on your end?
Most photographers work will mostly be seen on the internet and while this is true about the wide variances on how an image might be seen. It is no reason to not give your images the best starting point possible. Think of calibrating your monitor as giving your images an average possible starting point. If someone else's monitor is too bright or over saturated you can't control that. However, by editing your images on an uncalibrated monitor that is already too bright or over saturated you are increasing the chances that someone will see your images even more poorly represented.
All monitors are manufactured with an average color temp of 6500K and brightness of 100 cd/m². Because of a lot of different reasons your monitor might not meet these averages by default. By starting off with the best edit and calibrated representation first you decrease the chances that your images will be seen in drastically different ways. Of course, there will always be monitors that fall into extremes.
Also when it comes to working with commercial and advertising clients. You will learn quickly that their design and art departments do calibrate. They often have specific color pallets they need you to work within and demand accuracy since the final results will be ads on brand for display online and in print.
For me personally, I have been using Spyder devices since the Spyder2 came out and have always had good results with both the hardware and support. I first started calibrating my monitors because I often would need to work in different locations on a variety of monitors. I started in photography as a digital tech and would either be editing on multiple monitors at home, my laptop, or on a client's system. Once I started using multiple monitors I realized quickly the need to calibrate. Older laptops were often so bad I couldn't edit with them when I needed to. Calibrating once a month on all my devices and even for some of my consistent clients made my life so much easier.
How to Calibrate Using the Spyder5ELITE
Once you get your device the process is super simple. The supplied software is easy to install and walks you through the entire process. For the more advanced options, there is a built-in “Interactive Help” sidebar that provides instruction, tips, and descriptions of what just about everything does. It is very intuitive to navigate the whole software experience.
For the average user with a fairly modern IPS monitor the default or basic setting will probably provide you with good results. My main desktop consists of two quality 27” IPS monitors and one older sidebar monitor I use to keep a browser open while editing. The two IPS monitors usually match pretty well but the third is way off without any calibration. So, as a result, I have to put a little more work into getting it to match the others with the software. Short of having a situation similar to this or having just an old or poorly made display the default settings most likely will get you calibrated.
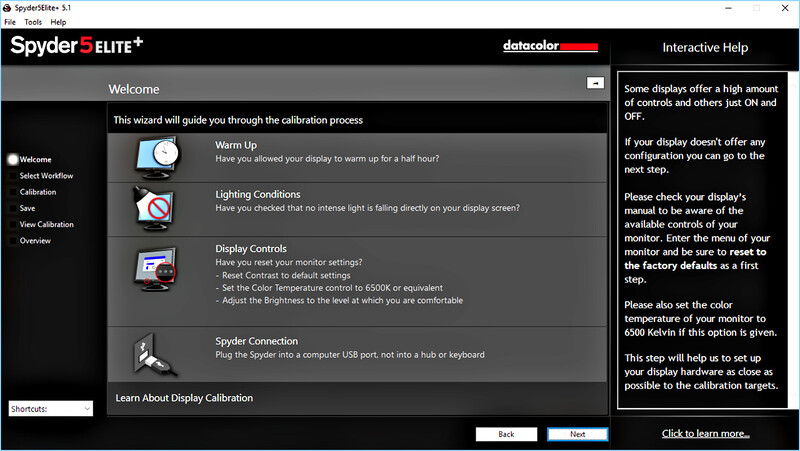
Step One
When you first launch the software it will display a series of tips and conditions that will make the process more accurate. It's always important to give your monitors time to fully turn on and this can vary from monitor to monitor. Since our eyes are so good at adjusting to light it can be difficult to tell slight differences over a 10-15 min period. It is also good to give your eyes time to adjust to your working station. So I usually do some emailing or social media for a bit before I start to calibrate my device.
You also want to make sure you have even lighting conditions in the environment you do your editing and calibrations. Especially making sure there is no direct light falling on your monitor screen such as sunlight from an open window.
Finally always reset your monitor's settings to its defaults before doing your calibrations. This is most import the very first time as you most likely have made adjustments to make your display more pleasing to your own eye.
Step Two
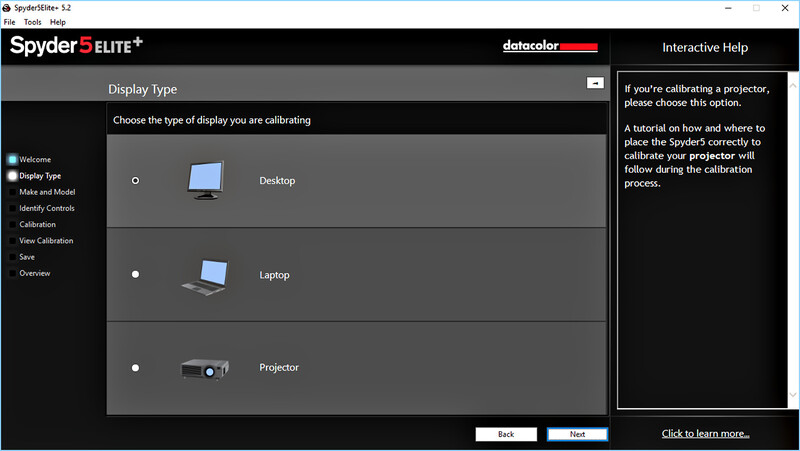
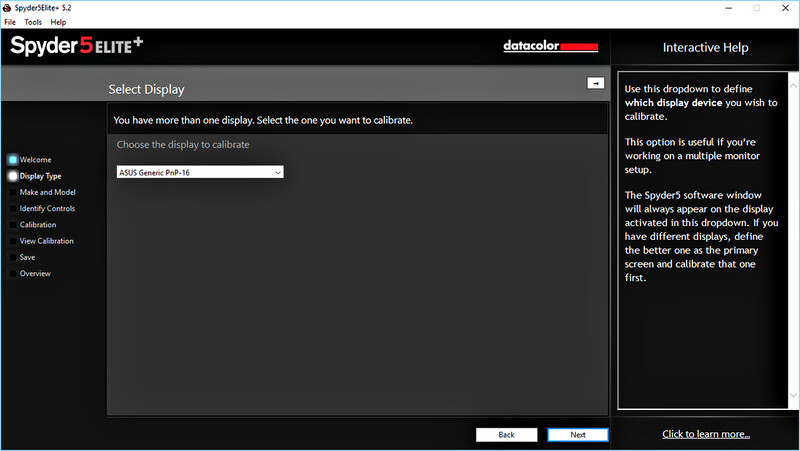
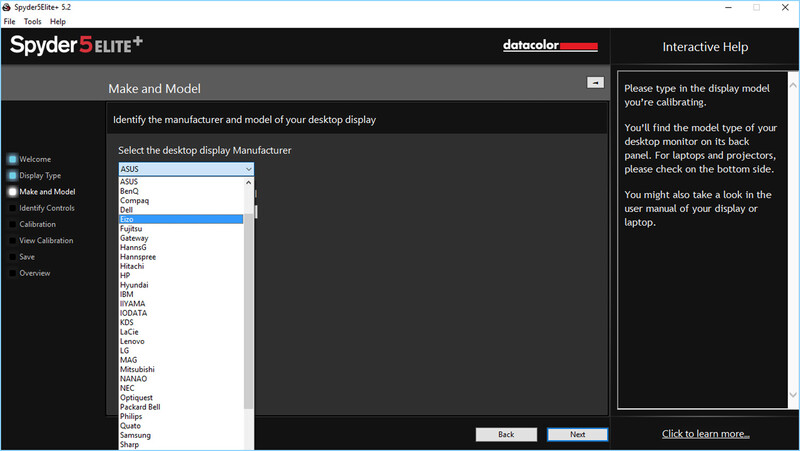
Once you've made sure the monitor is ready to be calibrated the software will walk you through the setup process. The next few windows are really only necessary the first time you set up a new calibration as you are letting the software know important info about the specific device. After each initial setup, you will have the option to skip these steps for future calibrations making the process easier and faster.
The software will ask you to choose a display to calibrate, the type of device you are calibrating; Desktop, Laptop, or Projector, and the name/model of your device. If you have multiple monitors connected you will have to repeat the process for each. Additionally, there is a section in the shortcuts menu for matching multiple displays together. This is very handy even if you are using three very different monitors. With a little extra work, this process will get them as close as possible to each other. It will then ask you what type of color and brightness controls your monitor has available in its menus.
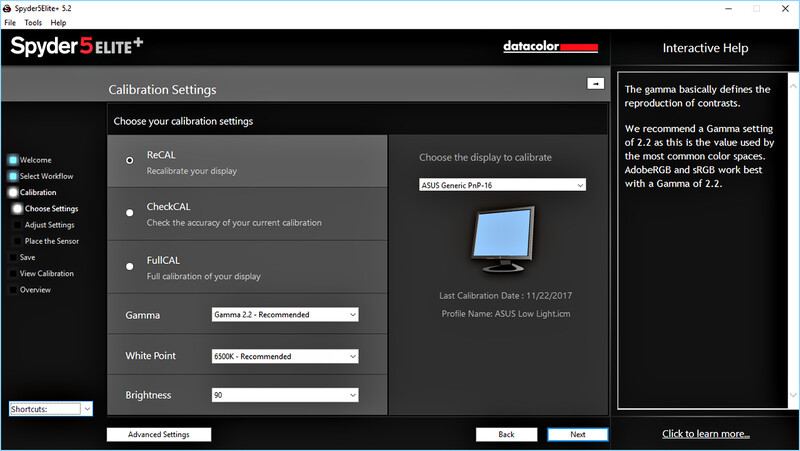
Now that you have done all the initial setup you will be shown the calibration settings menu. This is also where you can find the advanced menu settings if your monitor needs more fine-tuning. Like I mentioned above for most users the default settings will get you good results and I typically use these for my IPS panels. You may have to do a little research on your monitor or check the user manual if you don't get decent results with the default settings. This was the case with my older monitor. After doing a little reading I found that the color temperature for that monitor was cooler than what my IPS panels were. So changing the white point to match made a big difference in the final calibration. Once you have set up these final settings you will be able to skip to the next process each time you want to re-calibrate that monitor.
Step Three
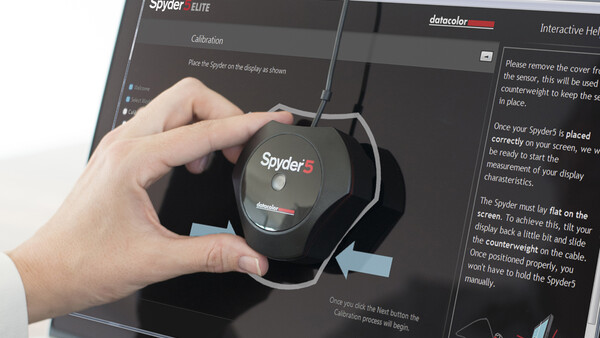
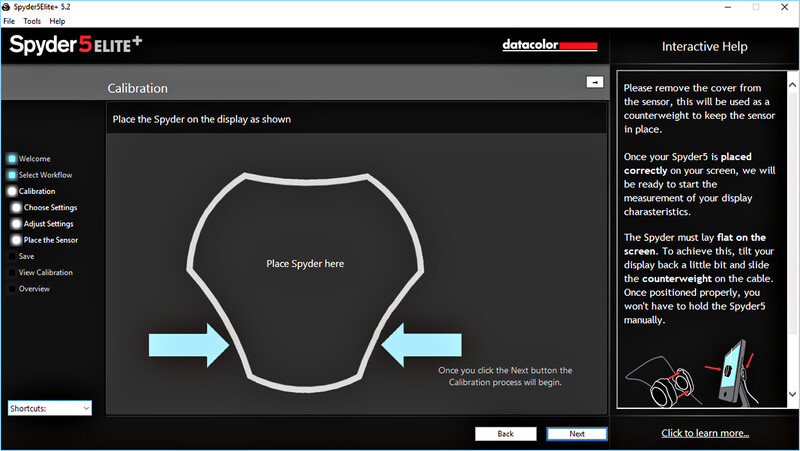
Now you are all set to start the automated calibration process. The Spyder5 Series is a much better-designed device over its previous versions. For starters, the counterweight portion now doubles as a sensor cover for the sensitive colorimeter. This also makes the entire device more compact and portable if you need to take it with you. For instance, I bring mine back and forth between my studio space and home at least once a month. Another great improvement is the additional ambient light sensor on the top side of the device. This is great for getting the best screen brightness in any environment. Something I found harder to properly set on older Spyder devices due to how easily your eyes can be fooled into thinking to bright is just right.
With this new design placing the device on your monitor is pretty straightforward. Remove the cap and slide it down the USB cable enough so that you can line up the device with the provided matching outline on the software. Plug in the USB cable and make sure the device is lying flat on the screen. If your monitor is more vertical like mine and the device does not lie flat I will often take something like a TV remote and lean it up against the device to keep it flat. Now hit Next and wait for the device and software to do its thing. The amount of time it takes to complete may vary so I typically use this time to get a snack or watch some YouTube on another monitor.
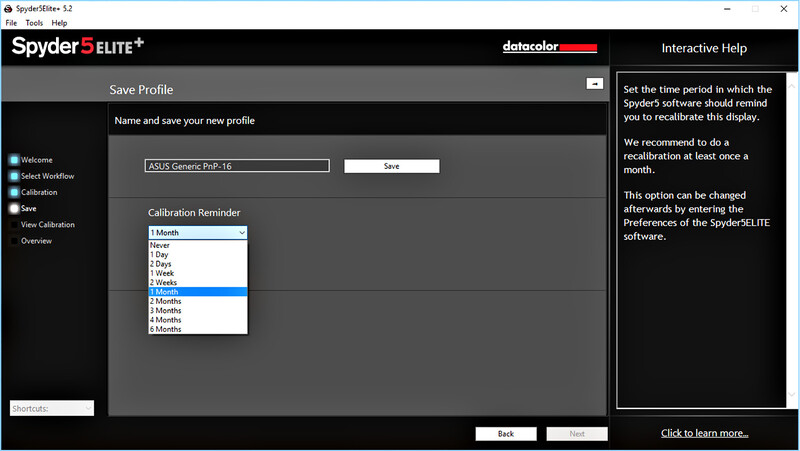
Once it is done it will ask you to name your profile. I like to have a different profile for daytime and evening editing as I find my eyes get more fatigued with the different ambient lighting. Alternatively, with the new 5 series, you can choose to run the device plugged in all the time and let the built-in ambient sensor adjust your setting throughout the day for different lighting. This sounds like a great feature but I haven't been able to work it into my regular workflow just yet. Though it is something I think would benefit me.
That's it.
Bonus Step
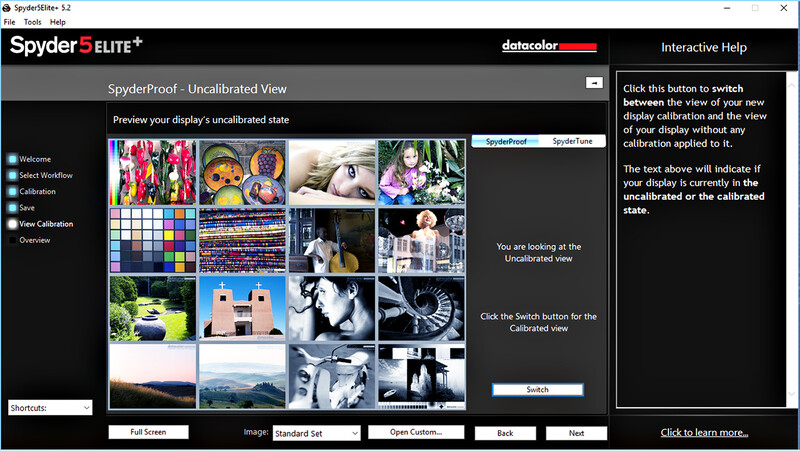
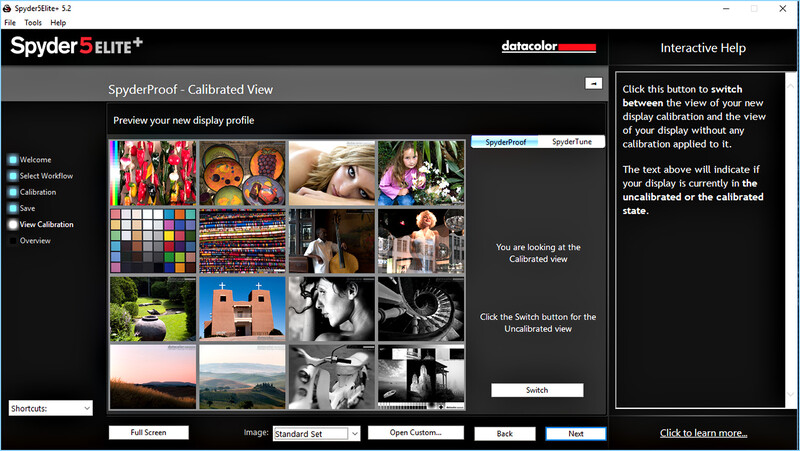
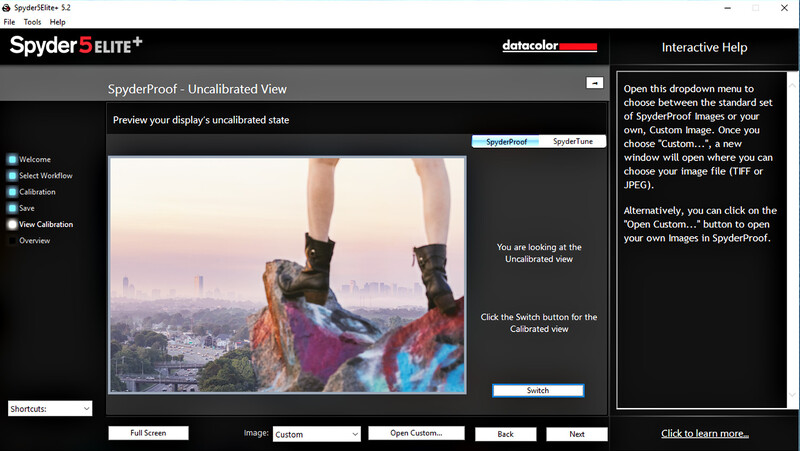
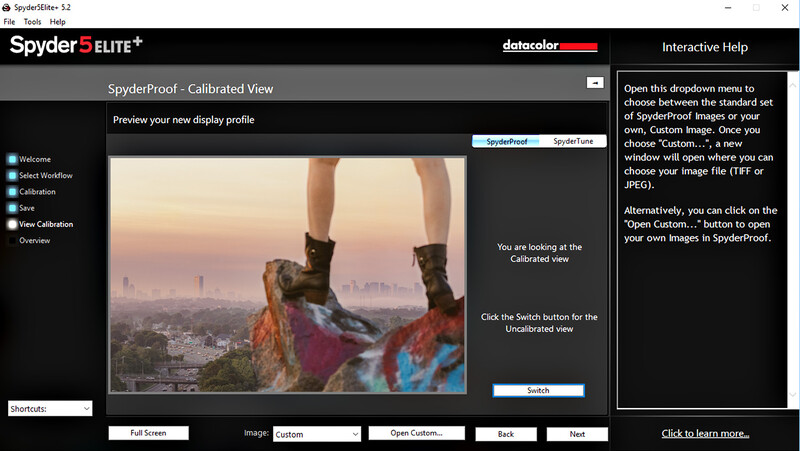
You have just created a calibrated profile for your monitor. Now every time you boot up your computer the software will either activate the profile or prompt you to update your calibration depending on how long you set it for. From here you can view the results on either the default images or your own images by creating a custom set. The biggest changes I often see in an uncalibrated monitor are the brightness and color temperature. It's so easy to not notice how much cooler colors like blue can take over your display. Especially if the brightness is turned up too high. Without something to compare it to like a calibrated monitor or physical print it just seems normal. Once you can switch back and forth in the software you quickly can see how your eyes just can't judge for themselves.
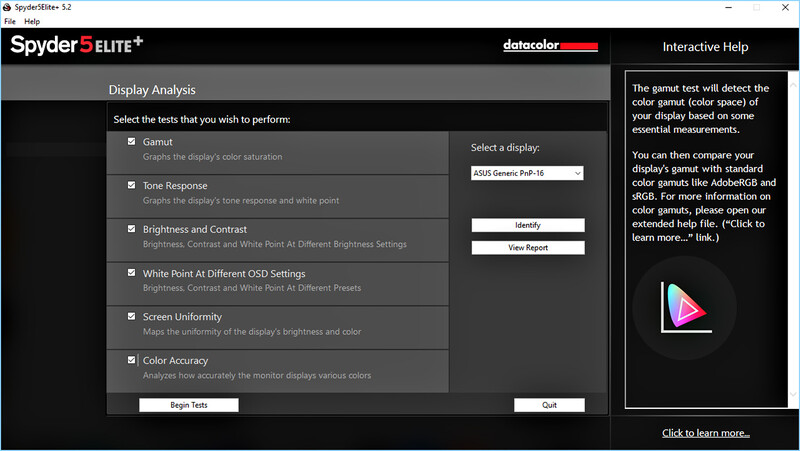
Advanced Display Analysis
Once you have your monitor calibrated Datacolor includes a bunch of interesting tests that can be run to see how well your monitor performs. If you have different monitors it is pretty cool to see the differences between them especially if they are of the same make and model. For a lot of users though myself included what to do with this info might just be overkill. It did help me decide which one of my two IPS panels would be my main monitor for editing but other than being interesting to read through the result I’m unsure what could be changed to improve them short of spending more money on a better monitor. If you know more about these tests I’d love to hear about it in the comments.

Conclusion
The entire Spyder5 series of devices are pretty simple to use and in my opinion, the best designed so far. The software is really hard to screw up and pretty much walks you through the entire process. Even when you start getting into some of the advanced settings it lets you know what everything does and means. At that point, it really is just trial and error to find a combination to get the best results. Since each monitor can be so different there isn't a way for me to walk you through that process. However like I've said in the most common cases the average user should see good results just following the default instructions.
I believe if you are delivering images to a client you really should be calibrating your monitors. Even if all you deliver is unedited tiffs to a client you want to make sure what you are seeing on your screen straight from the camera is correct. If you are more of a hobbyist then you still might want to think about calibration. Everyone should print their work so it can be appreciated in the real world and we at Fstoppers have written several articles on how printing your work can improve your photography. Having a properly calibrated monitor is the first step to getting better prints. For a reasonable price with the Holiday sale, you can make your editing and images better. That even for entry-level photographers seems like an easy choice. Especially considering how much we often spend on new toys for ourselves.


Join the Fstoppers community for free
-
Post comments and join in the discussions
-
Browse the site ad-free
-
Share your work and get featured in the community
-
Compete in the photo contests for fun and prizes
2 Comments
I use Spyder... and this article is a reminder for me since it's been more than a month since my last calibration.
What I've been noticing lately, and I don't think it's a calibration issue, rather than a software thing... I'd post in Lightroom, then once I export I'll notice my images have deeper shadows or more contrast when I open them up on the desktop. It's bizarre, and I've needed to take this into account in editing. Anyone else experience this?
I prefer the Xrite i1 Display Pro. Easy to use, state-of-the-art performance.