
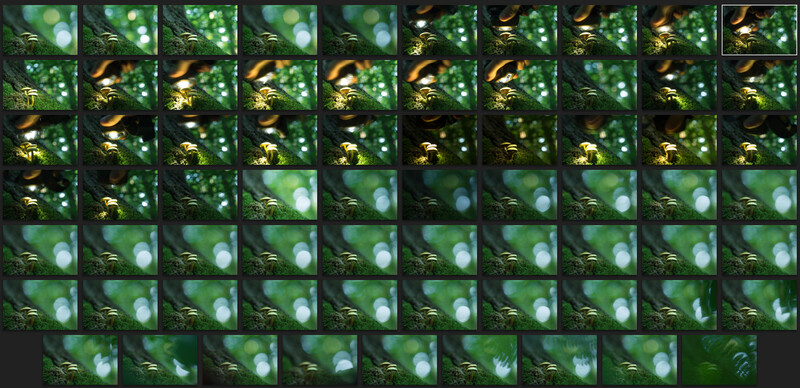
The weather outside is heinous. Seemingly perpetual rain batters the windows as we fire up the computer. The northern autumn is definitely on our doorstep and one of the first signs of this change of seasons is the increasing number of mushrooms in the forest. We’ve bagged 69 shots of just one composition previously and this is a great time to post-process them. Let’s get into Lightroom before more fungi start to come up after the showers have passed. Let your imagination run wild with the post-processing of glowing mushrooms that are straight out of a fantasy film. Here is how I process my own little fantasy world.
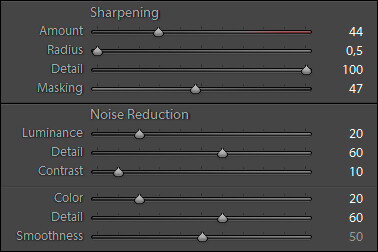
1) Raw conversionThe most important advice I can give you here is to make sure you synchronize your settings among all exposures. Just select them all before you start pulling all kinds of sliders. Speaking of which: I’m not going to show you each and every slider as I’m sure you’ll figure this out. An equally important thing to note: This is not the final step in the editing process, so be very careful with saturation and contrast in each step that leads up to the final image. Leave the tone curve linear, and rather decrease contrast than increase it. That will provide editing leeway after you've converted the image. If you find that your exposures are too dark, now is the time to increase the brightness. The same goes of course for the white balance. I like to keep the overall image more towards the blue in order to create a good visual separation between the lit parts of the mushrooms and their mysterious surroundings. You might want to add a slight split toning for this too. As for detail and noise reduction, here are my settings:
Of course you can do this in Adobe Photoshop through Auto-Blend Layers, but I like to use a dedicated focus stacking program like Helicon Focus for more control over the stack. When you have that installed, make sure you have the images selected that you want in the stack. Right click either of those and hit: Export > Helicon Focus.
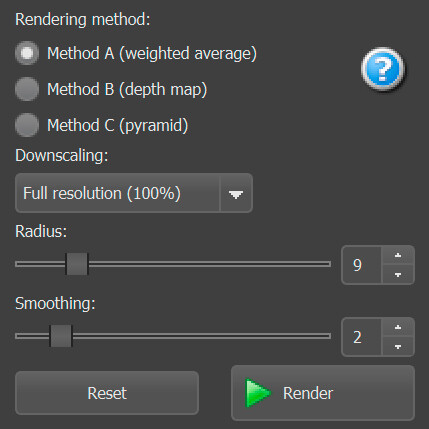
Don’t worry about the color looking goofy. The color profiles are probably mismatching, which is automatically corrected when you open the image in Photoshop with the correct profile. For now, it’s time to pay attention to the rendering method. With method “A”, which is a weighted average, I dial in a Radius of 9 and a Smoothing of 2. These are a good balance between separation and blending with this depth-of-field. Hit “Render” and let the image build up. You’ll see that the image is close, but not perfect. So let’s press the “Retouching” tab at the top of the screen.

You will have to select a source image that want to replace the stacked image with in the “Source image” list, but pressing F9 while hovering over the resulting image is a good and fast way to paint in specific areas of focus back into the image. It takes a lot of time doing this perfectly, but also to the way Helicon Focus works. Continue until you are either happy with or tired of this process. Then save the image as a TIFF-file in a temporary folder.
3) Putting It All TogetherUpon returning to Lightroom, select all 69 images (that includes the previous focus stack) and right click: Edit > Edit in Adobe Photoshop CC. This will take a while, so grab a coffee while you’re waiting for the export.
In Photoshop, all the images open side by side. But you actually want them as layers. Luckily, there’s a great little tool for just that. Go to File > Scripts > Load Files Into Stack. Now click “Add Open Files” and leave both checkboxes unchecked. There you have it. Close the other open files and find the previously focus stacked images in the Layers palette. You will want to put these into a new folder called “Stacked” or something similar.
4) Create a Base Layer
Now open the focus stack you’ve made in Helicon Focus and put it onto a new layer, below everything else. Go ahead and select each and every layer by selecting that bottom layer. Hold shift and click the top layer. Now go to Edit > Auto-Align Layers. Select Projection: Collage, leave both checkboxes unchecked and hit OK. All of your images should be aligned with the stack we’ve made before.
We've got the folder with stacked images to manually repair any flaws you see now or later. They’re also useful to select a nice, unstacked background from to avoid having any crazy artifacts in there. Mask in the background, showing only the peaceful and creamy bokeh of one of the images. I’ve also shot a background in which I (gently) grabbed a nearby sapling tree. I held it behind the mushrooms while the camera was recording the focus stack through Helicon Remote. For the foreground, I blended in this shot where I put a leaf inside the lens hood. This gives the image much more depth and interest, while preventing that any of the blurred elements got in front of the critical subject.
When you’re done, it’s time to merge these layers into a base layer. Label it accordingly and make sure it’s on the bottom in the layers palette before the next steps.
5) Make It Glow!Hide all layers except the bottom one. We are now masking in different areas of the light painted images. This task may seem daunting at first, but as soon as you begin, you will start to feel the magic of these mushrooms. No psilocybin required. Set the bottom of the light painted images to 50% opacity and zoom in on the heart of one of the images. Make sure that the focus is spot on. Try with another image if it isn’t. Then check for alignment issues. Drag the image around until it aligns perfectly with the heart of the mushroom. The rest of the image isn’t important, because the next step is to alt-click the “Create Mask” icon in the layers palette. You’re presented with the original merged image, because you’ve created a black mask. Select the mask you’ve just created and select a soft brush at about 10% opacity. Start to paint very lightly with white. More near the center, less around it. Try to create beautiful and natural-looking transitions.
Continue to add in selective portions of other layers. Also set the blending modes of some layers to Screen, Vivid Light, and Soft Light. Scroll through those blending modes after you’ve completed the masking to see what it does to the image. Remember, you’re after a magical glow! In order to speed up this process, merge each subsequent layer with the one below it.
As you build up the image, you start to see small errors that the automated stacking process made. It’s a great idea to get rid of them as soon as you notice those. But don’t forget to save the image regularly. With files that exceed 12GB, your computer is prone to slow down and a crash is always around the corner. Eventually, you will end up with just two layers. One in which you have combined all light painted and repaired areas and the base image before light painting.
As we’re nearing the end of this tutorial, I want to show you want you can do from this point on. Personally, I’m far from done with the image. If the light was really emanating from the mushrooms, there are reflections we need to take care of. Create a new layer and set it to Soft Light. Eye drop one of the brighter colors already present. Paint on the areas where you would likely see light reflecting on. The base of the toadstools is very important in this step, as the hats worked as umbrellas; shielding the ground from the LED light.
Also, the background and the general surroundings of the mushrooms are also a bit too bright for my taste. When you tone those down, be sure to target the midtones and brightest parts. Guard shadow detail at all costs, but also keep a close eye on saturation. If you increase contrast, you’re bound to increase saturation as well.
For the final steps, I like to get even more creative and tweak curves that target specific areas and specific luminosities. Create a couple of luminosity masks that help to keep any adjustments local and targeted.
Since I was looking for a complementary color contrast long before I even shot this image, this is a good time to check if there’s enough color separation between subject and background. With targeted Color Balance and Vibrance adjustments, I’ve toned down the overall saturation and shifted the shadows more towards the blue, while leaving the light of the mushrooms unaffected. Let’s see how this image is looking with all these adjustments before I leave with you with a final before and after.
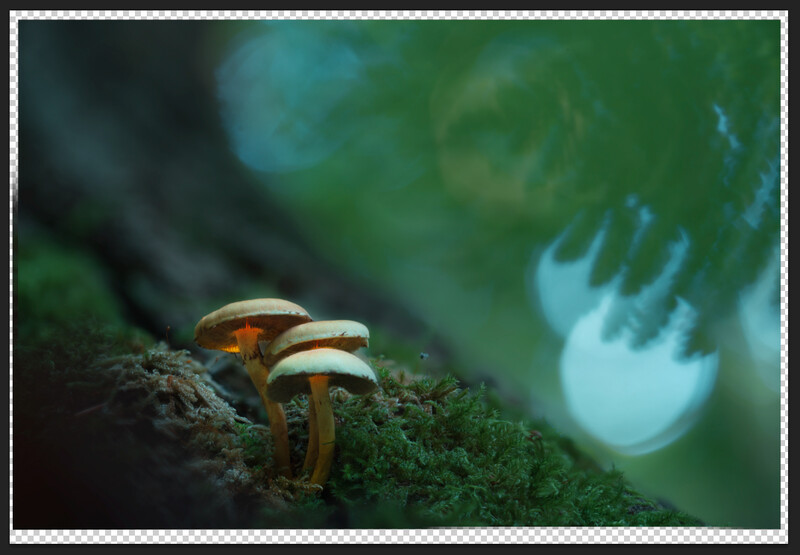
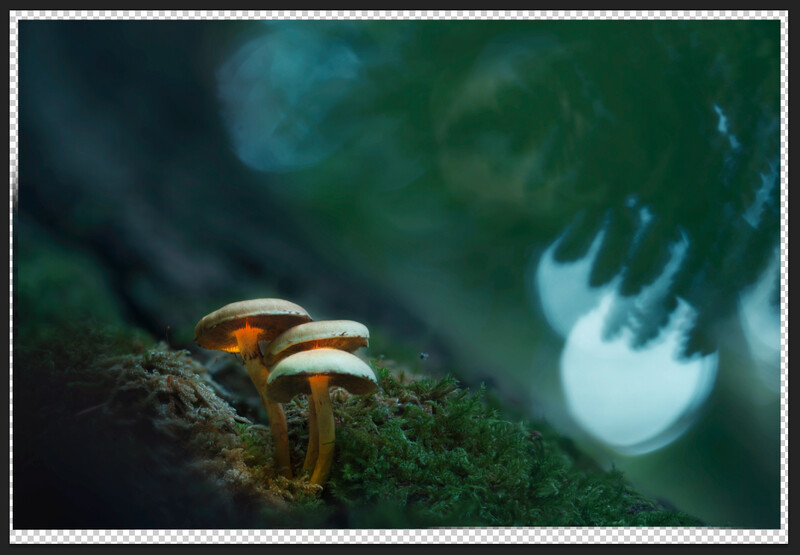
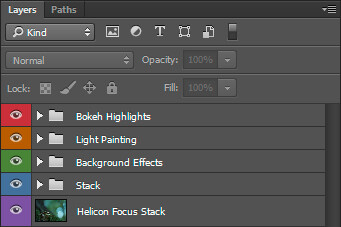
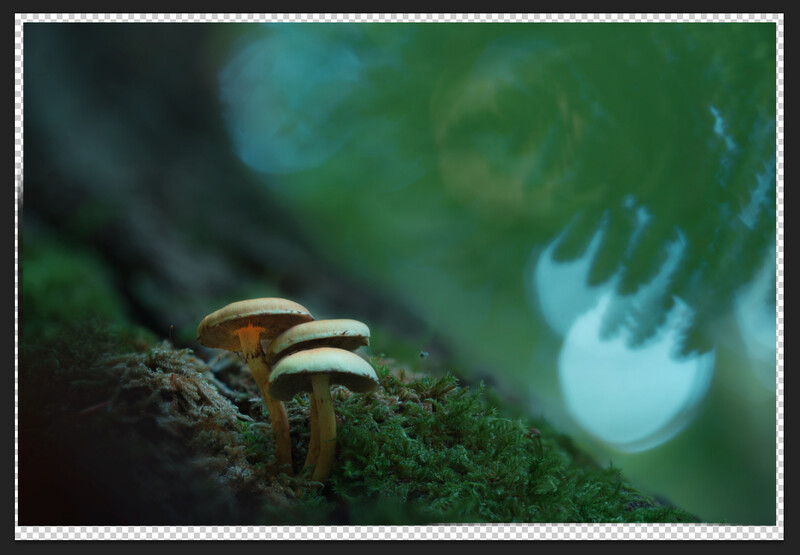
Up until now, we’ve had this unsightly transparent border around the image that was a result of the alignment process. I decided on leaving the crop at 3:2 right before these final adjustments. First, the whole image looks a bit too saturated for my taste, so I want to tone it down to more moody grays and browns. Nik Color Efex is extremely helpful in these cases, but also introduces posterization (banding) when you alter the contrast at the very last steps. To counteract that, I typically add this filter called Film Grain and set the grain size to 495. This grain will “bleed in” with the luminosity channel and helps to prevent banding in the output image for the web, as well as on print. I’m sure you’re interested in seeing my layers palette after all this. I’m happy to include it for you:
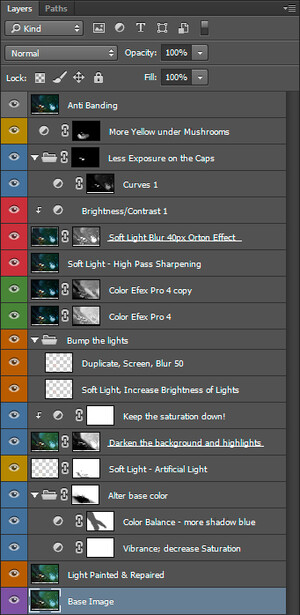
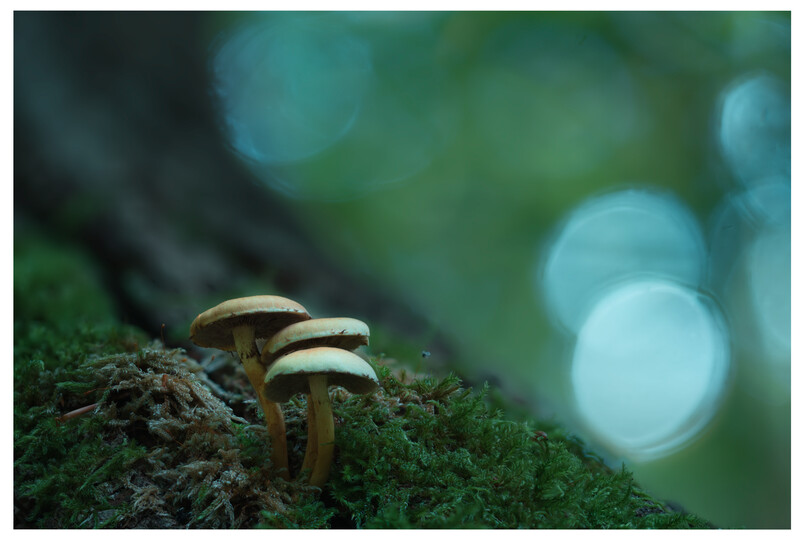
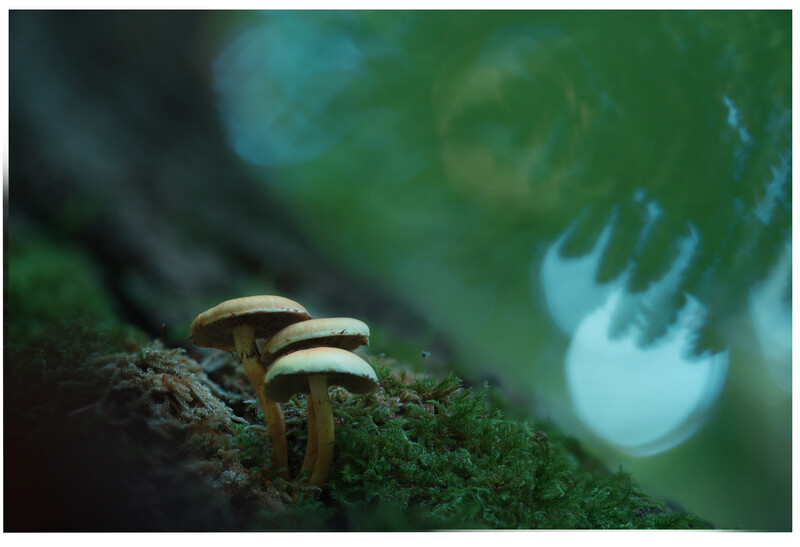
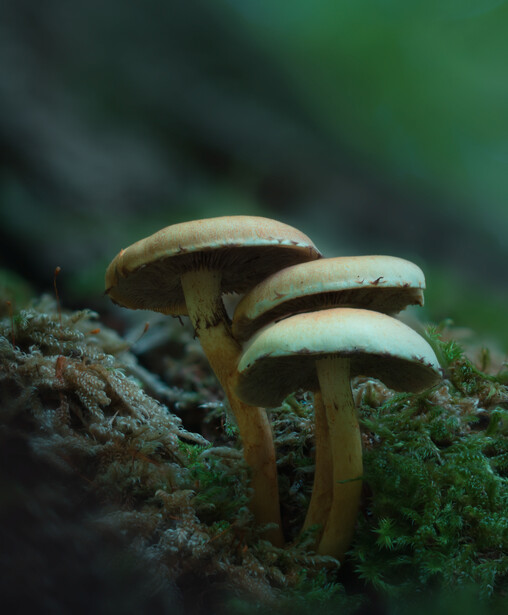
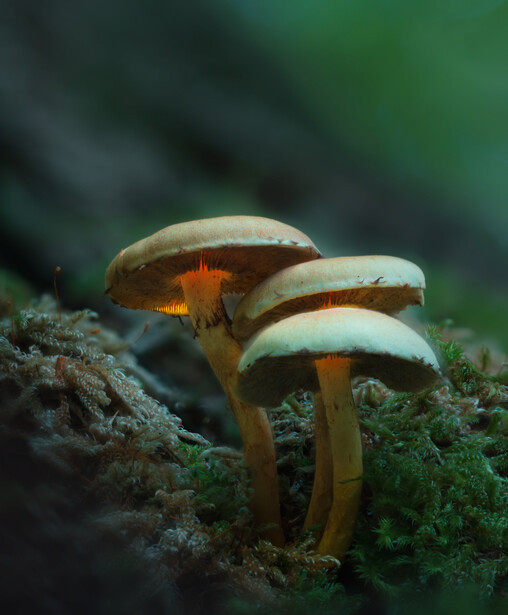
It’s a good idea to save the image as a PSD. Doing so will retain quick editing capabilities (and a preview) when you import this image back in Lightroom to check the histogram and dial in some final settings. For the social web, I add another layer of grain. It’s hardly visible, but with all this compression on Facebook and 500px the image will degrade and introduce banding. Here's one of the original raw files and the final image compared:

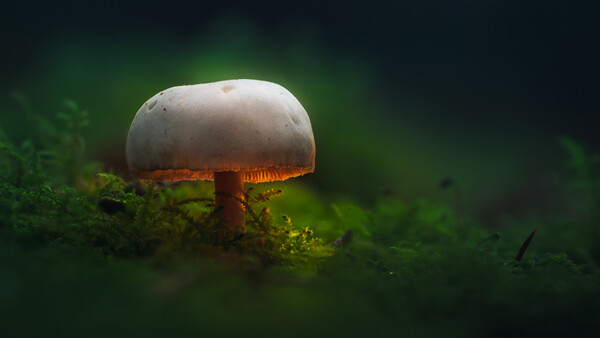
Well, here’s my take on those glowing, magical mushrooms. I hope you like the result and have learned a thing or two in these long and complicated written tutorials. Let me know in the comments if you have! I can imagine that you’ve been struggling to keep up. That’s the reason I’m hosting private Skype processing workshops. Landscapes, mushrooms, nightscapes; I’ll help you take your own image to the next level. If you’re interested, be sure to book an editing session through my website or contact me for inquiries.


Join the Fstoppers community for free
-
Post comments and join in the discussions
-
Browse the site ad-free
-
Share your work and get featured in the community
-
Compete in the photo contests for fun and prizes
5 Comments
Cool stuff... I need to get out and look for elves and fairi-ehm mushrooms and other stuff in the woods
For sure, Paolo! :) Glad you liked it. Thanks!
It reminded me of this video "DYI"
https://www.youtube.com/watch?v=D5LjGFkpApw
Cheers Fabian. Now I'm going to do this the rest of the day. :D
Hi Daniel thanks a lot for this article! Your photos are just amazing! I read the article but I don't understand one think. Why you need so many photos (69)?