Layer masks let you hide and reveal exactly what you want, which means cleaner cutouts and composites that actually look like they belong together. If you care about believable edges, quick revisions, and nondestructive edits, you need them in your toolkit.
Coming to you from Aaron Nace with Phlearn, this practical video walks through building a simple composite with a subject, mountains, and clouds while keeping everything editable. You start by running "Select Subject," loading that selection into a mask, and stacking background elements so they peek through cleanly. A quick crop sets the frame, then a smart move extends sky with Generative Fill so the scene has breathing room. The clouds get scaled, masked to the sky selection, and switched to the Screen blend mode, then tightened with Levels so they sit in the scene instead of floating aimlessly.
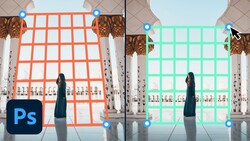
You see why the edge work matters once the mask is refined. "Select and Mask" softens the cut line with feather and a slight negative Shift Edge, which removes that telltale halo that ruins composites. The Refine Edge Brush pulls back fine details like feathers and stray hair, and "Decontaminate Colors" knocks out leftover fringing that gives away the original background. Unlinking the layer and mask lets you nudge the clouds or the mask independently, so you can reposition without redoing the hard work. When you relink, the layout stays locked and tidy.
The background blur is where the image stops looking pasted and starts feeling photographed. Converting the clouds and mountains into a single smart object means one Camera Raw Filter applies a consistent lens blur across the whole background. You paint the blur map to keep it uniform behind the subject, then adjust the amount without baking anything in. This keeps the depth of field believable and matches the slight softness already present on parts of the subject, which is the kind of small alignment that sells the fake.
Masks do more than cutouts, and the video pushes that point with adjustment layers. A brightness and contrast layer targeted by a radial gradient brightens the center, then a second pass darkens the edges for a subtle vignette that guides the eye. A gradient map at roughly 10–20% opacity washes a gentle color grade across everything, tying tones together so the subject and background feel like the same light and air touched them. You get the idea without every slider value, which is the right balance when you want to understand the why and still see the exact brushwork live. Check out the video above for the full rundown from Nace.


Join the Fstoppers community for free
-
Post comments and join in the discussions
-
Browse the site ad-free
-
Share your work and get featured in the community
-
Compete in the photo contests for fun and prizes
No comments yet