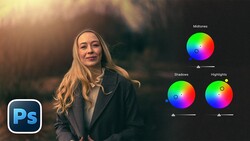
Contrast and clarity can turn a flat image into something that actually holds attention. Used without control, they can just as easily make a photo look harsh and overprocessed.
Coming to you from Aaron Nace with PHLEARN, this practical video walks through using the Camera Raw Filter in Photoshop to adjust contrast with more precision than most people realize. The process starts by converting the background layer to a Smart Object, then opening the Camera Raw Filter from the Filter menu, allowing every adjustment to remain editable. Instead of pushing the basic Contrast slider, Nace moves straight to the histogram. You click directly on the blacks, shadows, exposure, highlights, or whites in the histogram and drag them left or right to shape tonal range with intent. It is faster than bouncing between sliders and gives you a visual anchor for what you are affecting.
You watch the image shift as the blacks deepen and the shadows settle into place. The histogram becomes more than a graph. It becomes a control surface. Nace adjusts each tonal region individually, building contrast piece by piece rather than applying a global bump. The before and after comparison shows a clear difference, but nothing feels clipped or forced. This method gives you separation in the tones without crushing detail. If you tend to grab the Contrast slider and hope for the best, this approach will likely change how you handle raw files and even JPEGs inside Photoshop.
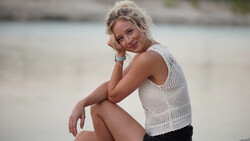
Clarity is where the video shifts from global edits to targeted ones. Instead of increasing clarity across the entire frame, Nace opens the Masking panel inside the Camera Raw Filter. The Landscape mask quickly separates elements like natural ground, water, and sky. From there, specific areas are selected and refined, including an additional Select Subject mask. Clarity and a touch of Texture are added only to the ground and the subject, leaving the background alone. The difference is obvious when toggling the mask visibility. The subject gains presence. The foreground gains grit and detail. The rest of the frame stays clean.
There is also a small color adjustment applied just to the water, adding a bit of saturation to support the subject without overpowering the scene. Each mask has its own Light, Color, and Effects controls, so adjustments stay contained. You see how clarity increases midtone contrast, while Texture enhances fine detail in a subtler way. Used together in controlled areas, they create depth that global sharpening cannot replicate. The Smart Filter remains editable back in Photoshop, so you can toggle the entire Camera Raw effect on and off or reopen it to refine the masks later. Check out the video above for the full rundown from Nace.


Join the Fstoppers community for free
-
Post comments and join in the discussions
-
Browse the site ad-free
-
Share your work and get featured in the community
-
Compete in the photo contests for fun and prizes
1 Comment
You can also do the same in Lrc. You should also mention the removal tool remove where it uses AI. Lrc is so much more today and with more tools than one would dream off.
This image I used the remove AI and got rid of some poles at the bottom, Using Sky I used Dehaze to bring out clouds detail and getting a blue sky. There was a post right below the window of the shed and got a good base to it. it was also cropped down to 8899x5932 from 9504 and again to 6994x3773 and to end with a lot of what was said here and is a A7RM5 + FE 24-105 F4 G OSS image.
One thing never ever mentioned is the 4 little blocks in the main section where you can select the Jpeg WB of your camera and just scroll down till you get a good image vs selecting in camera I used the VW a little brighter for the foreground section. but sharpness di not take much to get more.
Just all is fun also in Lrc.....