AI editing is no longer a side feature you occasionally test and forget. It is now a core part of how you clean, build, and style images in Photoshop, and it changes how much time you spend behind the computer.
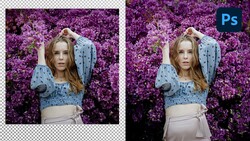
Coming to you from Aaron Nace of Phlearn, this practical video walks through how generative fill in Photoshop has moved beyond simple tricks and into real, repeatable workflow. You see Nace start with straight object removal on a well-composed portrait, using a simple selection brush to wipe out cables and graffiti that would have taken careful cloning in the past. Instead of fussing with tiny brushes, you draw loose circles, hand the selection to Adobe Firefly Image 3 inside generative fill, and let the AI produce multiple clean variations. You get a sense of how much heavy lifting can shift from manual retouching to quick, targeted prompts without losing control over the final frame.
The tutorial then pushes past small fixes and into more playful edits so you understand what is possible when you stop thinking of AI as only a cleanup tool. A quiet house scene gets turned into something much stranger by painting in an empty patch of yard and prompting generative fill to add garden gnomes, again relying on Firefly Image 3 to produce multiple looks. You watch Nace cycle through options, keep the ones that blend with lighting and perspective, and discard the weird ones without any drama. The point is not that you should start filling every lawn with props; it is that you can sketch ideas directly in the image instead of wondering what a location might look like with different elements in place.
Later, the video shifts back toward practical use as Nace tackles a busy beach scene full of cruise ships and industrial clutter on the horizon. You see two variations of the same base shot, one where generative fill simply strips out the ships using a blank prompt and another where a short “tropical” prompt asks Firefly to rebuild the background with trees and a more idyllic coastline. It is a clear example of how you can choose between subtle realism and more stylized edits, all inside the same interface. If you regularly battle power lines, cranes, or tourist chaos in the distance, watching that horizon get cleaned and then transformed gives you a clear picture of how far you can push a single frame.
The last section is where the partner models come into play and where the workflow starts to feel more like directed design than simple patching. Nace switches from Firefly Image 3 to Google’s Gemini 2.5 Nano Banana as a partner model inside Photoshop 2026, then selects the entire frame instead of just the boots on a subject holding sunflowers. The prompt is not just “sunflower boots,” it is a clear request to change the existing boots into sunflower boots while leaving everything else alone, and Gemini 2.5 Nano Banana responds with edits that respect the pose, lace, and dress. You see Nace regenerate a second time to compare options, using the same settings, and both results sit naturally in the image without the usual telltale AI smudges around edges. This section is where you start to see how partner models can be used to restyle wardrobe or props without reshooting or shopping for items that might not even exist. Check out the video above for the full rundown from Nace.


Join the Fstoppers community for free
-
Post comments and join in the discussions
-
Browse the site ad-free
-
Share your work and get featured in the community
-
Compete in the photo contests for fun and prizes
No comments yet