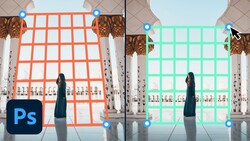
Photoshop offers a huge range of ways to make selections for extracting parts of a frame or creating layers masks, each appropriate for different situations. The Select and Mask workspace offers a very straightforward and powerful method for tackling a variety of tricky selection scenarios, and this helpful video tutorial will show you everything you need to know to get the most out of it.
Coming to you from Aaron Nace with Phlearn, this great video tutorial will show you how to get the most out of the Select and Mask workspace in Photoshop. While traditionally, you probably think of advanced selection as something generally the concern of those working on composites, you will often want to apply adjustments to only part of a photo, and becoming proficient with selections will help you create more precise layer masks for those adjustments. As Nace mentions, one of the most important things to remember is that when you output to a layer mask, you can go back and refine that mask at any time you want. This is great, as you will often create a mask, then notice that your selection was not quite what you wanted once you place a new object into the frame, so don't stress too much about getting it perfect at first. Check out the video above for the full rundown from Nace.


Join the Fstoppers community for free
-
Post comments and join in the discussions
-
Browse the site ad-free
-
Share your work and get featured in the community
-
Compete in the photo contests for fun and prizes
No comments yet