Frequency separation can be a very overwhelming technique used most commonly for skin retouching. It is a technique that is very easy to overdo and destroy texture when not used correctly. If you are unfamiliar with this technique, where do you start?
For those of you who are leery about using this technique, this video from photographer Sheldon Evans shows how to actually go through the process of separating the texture from color layers the manual way. There are plenty of actions and plugins out there that can help you perform this action, but if you don't have one already, follow the steps found in this video, and do yourself a favor and create an action from it.
Just remember there isn't a magic number for the blur value that works on all images, you will have to find the perfect value for each image. Also, you can try out other blur filters and see which one works best for you.
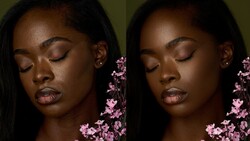
After creating the separate layers, Evans goes into showing how he edits out stray hairs and other imperfections in this video. While doing this, the key is to grab good texture areas to replace others. Focus on keeping the changes subtle and preserving the textures. Going too far can turn your subject into a porcelain doll-like creature, unless that is what you are going for.
Hopefully, with Evans' video, you don't feel so overwhelmed and can start using this technique successfully.


Join the Fstoppers community for free
-
Post comments and join in the discussions
-
Browse the site ad-free
-
Share your work and get featured in the community
-
Compete in the photo contests for fun and prizes
5 Comments
Constantly moving the mouse in a video is like saying "um" too much while speaking: don't do it
It's like a pesky fly. I kept wanting to swat my screen.
I like the idea of using lighten and darken modes limit the impact of your texture editing, but I am not a fan of the healing brush tool though since it tends to smudge too much and you don't have control over flow and opacity. I always use the stamp tool for texture replacement but with a low flow rate ~20% so texture replacement builds slower rather sledgehammers and smudges. I will try using the lighten and darken technique with my stamp tool technique.
Using the lightening and darkening modes was something I never knew about when treating texture!
I would say very poor result of FS in this video .. localy destroyed skin texture (blury spots) by using large sample area. Using brush in lighten mode that nobody eexcept him uses is used by pretty much everybody (even in patch tool/healing brush in normal layers .. or using lighten layer with normal brush) ..
I was skipping parts just to see if there is something new so if he explains that he is not doing itproperly with good result, only showcasing how it isdone than I appologize, but even than if you wanna teach, idealy do it properly with good results ..