The hottest trend nowadays is Photoshop presets. Presets to mimic the look of films past, to add a bit of editorial edge to those mundane studio shots, or to just expedite the editing process. Many companies have come out with pre-packaged presets, treatments, and plugins to help users reach a new level of creativity.
What most people may not realize is that these pre-made presets aren't anything special. We each have the ability to create these looks ourselves! It just takes a little more than a basic understanding of the programs we use. When playing around with color treatments and trying to replicate films, my weapon of choice is the Photoshop's Curves dialog. You can manipulate virtually any aspect of an image with just the curves dialog. From brightness and contrast, to color and sharpness; Curves can do it all! If you know how it works. Another great thing about Curves? It works basically the same in every image editing software. Some subtle differences may exist, but the nuts and bolts are pretty much the same.

Curves is such a powerful tool, and can do so many amazing things, that it would take many MANY posts to even come close to understanding it's full potential. So for today we are going to start with a basic color treatment. Color treatments in the RGB colorspace have a unique advantage (or disadvantage) that the color values are tied to the brightness and contrast of the image, unlike the LAB color space which separates the color information from the "lightness" (detail) channel (again, a totally different subject). Because of this, it makes it VERY easy to do a "vintage" treatment on an image, which are usually characterized by flatter shadows and tinted highlights. For example: adjusting the amount of blue in the image will affect the brightness and contrast of that blue, and it's compliment yellow.
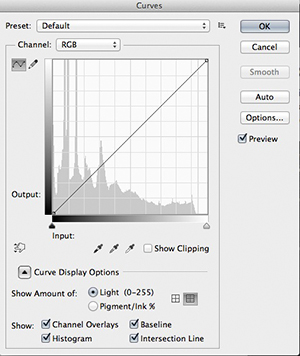
Here is one treatment in particular I wanted to share with you. It's a way to get an old school "cross-processed" look. Similar to a dialed down version of cross-processed Agfa Optima Film. By using the curves dialog in Photoshop (or any other program that utilizes a similar curve tool), we can precisely manipulate the tones throughout an image.

The basic rule of Curves is that the steeper the line, the more contrast, the flatter the line...well you get the idea.
Applying this basic rule across the separate color channels allows us to manipulate the contrast between colors and tone! This does require a little color theory but once you get the hang of it, you'll be amazed at what you can do.

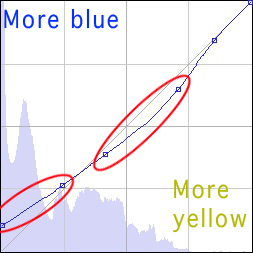
For example: Above (in the blue channel), I increased the amount of blue in the shadows (the left side of the curve) and decreased the amount of blue (added yellow) in the midtones. This flattened out the curve between the shadows and midtones and effectively lowered the contrast of the image.
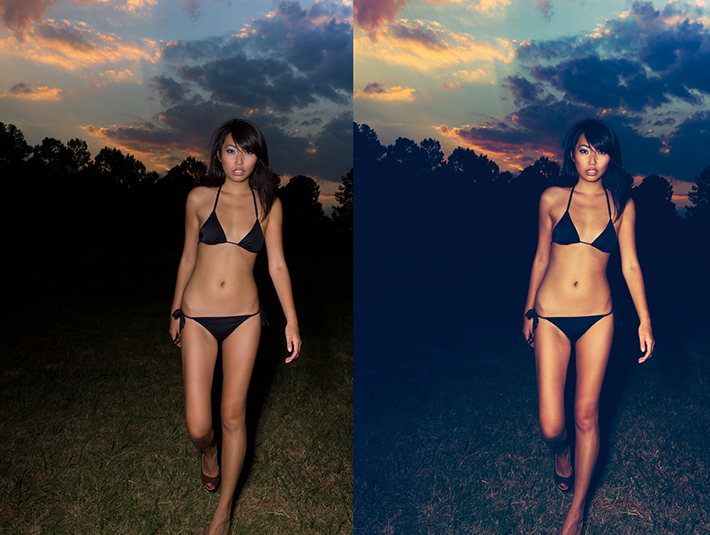
Here is an example of what you get with this color treatment.

So you can see how dramatic a change even the most subtle curve adjustments can make. Give it a try for yourself. Experiment and see what cool combinations you can come up with. The idea here is to get away from a dependency on presets, and truly understand how to manipulate your images to fit your own creative vision, not someone else's.
You can download the curve I demonstrated here and use it to your own ends; but I suggest using it as a starting point for your own awesome curve creation!
To install it:
(MAC) User>Library>Application Support>Adobe>Photoshop CS#>Presets>Curves
(Windows) Program files>adobe>adobe photoshop>presets>curves


Split toning-lookalikes is the flavour of the month since instagram hit it big it seems.
Yeah, and the worst thing is that you will spend time and energy getting that right only to have the client ask you what 'filter' you used.
Most of the time when I do split toning now, I try to keep it subtle. For one thing I like to make the deep shadows appear richer, not appear washed out.
Oh boy, i'm not even sure where to start. Automated processes in Photoshop are known as,"Actions", whereas automated processes in Lightroom are known as, "Presets". You can have brush presets, curve presets, etc but what you are describing are known as Actions.
Correct me on Photoshop history, but actions were first created in 3.0 which was... 19 years ago- and have been used since then. Photoshop wizards have ALWAYS used these in some capacity to aid in workflow.
What the author actually meant to say is how the "hottest trend nowadays" is to emulate film, not by using actions. Curves actually can't "do it all"- that's why there are other layers included such as Hue/Saturation, channel mixers, selective color, color balance, color lookups, split toning, not to mention how they all work against different blending modes.
And if you want to go exploring, go to deviantart.com and browse among the thousands of free actions that do every imaginable amount of toning- even cross processing (which is in itself an art to correctly use)
Thanks, but you missed the heart of the story, which is to inspire people to create these treatments themselves, and actually grow as an artist by learning how to create; rather than take something someone else created and use it.
You are correct at the inspiration and that was definitely not missed- but the technical aspects of the story are not correct. :/
If the intention is to create, maybe mentioning other ways to modify color such as the layer types that i listed above may help people to explore. Don't have to go into detail of what they all do but just mention them because if i were a total beginner, the article would imply to me that that curves is THE magic bullet that gives me total creativity- when in fact, there are multiple ways to get from Point A to Point B- some more advanced than others. :)
I see your point, but I wrote the article from my experience and how I do things. Which as I'm sure you know is only one of a MILLION different ways to do any task in Photoshop, including this one.
Not arguing that at all- only arguing the fact that Photoshop actions are called Actions, not presets and the current trend is not using Actions, but mimicking camera film looks with said Actions (And if you are using Lightroom, "Presets"). (Which btw, your article still incorrectly states ;)
And if the whole article is about creativity, paint a full picture by simply mention that there are other photoshop settings and layer types that can also be played with (for the purpose of being creative :)
Good lord dude. There are PRESETS in Photoshop under almost every adjustment type including curves. Go and write your own article to flex your knowledge muscle and stop ragging on someone who actually takes the time to do so. There are PRESETS in Photoshop as well as Actions as well as Addons as well as other types o PRE-DEFINED functions. It's clear what the author meant to 99.9% of the people reading this. You could have written a mind numbing article in the time it took you to embarrass yourself with your lack of not knowing that there ARE presets within Photoshop.
Well said!
The intention is well meant however ... there is a rationale behind using predefined settings and it's called : DON'T REINVENT THE WHEEL !!!
I fully concur the idea of playing around with the tools to get an idea of how they work ... however I use so many tools, devices and contraptions day after day where I have no clue how they actually work.
That said if what PS and LR presets is what I need why would I bother and waste time with fiddling around just to come across that I can't get it better than the presets.
Do many of these images look similar ? YES !! But so do most of Hollywood's 200 mio $ movies. Customers quite often expect to get a particular look because that is was they are accustomed to and familiar with.
Is it creative ? NO !!! But it certainly fits my needs and saves me a lot of time (and money). Therefore I don't condemn using presets if it's done in a professional way.
As somebody who creates (and sells) Photoshop actions, I always encourage people to not necessarily just run an action and call it a day but instead use it as a learning tool. I keep my adjustment layers un-merged, allowing users to turn layers on and off or adjust the opacity, adjust the adjustment layers themselves, rearrange the order, etc. I also label all of the individual layers to describe what they're doing, allowing users to easily turn off something that they don't think they want (such as "fade" or "contrast" or "warm tone"). You know that thing called "selective color" that we all shudder at the thought of? I didn't know until I saw a random YouTube video that a selective color adjustment layer didn't turn a photo black & white other than one color. Had I not come across that video, I never would've known how awesome selective color adjustment layers could be for toning, and I wouldn't have included them in my own actions (thus introducing that type of layer to others that didn't think twice about it). There are SO many different ways of doing things in Photoshop, and Photoshop actions with layers that remain intact can be an incredible resource for people who just don't really know where to start. Yeah, there are always going to be those people who just run a cheesy action and think it's omg so kewl, but really...are those the people who are even reading stuff here on FStoppers? Probably not.
Wait, selective color doesn't produce that cheesy effect from the 80s? I completely thought that is what it does. Huh. I am going to have to look that up now. That's what I love about PS. I have been fairly proficient for since Ps7, but I still learn new things all the time.
Hi Rich, just wanted to say thank you for this article, and for sharing a simple, powerful way to manipulate images. Please keep writing and inspiring, in spite of the less-than-positive comments that inevitably pops up on the internet.
*thumbs up*
Having used Photoshop starting with version 2.0 I agree that there are so many different ways to accomplish numerous effects. Automated actions are a good starting point, but I tend to always want to tweak beyond a script. I guess you can take a girl out of the darkroom but can't take the darkroom out of a girl. One image at a time is the way I edit... a hard habit to break.
So what I don't understand is...with the example above, did you just change the curve for the blue channel and the other channels adjusted accordingly? Or did you go into every single channel and adjusted them so the curves look like shown above? I like a bit of a haze look to my images and I just bend up the RGB curve a bit in LR4. But I love the way this looks above. The blue in the shadows. When I bend up the curve everything seems to get a bit of a green tint. Why would that be?
Thought I'd reply to both your posts :D
As for the Green cast you're getting you might be in the Green channel. That's really the only way to get a green shift when moving the curve "up" as you described.
You can go into the Red channel and push the curve down to get cyan,
But I could be wrong... Like I mentioned in the article the RGB color space has the disadvantage of each channel effecting every other channel to some degree, as well as brightness and contrast of those channels. So it could be just a side effect of an adjustment you already made.
So in the example above? Did you only make changes to the blue channel and the other channels adjusted accordingly?
Not sure why I get a green tint. I didn't make the change in the green channel but in the overall RGB channel. I just bend up the lower left curve a bit.
I made adjustments to each separate color channel, I only demonstrated the blue because it had the most dramatic effect on immage. Look at the top image of the post and you'll see the adjustments I made to the rest of the channels.
Adjusting the main curve adjusts all channels equally. If you are raising the middle of the curve up, then you are increasing the brightness of the mid tone values, which in your case MAY have more green than you notice in the original image.
I didn't raise the middle of the curve. I just bend up a straight RGB line at the very left. Pretty much like you show it for the blue channel in the red bubble on the left. I just pulled the very left point up a bit to get this haze look.
Oh ok, well still the same answer... there may have been more green than than it originally appeared to have and what you did by raising that point was to change the value of the blacks to a brighter shade, and when you do that....colors shift because you are adding in color values to that area (because Black in RGB is 0, 0, 0) so when you raised it up, what little information was already there... was probably really dark Green Channel information.
At least that's my best guess without actually seeing it in person.
I suggest you download that curve I provided, and play around with the points I created, and see how it affects your image.
I went into each color channel and made individual adjustments.
I really glossed over how to use curves, and probably assumed people had more than a basic knowledge of the dialog.
You've got to put down "anchor" points along the curve so you can manipulate certain areas (like the shadows) without the rest of the curve moving. You'll notice that not all of the points on my curves were moved off of the original starting line.
I suggest before moving any part of the curve to put down at least one anchor point at every graph intersection (squares).
Rich, thanks for taking the time, making the effort, and sharing your knowledge, much appreciated. Cheers!