What first drew me to the panoramic format was that it's the way we naturally see. Sure, you can't really compare a camera's lens to the abilities of two (or even one) human eyes. But nevertheless, we are a horizontally-oriented species -- we live, work, and see along a horizontal plane. And so, after a bit of research, I dove in to get the Fuji GX617. Why not Hasselblad's XPAN? Why not the Linhof or Horseman variants? And how on Earth do you use these things? Let's find out...
To get the decision-making portion out of the way, I'll quickly explain myself:
The Horseman and Linhof cameras are simply too expensive. I'm sure they're fantastic (and maybe worth it, if you have the money). But $500-1000 for a center filter, over $10,000 for a decent kit with a body and lens? No, thanks.
"But Hasselblad has the much more reasonable XPAN!" Yes, but bigger is better. I like to print big. And while you "can" do it with 35mm, it doesn't even compare to the large format size of the 617 panoramic image. So that's that. The XPAN is great as a panoramic Leica (I have the original and the XPAN II, though I'm likely to sell one). But it's just not the same. Besides, you can get a Fuji GX617 for just over $2000 with a lens, used on eBay (like I did). Mine has a small crack in it, but it doesn't effect any functionality.
So on to the real stuff:
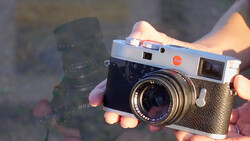
Yes, by surface area the 617 image is just about as large as the 4x5 negative. On one axis, even, it's quite a bit longer. And that means you can get a tack sharp print as long as you are tall, which is nice, needless to say. But there are some considerations when deciding to shoot with such a large camera in an irregular format. Luckily, Fuji has done everything possible to make it as easy as possible, but we'll go through some of the 'pros' and 'cons' as we get further in.
Basics:
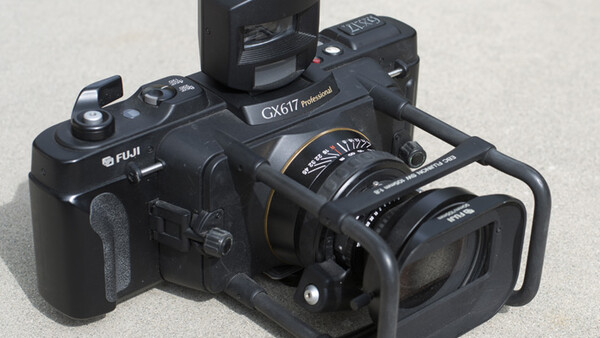
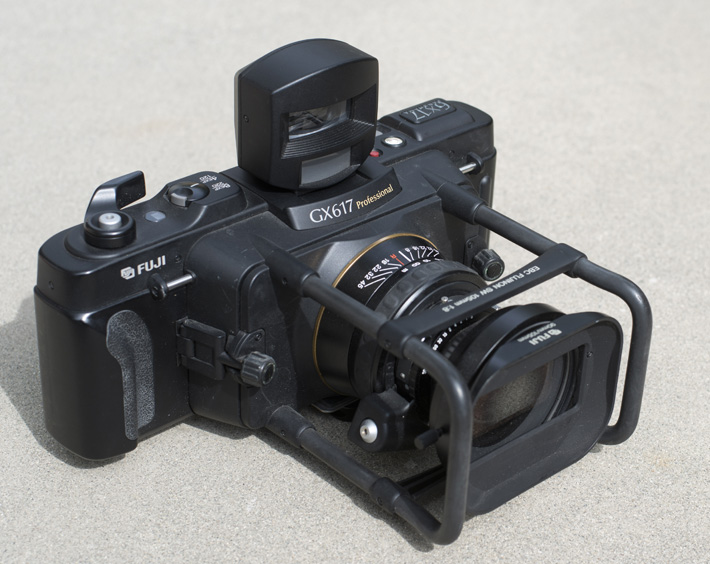
In short, here are a few features of the camera:
- 120/220 formats (for 4 or 8 photos per roll)
- 90mm, 105mm (tested here), 180mm, and 300mm lens options
- 2-stop center filters for vignette control/"evening" (make sure yours includes this...they're hard to find/expensive alone)
- Built-in bubble level (important -- you don't want any tilt with these)
- Hand-holdable (it's not easy, but it's very possible)
- Vibration-free leaf shutter in the lens (cable-release needed, needs to be cocked before every shot)
- Separate lens-specific viewfinder, non-TTL (I actually love this because I can take it off and treat it like a director's loupe to search for great shots without carrying the camera around)
Loading Film:
Loading medium format film is easy once you figure it out, but it's not as easy as 35mm film, no doubt. The nice thing is that I really find it easier to load this camera than to load my Hasselblad 6x6 cameras. The film lays flat, as for all intents and purposes, it's like any film SLR. You close the back once you have the START portion of the film lined up with the 120 or 220 line, and there you go. Click, wind film four times or so, and you're ready to shoot. Likewise, the film door (the back of the camera) stays on the camera and flips down to load it. This doesn't seem like a huge deal at first. But in reality, it saves you from having to hold or set down an entire piece of metal that you really don't want to get dirty every time you load film. Some other cameras of this size don't have this feature, so look out.

If you loaded the film (or looked at the photos), you probably realized there is no mirror or any kind of separation between the area inside the lens and where you load your film. That's because, of course, this isn't really an SLR. That mirror would be HUGE! So you do have to be careful about not getting dust anywhere, because it will get everywhere -- inside the lens, in the back of the camera where you load the film -- if you let it....
You can use 120 film for four shots per roll or 220 film for eight shots (recommended). Unfortunately, it's getting harder and harder to find the best films in 220, so I've found myself settling for 120 and getting that much better at changing the film. A simple turn of a dial and you can switch between 120 and 220 -- no complications past that.

Shooting:
For obvious reasons, this part is important -- and it's a bit odd. Like an SLR, there's a "release button" on top of the camera with a winding crank. This is NOT a shutter release button. It is a FILM release button that unlocks the film so you can wind it FOUR -- ! -- times to get to your next frame. It will automatically stop and wait until you re-release this button so you won't wind more than necessary. But that's all it does. To trigger the shutter, you need a cable release screwed into the lens as with any large-format photography (it is, after all, a large format lens).

At the widest, you get f/8, which is pushing it if you want your image to be sharp all the way through. Remember, the large format is going to decrease your depth of field dramatically. Because of this, a tripod is recommended for most shooting, especially with slower films. I want to experiment with some "street" photography with this camera, but have yet to do so. You can be sure I'll be using ISO 800 film and at least 1/320 on that shutter, just to be safe. I'll look ridiculous, but tell me that all you want when you see the images.

If you're on a tripod anyway, you may as well stop down to at least f/16. There's no reason not to. Admittedly, I haven't gone past f/11 for my current project because I'm diffraction-phobic. But I'm sure you'd be fine stopping down a bit more.
So to be clear, here's the order of shooting:
1.) Load film (start winding slightly before you close the back to make sure it catches)
2.) Wind film into position after loading (so there's a "1" in the film counter)
3.) Frame shot (remember to keep it level)
4.) Focus shot (you can't do this visually without ground glass, which I find a waste of time. Just eye-ball it or use a laser distance-meter, like I do, and guess accordingly)
5.) Set desired aperture and shutter speed on the lens (Remember, shoot +2 stops if you have the center filter in. I vary it half a stop depending on whether I'm using slide or negative film)
6.) Cock shutter
7.) Double-check framing
8.) Trigger CABLE release
9.) Trigger FILM release
10.) Wind film lever 4 times (or until it stops) and repeat steps 3-10 until film is out.
This seems like a lot to get used to, but honestly, it becomes second-nature after a while -- like driving a stick. You just get used to it. Aside from constantly having to reload the film, it's not much slower for me to shoot with this than with my Hasselbald. Of course, if the latter could magically shoot 617, that would be ideal. But let's not spend time on frivolous dreams of inevitable impossibilities.

After the shot:
I'm currently using this camera to shoot my senior show, so I've learned a bit about the costs of ownership. Needless to say, film is expensive. But if you can get over that -- no, scanning is still expensive. But if you can get over that -- no, printing is expensive. Okay, you get the idea. If you're going to go from what you see before you to a print, you're going to pay a little. But it's nothing in the end compared to buying someone else's work. And framing is somewhat more affordable than I thought it'd be.
If you don't care about having choices, for an 18"x54" print, you can get a plain black or white, metal or wood frame, with laminate or basic glass, with your image mounted edge-to-edge on semi-archival foam core or Gator board for around $140-250 from places that offer wholesale pricing (shout out to The Framing House Design in downtown LA and Curve Line Space in Glendale). I still haven't decided who to go with, but certain places have even offered me better deals based on my student status in addition to the quantity requested (32). In all, that's not bad. So don't be too overwhelmed with the options or cost.
In the end:
I love my Fuji GX617. I love the 617 format. And I love the camera itself. There's nothing quite like seeing that massive print come out of the printer. Honestly, consider asking if you can stand there while it prints at your lab. You just get this giddy feeling inside (or am I just more like a girl than I think? I mean that in the least sexist way possible, Mom. You know me.).
In any case, if you get the chance or think you might want to get into the panoramic gig, check it out. Get one on eBay. It might take some time, but if you get it used anyway, you can resell it for just about what you buy it for.
Have you guys had experiences with this or other panoramic cameras? What did you think?

Sample Image:

If you're passionate about taking your photography to the next level but aren't sure where to dive in, check out the Well-Rounded Photographer tutorial where you can learn eight different genres of photography in one place. If you purchase it now, or any of our other tutorials, you can save a 15% by using "ARTICLE" at checkout.


Join the Fstoppers community for free
-
Post comments and join in the discussions
-
Browse the site ad-free
-
Share your work and get featured in the community
-
Compete in the photo contests for fun and prizes
38 Comments
Thanks for covering a film camera. Many of us still do #BelieveInFilm and we love reading about cool film cameras.
Fantastic piece of kit! I had no idea these existed. I will be looking forward to those street shots, that's for sure. I have a Russian Horizont swing-lens panoramic camera, and it's a piece of kit all on its own. Thanks for this piece!
Would have helped had you put some sample images.
Me use internets? That's unpossible!
http://www.flickr.com/groups/364654@N25/pool/
wow, is this only in film?
Yes. RED (from the well-known RED ONE and EPIC cameras) once produced a PDF considering a 617 digital sensor that would produce something like 200+MP stills, but I had a feeling that wouldn't happen. So for now, "just" film, which I love :-)
Nope. Just pick up 4x Phase One IQ180s and duct tape them together.
Sorted.
You can easily crop from IQ180 to get the 6:17 aspect ratio with no compromise on resolution ;)
I could have used the internets for reading about the camera, I was just suggesting that photo samples would have made the review that much better.
You know, Jack, he could have just googled a review of the camera all by himself.
In fact, while we're at it, he should just google "photo news" and "Photo bts" everytime he wants to read something interesting instead of even coming to fstoppers. Genius!!!!!!!
Your wish is my command. I'm in the middle of a project at the moment, which has produced 99% of the photos I've taken with this. When that's finished, I can put more up.
Check Peter Lik's work. He was mostly using Linhof Technorama 617.
You had a great deal at 2K$, nothing under 5k$ on eBay for now...
This one is 2000 to buy now and is a bit used, but still seems perfectly fine. It even comes with the 90mm 5.6 lens, which is often more sought after because of the slightly wider angle and one-stop improvement on the aperture... I'd get this if I were still in the market for one today...
http://www.ebay.com/itm/Fuji-GX617-Panorama-Camera-/111033770326?pt=Fil…
There are some other options as well...but mostly G617's in that price range with the fixed 105mm f8.
This is a great camera, when I used to work for Lifetouch I used this camera for years for all of there Panoramic prints (senior class, all school). I was first blown away at the dof that this gave me at f/16 a whole school field and everyone was sharp.
Good article. The 617 format is getting some new love with David Guttenfelder's amazing images out of N. Korea, not only with iPhone but with an XPAN II (I know, its not the same, but... lets look past that): http://www.dailymail.co.uk/news/article-2252102/North-Korea-photographs…
Then there is the faux-617 used by Daniel Berehulak from Getty Images in India (travels the world) created by one of my new favorite apps, 645 Pro. Its kind of difficult to use compared to my previous choice of Hipstamatic, and the options aren't as wide on filtering, but its great. http://www.dailymail.co.uk/news/article-2247105/Afghanistan-Pictures-Ka…
Cool writeup about a very awesome camera. I saw one of these a while back and wondered what it'd be like to shoot w i d e and then also in portrait format, that could be really interesting.
Just as an aside, don't stress about diffraction with lf lenses, they're designed to give as little diffraction as possible. Get that baby at f45 and enjoy a really deep depth of field.
Just keep telling yourself: it's "intents and purposes", since "intensive purposes" doesn't really make sense in context.
Great article and thoughts, however!
You've never seen any intense purposes for something? Makes sense if you think about it.
I used the first version the G617 extensively in the early 90's. I had it set up mostly for hand holding but if I had the time to put it on a tripod I had a couple of little tricks in my camera bag for it.
I cut and rolled up some thin Rosco or Lee diffusion onto a 120 spool for those quick times when I needed to check composition. Just stretch it across like a roll of film and make sure its tight, then use a loupe to check the corners and edges. If I had a lot of time I used to stuff a cut piece of ground glass in the side of the camera bag. This fit perfectly against the film rails and gave me a precise and critical focus.
For portraits I would use a CU #1 or CU #2 depending on my subject distance. I also had some thin string wrapped around the "roll cage" and tied off. I could get my subject to grab the end of the string and touch it to their nose and then I knew the pre focused distance was correct. They then just drop the string without moving and there you go, perfect focus on a ridiculously close subject on 617.
I tried to never let the size or format of the camera ever impede what I wanted to do; hiking, travelling or crazy locations and subjects. If you can really keep your ear to the ground, you can find G617 for under a grand.
I once met the doctor from Hamilton who was responsible for Linhof creating the first 617. I think he still has the first two. He was doing 3 projector slide shows with Hasselblad and some tech from Linhof became interested in his project, and the rest is history, or not really.
Once last thing, don't forget these cameras have leaf shutters that sync at any speed.
I agree with Gordon. Thanks for covering a film camera. Film isn't dead. More of this sort of thing would be appreciated.........Hasselblad CW, Pentax 67, etc.
Film is just as "dead" as Vinyl, Beta, and calculators from the 60's.
Of course it's not GONE, but now it belongs to curious hobbyists and collectors, instead of industry professionals, a step away from becoming antique, the way all old things go.
Jose Villa: 'curious hobbyist' and total non 'industry professional' who somehow manages to charge $10k+ per wedding, no album. As a professional. In the industry.
Well done. I bet you like test charts and HDR.
Oh I'm sorry, I didn't mean to hurt your precious film's feelings. I actually like film mind you. Fact is you don't know anything about me, and I wonder if you're willing to put your money where your mouth is and actually place a bet on something you know nothing of..?
No?
Didn't think so.
Now, being such a wiseguy, please tell me, is Jose Villa the usual wedding photographer? If you like betting so much, I would bet you that for every Jose Villa, there are a thousand wedding photographers who use digital.
And in ten years, how many Jose Villas will there be?
Like I said, film is not gone. Some people still use it. But it's going away and you have to be an idiot to argue on that. Well, the internet...
Im with Jack... I think you are way off the mark here. I just picked up an RB67 and it is just simply lovely. Sure, i'd love a 5dmkiii... but at this point id rather have the RB. It's comparing apples and oranges. Try getting the look of film from your SLR... or as Jack said... keep shooting your HDR :P
How the hell do you know what I shoot and with what? Who says I'm not a film fan myself? I just love how people think they know everything. Some people on the internet have it all figured out. Why not use your ultimate knowledge for some good, like curing cancer or solving energy problems? Nah, probably too boring.
To the point, how much you like your camera doesn't change the fact that Kodak closed shop because the demand for film is mostly over. Keep your emotion separated from the facts, like what sells today and what 99.9% people use. That's the mainstream and it's digital. I also love tape cassettes, but they're practically useless today with flash memory and MP3 players.
As for getting the film look, if that's what you're into, there are many options beside the dark room. Unless you're a purist, which just voids the entire argument.
http://fstoppers.com/fashion-photographer-norman-jean-roy-says-digital-…
so then there is that.
Anyways, thanks for the rant. Let's recall what just took place. You: film is dead, Me: I think you are wrong You: AHHHHHHHHHHHHHHH
Your remarks alone suggest you yourself are not a fan of film. I would not deem film as dead... because i just started shooting with film. So i guess to me, no, film is not dead. Furthermore, how can it be dead when everyone is trying to emulate it?
Sure digital has taken over, but there are many people still out there shooting film who are successful journalists and fashion photographers. If your point was that digital has "replaced" film id be inclined to mostly agree... but we probably should have had that conversation circa 15 years ago.
Now lets braid each others dread locks and sing Peter Tosh together and make up.
Lol, really laughed from the "AHHHHHH" which wasn't very accurate, but essential. Anyway I think we mean the same thing with different words, so sure, making up accepted.
"Anyways, thanks for the rant. Let's recall what just took place. You:
film is dead, Me: I think you are wrong You: AHHHHHHHHHHHHHHH"
At the point where you have to rephrase what your opponent said, you've already lost.
Him: I believe film is dying, as did CD's LPs, and various other technologies before it.
You: LOLOLOL WTF NO UR NOT RITE BARBEQUE WTF LOLZ!@!!!!!
You sir, were on the debate team in high school... although i do believe you did just rephrase what both of us said. :D
I hope to. We'll get there. I have most of these anyway. Stay tuned!
i sell mine (in france) if someone is looking for this beast !
90mm and 180mm with center filter the case and other few things
like new and at a small price ;-)
How much? :-)
great.... i have to go to 3 different website to have a decent review?
It's like how that other guy on Fstoopers who complained that we weren't doing his fact checking for him!
Genius!
I think this guy above works at Fstoppers secretly.
Actually digital still cannot reproduce the smooth graduations of film, unless we are talking about a phase1. D800 can see 14 bits. Film with a good scanner can show at least 48-bits.
People say that this is nonsense you cannot see more than 16 million colours. I will say if you check high dynamic scenes pics taken with top of the range DSLR. Banding/posterization can be seen. Try that with film!
I was thinking of a crazy idea of using a 2x anamorphic adapter on 6x6 but this might come close to quenching my thirst for massive widescreen images! A bit too wide though, I draw the line for stills at 2.55:1 so its close enough to crop. The next best thing (and maybe slightly cheaper/easier to work with) would be a 6x12 format. People say I'm obsessed with wide screen (and I probably am!) but how can anyone deal with the ugly square ratio of 6x6 and 6x7!?! I couldn't care less what "traditions" dictate in terms of aspect ratios for prints, I'll fricken letterbox a 2:1 image inside of an 8x10 if the local CVS drug store won't play nice with my wide images (sarcasm, of course I would go to a specialty printer)
Two things from the article: I thought the Neutral Density filter was only one stop, not two. So, for example, I would rate ISO 160 film at 80, not 40 as the article would indicate. Second, there is a pressure plate that needs the be flipped when you switch from 120 to 220 film and back. The article doesn't mention this.