
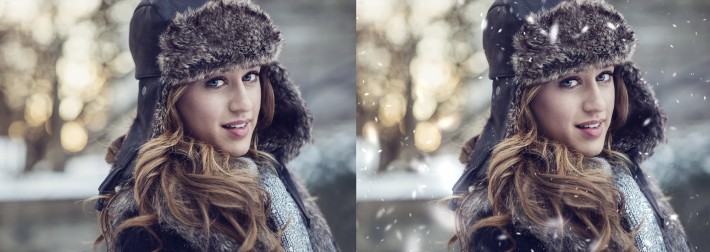
Setting aside the runny noses, forget the frozen fingers and the frostbitten toes, and the winter season can lend itself to some pretty magical photos. Personally, and I’m sure many of you will agree, it’s hard to find a willing subject and convince myself to drag my gear out when there is a blizzard. The truth is, if I could create a life-sized snow globe studio with central heating, I’d be a happy man. Well, I found an alternate solution.
I found the next best alternative to this snow globe idea: inserting snow flakes into an image in post processing. Using Photoshop, making a custom brush that will randomize snowflakes in different manners such as the shape, size, opacity, angle and placement can take a winter themed image to the next level.
In this tutorial, you will learn how to create the “snowflake brush” and how to use it. (Other photo examples on my FB Page)

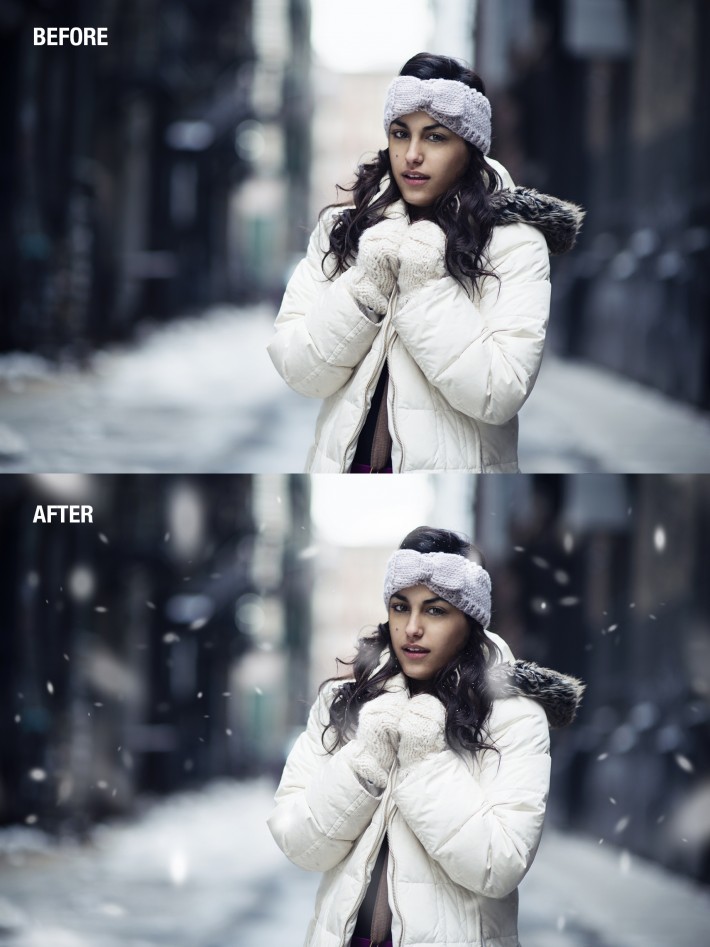
Before starting, it is extremely important to pick a photo that will seamlessly and most obviously fit with a winter wonderland theme. The photo has to match the feelings and mood that are emoted on a typical wintery, snowy day. This mood can be altered by simply adjusting different elemental factors in the photo such as curves, levels and color balance to cooler colors.
The upside of creating a custom brush is that the brush lends itself to fine-tuning according to your exact needs. Each setting will affect the brush in different ways. It is important to remember that these are suggestions and tips on how to insert the most realistic looking snowfall into your image. These “guidelines” are not set in stone and are meant to be tampered and played with. Use your own discretion. Additionally, I am using Photoshop CS6. However, this should work in most versions of Photoshop.
Here I will explain the brush panel settings in depth:
BRUSH TIP SHAPE
SIZE: This is the general actual size of the brush. Meaning, "SIZE JITTER" (under Shape Dynamics which I will mention soon) will randomize the brush size but within the general size you chose. Starting of at 100px worked for me but depending on the resolution of the image, the size of the brush will have to be adjusted. The lower the resolution, the smaller the brush and a larger brush should be used for larger images. There is no right or wrong way to go about this, use your own discretion.
ROUNDNESS: The roundness setting will affect the shape of the snowflakes. For it to look most natural, the flake should be more oval than circular. I find that setting the roundness to somewhere between 50%-70% works.
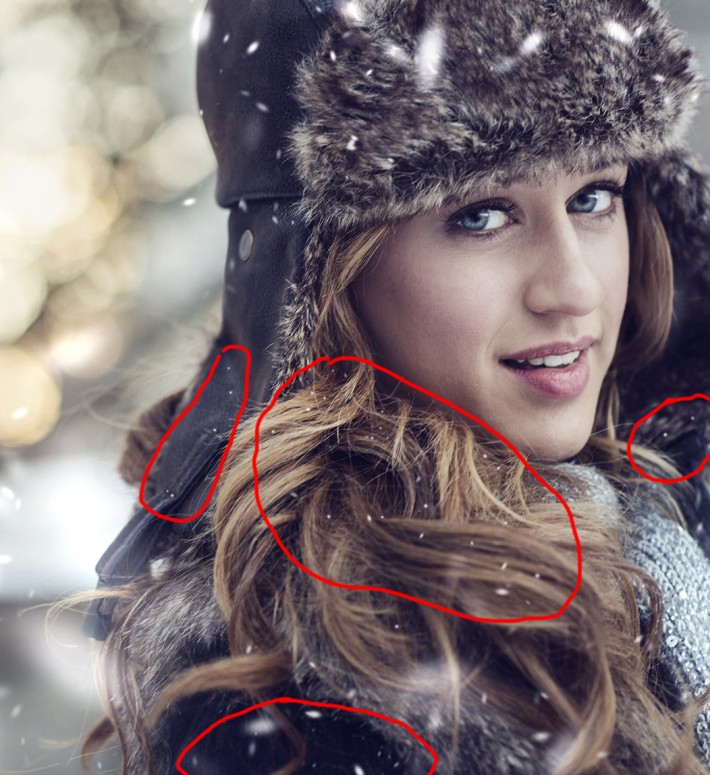
HARDNESS: Depending on the placement of the snowflakes, some will have to be harsher or fluffier than others. In general, setting the hardness to 15% when placing snow around the subject works great. However, when placing flakes on the subject, such as on the hair, the hardness should be harsher, around 75%.
SPACING: This setting will control how close and how packed the snowflakes will be in relation to each other. Spacing the flakes at 400% gives it a natural look.
SHAPE DYNAMICS
SIZE JITTER: Snowflakes in reality are unique, and an image should reflect that. This setting when set to 100% will randomize the size of the flakes.
MINIMUM DIAMETER: 25%
ANGLE JITTER: Snow doesn't fall from the sky in a straight line, each flake flutters and makes its way down taking a unique path. The angle jitter setting will randomize the angle of your brush mirroring the path snowflakes take on their way down.
SCATTERING
BOTH AXES: Make sure to check this box.
SCATTER: The scatter setting will scatter the cluster of flakes so they don’t appear to be falling in a straight line. Usually, 1000% does the job, however if you find that the clusters are too scattered bringing down this setting can prove to be helpful.
COUNT: According to the number set on this control, the amount of flakes that appear per click and drag will vary. Leaving it a lower number will give you better control of snowflake placement even though it means that you will use more brush strokes. On average, setting the count anywhere from 1-8 is great.
TRANSFER
OPACITY/FLOW JITTER: The opacity of each flake must be unique so that the image will look more realistic. These settings will randomize the opacity. Both opacity and flow jitter should be set to 100%
Make sure that all controls are set to “off.”
To save you the time, I uploaded the brush from this tutorial. CLICK HERE TO DOWNLOAD MY CUSTOM BRUSH!
Mentioned previously was the concept of harsher flakes in the subject’s hair. When approaching this method, it is important to visualize what an actual photoshoot in the snow would be like. Chances are if it were really snowing, your client would have some collection of snowflakes in his or her hair. When considering the placement of snow in a client’s hair, turn down all settings a few notches so the flakes aren't as random. The actual placement needs to be extremely controlled because the flakes must be positioned in spots where snowflakes would actually rest. It is important to look back on the image every once in a while to make sure the scenario looks natural.
Falling snow is one of the most beautiful forms of precipitation. As a child I would equate snowfall to angels having a pillow fight in the sky and snow was the feathers from the pillows exploding over earth. The white sheet that spreads over the city is resplendent and graceful. Even Disney has taken note of it and created a film entirely dedicated to snow and the cold. “Frozen” uses the imagery of snow in the most majestic way (I’ve been told to watch it countless times.)
As I write this, I’m hearing news broadcasts discussing the impending snow apocalypse that is bound to hit us here in the Northeast. I’m just happy I can put fake snow in my pictures without having to go out there to brave the cold, gusty winds.
I'd love to see what you guys will come up with feel free to tag or message me on Facebook!


Join the Fstoppers community for free
-
Post comments and join in the discussions
-
Browse the site ad-free
-
Share your work and get featured in the community
-
Compete in the photo contests for fun and prizes
20 Comments
Well explained! Thanks for the brush!
Awesome Job Dani! I can't wait to see the future articles and videos!
Here's my example of it being overdone for comic purposes haha.
even this version of it being 'over done', still looks pretty damn good!
Thanks! Yeah, the technique is great and really turns out a nice result! It's just all about doing it in different layers.
Ual Dani you are Awesome !!! Thanks
I've been looking for a different way to do this rather than just using noise, thanks!
Great as always, Dani!
If you swap the before and after, this would make a great Head and Shoulders advert.
Good job, Dani! I tried this myself for a Christmas photo last year, and while it looked good, it did look a little shopped. This is a better way for sure. Thanks man!
It's awesome that you posted this because I did some snow portraits last week and this extra effect help make my images pop just that much more! :) Thanks Dani. Here it is on my photos.
Awesome Job Jeff!
Maybe a bit more demonstrative.
https://www.youtube.com/watch?v=w8IasE9BgRg
This is mine :) Heavy snowstorm is going on here!
[img]https://dl.dropboxusercontent.com/u/1518740/A6539456.jpg[/img]
Are we still able to download the brush? I'd love to play with this in some of my images! Thanks Dani!
Hi! It seems the brush has expired. Any chance we can still get hold of it?
Thanks
Mike
Dani great job...but the link you provided to the brush has expired.
-delete-
Made this one over the weekend. Was just a snow.png that I added over as a layer and then tweaked the transparency.
I just found this amazing photoshop file that actually ANIMATES your snow as a looping .gif (very realistic), check it out - http://bit.ly/winterscene